Welcome, Guest. Please login or register.

Login with username, password and session length

 
Advanced search

1411431 Posts in 69363 Topics- by 58416 Members - Latest Member: JamesAGreen

April 20, 2024, 03:47:54 AM

Need hosting? Check out Digital Ocean
(more details in this thread)
TIGSource ForumsCommunityTownhallForum IssuesArchived subforums (read only)TutorialsAutodesk Animator (80's software)
Pages: [1]
Print
Author Topic: Autodesk Animator (80's software)  (Read 18065 times)
r.kachowski
Level 5
*****

and certainly no love below


View Profile WWW
« on: September 16, 2008, 04:01:44 AM »

Hey, I was wondering if anyone had any resources (tutorials or what) on using this software. You can download it free (abandonware) here.

I read in a magazine that Paul Robertson (of pirate baby and

) uses it a lot. Also the samples that come with the download have some wicked lawnmower man/

style 80s 3d effects.

I was hoping that one of you guys had some more information on this and could hook me up. I've been messing with it for a while but i dont have much experience with animation software (aside from flash).
Logged
moi
Level 10
*****


DILF SANTA


View Profile WWW
« Reply #1 on: September 16, 2008, 04:41:33 AM »

I don't know, I don't feel very comfortable leaving my email then downloading a cracked .exe from a russian website  Embarrassed
Logged

subsystems   subsystems   subsystems
deadeye
First Manbaby Home
Level 10
*


View Profile
« Reply #2 on: September 16, 2008, 04:59:57 AM »

No, no... is good.  You download for motherland.  Capitalism be damned.
_______/
Logged

tweet tweet @j_younger
Fifth
Level 10
*****


View Profile
« Reply #3 on: September 16, 2008, 09:26:10 AM »

Oh, my goodness, Autodesk Animator!  I love that program!  I still use it for animating from time to time...

It does a lot of things right, but its interface is very different from newer stuff, as it came before that kinda thing was more standardized (for instance, backspace is undo).

I'm afraid I don't have any tutorials or information, aside from knowing how to use it fairly well.
Logged
r.kachowski
Level 5
*****

and certainly no love below


View Profile WWW
« Reply #4 on: September 16, 2008, 10:00:59 AM »

It does a lot of things right, but its interface is very different from newer stuff, as it came before that kinda thing was more standardized (for instance, backspace is undo).

Yeah, that's what gets me. From the examples it comes with and from the sheer awesome of paul robertson's work it looks really effective. It's something I'd like to be able to use (and free is a hard price to beat Smiley. But there's stuff like buttons called "Glass" and the menu options (I heard it has it's own scripting language?) that seem kind of counter-intuitive.

I was just wanting to know if other people used this at all. Maybe I'll fire some questions at you later  Grin
Logged
Fifth
Level 10
*****


View Profile
« Reply #5 on: September 16, 2008, 12:57:48 PM »

Well, I can try and cover the basics, at least...
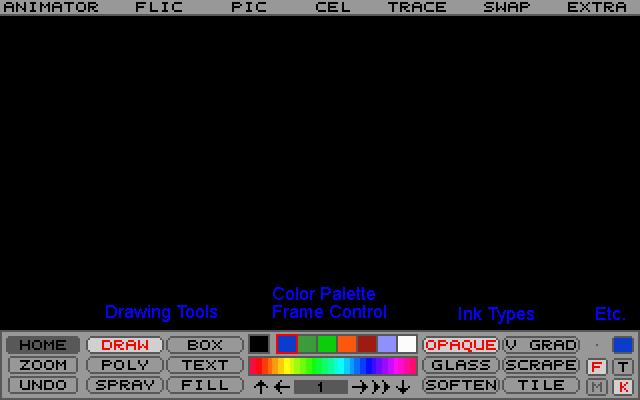


Home, sweet Home!
This is the interface you'll have for most of the time.  As a rule of thumb, left mouse button (LMB) will do standard actions, while right mouse button (RMB) will go into relevant setup/option interface of some sort.  For example, LMB on the Zoom button will let you select an area to zoom into.  RMB on the Zoom button will allow to to pick the degree of zoom.
So, if you use the LMB in the open area, you will draw with the selected tools.  RMB will hide and show the Home frame.  You can also use "Space" for this.
Oh, and if you ever get stuck in an interface bit where you want to exit, you can just RMB over the open area, or press "Space".


Now, onto the specifics!


There's three basic elements to the Home interface:  Your color palette, the drawing tools, and the ink types.


The color palette consists of the colors you have easy access to.  You can change any of these colors by right-clicking it, then selecting a replacement color.
The first color, all by itself, is your "zero clear" color - that is, transparent.  If you change this, you change the color of nothingness.  Next to that are the handy bunch of colors that you want easy access to.  Some of them have additional roles when it comes to in-betweening, but that's a matter for later.  You can see your currently selected color on the far right under the Etc. section.
Below this is a palette segment.  You're allowed a maximum of 256 colors at any one time, and you can grab a section or two of that 256 to have easy access to, like the colors above.  LMB will select a color, and RMB will open up the wondrous Palette interface, where you can access, select, and manipulate your 256-color palette (as well as the smaller palette segments and other colors) to your heart's content.  It's a very thorough part of the program, and I'll get to it later.


So, on the left you have your drawing tools.  From simple mouse-drawn lines to spline shapes and polygons to fill and separate, it determines the shapes that you draw and how.  You can have six at your immediate disposal, and you can change which ones are there (as well as the advanced options for them) by using the RMB.  There's a long list of them, and they all have descriptions.  Check 'em out, and see what kinda stuff you can find.

You may notice some recurring options among drawing tools.  Things like Closed, Fill, and Tween are shared (on or off) among the tools which use 'em.  Fill (fills the shape with a color) and Tween (used for animating between two different shapes) even have indicators on the Home frame: the F and T under the Etc. section.


Ink types, on the right side, determine how the ink affects the drawing.  Like drawing tools, you can have six available at any one time, and you cna change 'em out/adjust the options by using the RMB.  There's a great deal of variety, again, from opaque and transparent colors to softening sharpening to making pixels move or scramble to gradients of different types and directions.  Try 'em out, and see what you can find.


Equally important when it comes to animation is the frame control, sitting beneath the color palette.  You can use this to move through your frames, as well as check the animation.  Left-to-right you have First Frame (which you can use the up arrow to get to), Previous Frame (also left arrow), Current Frame, Next Frame (right arrow), Animate (you can use down arrow for this), and Last Frame.  If you click LMB or RMB on the current frame number display, you enter into the Frames interface, where you can adjust your current frame, your maximum frames (you can add or subtract or even multiply the current frames by 2, 3, or 5) and segment-based animation control.  Which is a matter for later.  But this is where you come to adjust you frame count.
You can also insert a single frame by pressing the "Insert" key from the Home frame, and delete one with the "Delete" key.


For what's left over, I'll go over the Etc. section:  On top, you have your brush size and current color.  LMB on the brush size will switch between one pixel and many pixels.  RMB will determine how many pixels "many pixels" is.  Either LBM or RMB on the current color will open up the Palette interface.

Beneath this are four boxes:  F means fill a shape, T is for shape-tweening, M refers to a color mask, and I have no idea what the K stands for.


Woof... I hope that's a little helpful to start, even though it's basic stuff.  I'll get to the more confusing bits later...
« Last Edit: April 22, 2017, 11:43:10 PM by Fifth » Logged
neon
Level 10
*****


DOHOHOHOHO


View Profile
« Reply #6 on: September 16, 2008, 03:12:45 PM »

oh my god.  this is EXACTLY what i needed.  YUS!  Kiss Kiss Kiss Kiss

time to animate without wrenching out the camera, light table, paper, pegboards, pencils, cels, blah de blah de blah
Logged

Fifth
Level 10
*****


View Profile
« Reply #7 on: September 16, 2008, 04:14:20 PM »

Awesome!
Let's see if I can't cover some of the more animation-based aspects, then...


Starting with the options in the menu bar:


ANIMATOR
Most of the stuff here can be accessed with the RMB on the home area below: palette, drawing tools, ink effects, etc.  "Browse Flics" is simply a way to look through the thumbnails of the Flic files that you've saved, "Titling" I think has to do with adding scrolling text, or something, and "Optics" involves moving, rotating and resizing a two-dimensional image in a 3D plain, which, while interesting, has limited application.


FLIC
A Flic is your current animation.  The file you're working on.  "New" will through away the frames and all, but keep your palette, your settings, and anything you have saved in other means.  "Reset" will throw everything out and revert back to the default settings.  There's also a way to change what the default is, if you feel it necessary.  You can load and save flics here, as well as do things like attach two flics to one another, overlay one on top of another, save one backwards, and some other stuff.


PIC
A single frame; you can save and load a Pic as a GIF along with its palette data.  Of the other options, "Clear" will clear the screen, "Restore" will restore it to what it looked like when you first entered that frame (using the frame controls), "Apply Ink" will apply the current ink effect to the entire frame (as though covering the whole thing with a filled rectangle), "Separate" will replace whatever color you click on with the current color and ink effect (this one's also available under the drawing tools, and I wish more programs would allow me to do this), and "View"... um, views the frame.


CEL
A Cel is the equivalent of the modern-day clipboard.  You can clip a section of the scene, move it around, stretch it, turn it, and paste it where you please.  Also, if Tween is turned on (the T in the lower-right corner*), you can make a Cel move automatically from one position to another, pasting itself automatically on each frame in between in the specified range of frames.  You can also, of course, load and save them as you desire.  They aren't saved with palette data, but they'll do their best to fit their colors using the current palette.
I'm sure there's a lot more potential to Cels than I've ever realized, particularly if one were to use 'em in a traditional sense.

*Many menu commands and other things will make use of the "Tween" option.  If you want something to apply to a single frame only, make sure the T is off.


TRACE
This menu contains most of the more traditional animation techniques, though I'm not really sure what a lot of the options here do.  But there's some good stuff here.
First of all, "Blue" refers to the first color of the easy-access color palette, which, by default, is blue.  This blue is used when you make a guideline frame, and can be erased with a single command ("Unblue Frame").  The second color, by default green, is also used as a guide.

The most useful command I know of here is "Insert Tween", which will create a new frame between the frame you're on and the next frame.  This frame will show what's drawn on both frames using the blue and green colors.  You can then draw an appropriate in-between and erase the guides using "Erase Guides".  Useful stuff.

Unfortunately, I have little to no idea what most of the other commands here do.  Sorry.


SWAP
This is used to create a little piece of space outside of your animation.  Simply choose "Clip", and the current frame will become your swap space.  You can use "Trade" to switch between the two spaces, "Paste" to overwrite your current frame with the swap space, "View" to simply see what's on the space, and "Release" to get rid of the swap space.  You can also use the "Scrape" ink effect to draw through to the swap space, if you so wish.

EXTRA
Various things are here, such as masks, grids, macros, settings, and the like.  I don't remember exactly how to set up masks and grids and such, but it shouldn't be too difficult.  Macros are fairly interesting (I was always amused that the last thing to happen in any recorded macro was the mouse going up into the menu and hitting "End Record"), but I'm not exactly sure how useful they can be.  The program does come with a macro that shows off the "Optics" options fairly well, as well as color cycling, but that's all of limited use.


...And that's the menu commands, albeit a little incomplete.
Hopefully it's still helpful.
Logged
breton
Level 0
*


View Profile
« Reply #8 on: April 04, 2009, 05:09:36 PM »


Beneath this are four boxes:  F means fill a shape, T is for shape-tweening, M refers to a color mask, and I have no idea what the K stands for.


first off, thanks for posting this tutorial, you're a jewel. It's virtually impossible to find useful information and resources about this ancient program on google. I once found a book in the library about it, but it's gone, and I've forgotten what I'd learned.
'

anyways, I figured out the K stands for "Clear Key", which means that when you're pasting a cell, the K button determines whether the background color is transparent or not. I guess in this case "background color" or "key" color is whatever is the left most color in the quick color palette.

I  still haven't totally figured out what the T button does though.
Logged
Lord Tim
Level 1
*


Overclocked to 20 MHz


View Profile
« Reply #9 on: April 13, 2009, 09:19:39 PM »

I don't know, I don't feel very comfortable leaving my email then downloading a cracked .exe from a russian website  Embarrassed

http://www.mailinator.com/index.jsp  Gentleman
Logged
breton
Level 0
*


View Profile
« Reply #10 on: February 03, 2011, 10:52:42 PM »

Hey, I was wondering if anyone had any resources (tutorials or what) on using this software. You can download it free (abandonware) here.

I read in a magazine that Paul Robertson (of pirate baby and

) uses it a lot. Also the samples that come with the download have some wicked lawnmower man/

style 80s 3d effects.

I was hoping that one of you guys had some more information on this and could hook me up. I've been messing with it for a while but i dont have much experience with animation software (aside from flash).


Hey guys, I'm just posting here to let you know that I've successfully open sourced Animator Pro, and will be continuing to work on documenting and improving this classic program.  I've set up http://animatorpro.org as the basis for these operations. Wiki will be forthcoming. And binaries as soon as I can work out how to compile the thing.
Logged
Fifth
Level 10
*****


View Profile
« Reply #11 on: February 04, 2011, 11:39:57 AM »

Ooh, awesome!

I wish you the best of luck in reviving this program!
Logged
XRA
Level 4
****

.


View Profile WWW
« Reply #12 on: February 06, 2011, 08:00:50 PM »

nice find!
anyone remember Newtek's Aura video paint program?? That is (and remains) the best drawing program I've ever used in terms of how slick and fast the drawing feels with a tablet... soo smooth. It also had 2d animation capabilties..
Logged

pelle
Level 2
**


View Profile WWW
« Reply #13 on: April 22, 2017, 02:41:32 PM »

High level thread necromancy.

I stumbled upon the open sourced Animator Pro about a week ago. I remember seeing it and trying it briefly in the early 90's (probably not a legal copy someone had, no). Instant fan now after having played with it for a few hours (thanks to Fifth above that provided some badly needed instructions to get started).

Sad how few seem to have even noticed the application was released for free, and ever fewer the source code release. No new development on GitHub for three years. I hope it picks up speed eventually.
Logged
Fifth
Level 10
*****


View Profile
« Reply #14 on: April 22, 2017, 11:42:47 PM »

Oh dang!  Didn't expect to see this thread again!

Well, glad it was of some help to you!  And  I might as well at least fix an old image in my post there that went down with geocities.
Logged
pelle
Level 2
**


View Profile WWW
« Reply #15 on: May 12, 2017, 09:08:10 AM »

This post. The documents on archive.org. That is probably where anyone interested in learning AA (AP?) should go first.

https://github.com/AnimatorPro/Animator-Pro/issues/19#issuecomment-300640055

Also I ordered Inside Animator from Amazon a few weeks ago. I have no idea if this will be useful but it is a lot of fun and the application is much better than I would have guessed. A good waste of time instead of working on anything useful at the moment if nothing else... My vague memories of the little I saw of AA back in the day was mostly of playing with a few crazy inks and the optics presets. Those are actually probably the least interesting parts. The palette tools and all the clever ways 256 colors are handled are amazing. All the fun little tricks for tweening and the blue/green frames for animations are great. Everything is so coherent and makes a lot of sense once you read up a bit on how it works. Very clever GUI that stays out of the way.

One really good thing is that on a modern computer, or even my 9 year old one, even in dosbox, it runs incredibly fast. There is usually zero time between clicking something and seeing the results. And that includes things like file operations. So you can juggle frames, cels, entire flics, etc to and from disk and use all the built-in features for combining flics without delays, like if everything is in RAM all the time (and my old computer does not even have a SSD). Just took a while to get used to the current project being a directory full of little files, rather than everything loaded in the application like it would probably be in a more modern application, but it works just as well.

Took me a while to grasp, but combining different flics is what you do instead of layers. And save/load constantly is what you do instead of multiple levels of undo, and since saving/loading requires no measurable  time or disk-space (and there is a built-in "save to next numbered file") there is no reason to not save all the time. (There is also the built-in swap buffer, the cel, and "restore frame to what it was like before you started editing it", so only having a single undo is not as disastrous as I first thought even without all the backup saves).

Of course with the source code available the shortcomings could be fixed if the right developers with enough motivation comes along. It is a great base to build on. It seems a bit non-trivial to compile at the moment.
Logged
Uhfgood
Level 1
*


225 lbs of awesome!


View Profile WWW
« Reply #16 on: May 22, 2017, 04:44:29 PM »

I actually have an original copy of AA Pro -- bought it in the early 90's.  Never really got around to using it, but it was pretty dang expensive.  Kind of neat, I've played with it a little since then.  Works ok in dosbox.
Logged

Pages: [1]
Print
Jump to:  

Theme orange-lt created by panic