Some more technical fire hosing.
Custom Lightmapping in UnityI got fed up with Unity's new lighting system and spent the last week or so writing my own custom lightmapping solution. Unity 5's Enlighten can give amazing results if you're going for a next-gen look but it's completely unsuited for what I want. And in the past 8 months of betas and release, I've never once gotten a decent lightmap of the Obra Dinn out of it.
Thankfully, Unity is a flexible engine with especially great editor integration, and rolling my own custom direct-lighting lightmapper wasn't too onerous. The basic idea is to take what the dynamic shadowcasting lights generate, pretty it up a little bit, and bake it into the lightmaps. This kind of direct-only lighting works fine for 1-bit so there's no need for bounces, emission, AO, final gather, etc. All the stuff that makes Unity 5 light baking take hours and hours, gigs of memory, and crash my computer in ways I've never seen.
Lightmap generated with custom GPU-accelerated "lightcaster"
In developing this system my two criteria were that it has to be fast and it has to look decent. "Fast" means GPU-only, which introduces some interesting constraints on the algorithms. "Decent" means soft shadowing.
The ProcessHere's the basic steps for the process that I ended up with. I call it
lightcasting to emphasize that it's direct light only.
Step 1: UV2 UnwrapUnwrap each object into the second UV channel. Unity's built-in model import unwrapping isn't bad but I found Maya's auto-UV generation a little better so that's what I'm using.
Torus and its unwrapped UV2 channel
Step 2: UV2 ScaleFor every object, determine the texel scale for its lightmap. This scale is based on the area of the triangles in the unwrapped UV2 channel, the area of the triangles in the final transformed model, and the desired texel density of the lightmap. Create a blank unlit local lightmap at the right size for each object.
[PICTURE OF MATH]
Step 3: Build UV2->Pos/Norm MapsKey step: For each object, generate a mapping that will transform UV2 coordinates to a local position and normal at that point on the model. The overall lightcasting technique is based on realtime shadowmapping, which requires the world position and normal for each point on screen to compare against the shadowmap depth. Because lightmaps are rendered into a UV2-mapped texture and not the screen, we need a way to convert those UV2 coordinates to position/normal. The UV2->position and UV2->normal maps can be rendered into a target with a simple shader.
Mappings from UV2 to local position & normal.
These are used to translate UV2 lightmap coordinates to worldspace position/normal.
Step 4: Render Light View DepthsFor each light: Build a frustum and render the depth buffer at some suitable resolution - same as realtime shadowmapping. Spot and area lights are easy but point lights require 6 frustums (to form a ~cubemap) and special handling to average all 6 results together and avoid artifacts on the edges. Also, large area lights can be broken up into multiple smaller ones to keep the depth buffer at a manageable size.
A typical spotlight depth view
Step 5: Render Light/Shadow Into Local LightmapsFor each light: For each object within the light's frustum: Use the UV2->pos/norm maps to perform standard lighting and shadowmapping into the local lightmap. Most forms of soft-shadowing are handled at this stage. Light cookies are easy to support here - something that Unity's lightmap baking has never supported for some reason.
Lighting and shadows rendered into a local lightmap
Step 6: Prune Unaffected ReceiversDetermine which objects were actually lit by something. That means checking each object's local lightmap and searching for any pixel > 0. This step is a little tricky because we want everything to run on the GPU where searching isn't efficient. The solution is to repeatedly shrink each local lightmap down into a temporary buffer. At each shrinking step, sample the nearby area to find the maximum pixel value. So the brightest pixel in a 4x4 area will become the new value in a 1/4 size reduced buffer. Do that enough times until your buffer is 1x1, then write
that value into another buffer that's collecting the results of all objects. This all happens on the GPU. Once all objects have been collected, you can copy the collection buffer to the CPU and read out the max pixel values for each object to determine which ones were hit by a light.
Reducing local lightmap to a single pixel containing the max brightness
Step 7: Atlas Local Lightmaps Into Global LightmapAtlas all the (lit) local lightmaps into multiple pages of a global lightmap. Unity has a basic built-in texture atlassing feature but if you want optimal support for multiple pages, you need to use something else. I ended up porting a
really good C++ solution to C#.
Local object lightmaps atlased into a single global lightmap
Step 8: Dilate Global LightmapDilate the lightmap to hide any seams.
Dilating the final lightmap atlas
Soft ShadowingLightcasting is based off realtime shadowmapping but offline baking lets me use some beefy soft-shadowing techniques that'd be harder to justify for realtime performance. I implemented a few different techniques, each with their own plusses and minuses.
Reference
For reference, the scene with no shadows and with Unity's dynamic realtime lighting.
Percentage Closer Filtering (PCF)
A standard technique for softening shadowmap sampling. This is basically a uniform blur on the entire shadow.
GOOD Simple, looks ok, not many artifacts
BAD Softens everything equally and doesn't simulate penumbras
Variance Shadow Maps (VSM)
Another standard technique that allows blurring the shadow map in a separate, very fast pass. If you need something simple and fast that looks good for realtime shadowing, VSM is one of the better solutions.
GOOD Simple, looks good, simulates a poor man's penumbra with perspective frustums
BAD Weak penumbras and bad artifacts in complex scenes at higher blur settings
Percentage Closer Soft Shadowing (PCSS)
An advanced technique that attempts to estimate more accurate penumbras. It's a little heavier processing-wise and the blocker estimation breaks down for complex scenes but for simple scenes it looks ok most of the time.
GOOD Decent penumbra simulation
BAD Artifacts where shadows overlap, hard penumbra edges when reducing artifacts
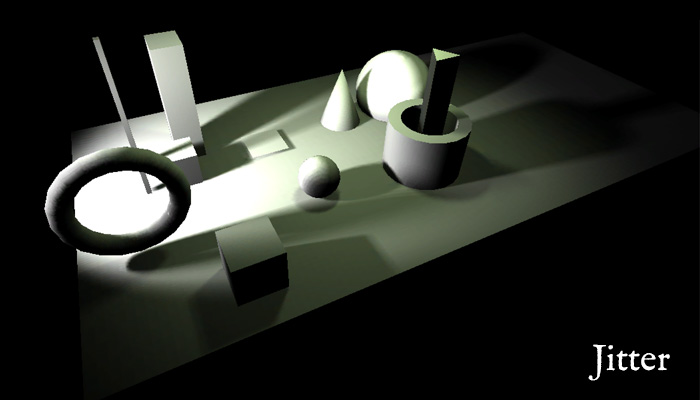
Jitter
This is by far the best-looking technique, and the closest to modeling shadow penumbras accurately. It's also pretty simple: render into the lightmap multiple times, moving/rotating the light slightly for each pass. The big downside is that it's slow. Each jitter pass is nearly equivalent to adding another light to the bake process.
GOOD Looks great and simulates penumbras accurately
BAD Can be very slow. Long shadows require many, many jitter passes to avoid banding
So, that's a lot of choices. For now I'm keeping them all as optional settings. Different techniques look best in different circumstances. With a distant sky light for example, PCF works best with its general blur and reduced artifacts.
Custom = MoreSince this is now a custom system, it's possible to go beyond simple lightmapping. The main extra features I wanted were the ability to blend between multiple lightmap snapshots for animating moving lights and to have multiple baked lightmap layers where each layer can adjust the color/intensity of its contribution at runtime.
Animated SnapshotsIf I can be happy with monochromatic lighting per lightmap (I can) then a simple form of multiple lightmap snapshots are possible by storing each frame (up to 4) in the different color channels.
Blending between snapshots baked with hard shadows
Blending between snapshots baked with soft shadows
All snapshots/channels
This works well enough with subtle movement and very soft shadows. I could also use it for coarser state changes, say to lightmap a room with the door closed and the door open and to blend between them when the door state changes. With standard global lightmapping this would give me 4 frames of animation for the entire level. For more localized animation and more frames I created a layers system.
LayersA
layer is a collection of lights and the lightmap they generate. Each layer controls parameters about format, texel density, shadowing technique, etc.
Lightcaster with multiple layers
It's possible for any object to be lit by multiple layers and thus need to perform multiple lightmap lookups during in-game rendering. Compared to actual realtime dynamic lighting though, a few extra texture lookups per object is cheap.
The main complexity from adding multiple layers is in dealing with the newly-required material variations/assets/shaders during the baking process. Critically, you want to minimize the number of materials in your scene. This is important for draw-call performance and especially Unity's built-in static batching system.
Also, now that an object may reference more than one lightmap the built-in Renderer lightmapping properties are not enough. By default Unity provides Renderer.lightmapScaleOffset to specify how to transform the local UV2 coordinates into the larger lightmap atlas. This is a great feature and lets you lightmap instances differently while sharing the same UV2 channels. Unfortunately, there's only a single lightmapScaleOffset per Renderer; if an object is lit by more than one layer you're SOL. To further complicate things, static batching
will bake lightmapScaleOffset into the UV2 channel, so that shader value becomes useless after batching. These are all esoteric details but the point is that it complicates support for multiple lightmaps per object.
During baking the steps above are performed for each layer in turn, then there are additional steps to combine them all:
Step 9: Create Receiver GroupsGroup every lit object based on which materials it currently has applied and which layers affect it. These are called
receiver groups. Generate a new material for each receiver group that combines mixing the X layer lightmaps and the old material that was applied before.
Step 10: Encode Multiple Lightmap Coordinates per ReceiverHard part: Encode the multiple lightmap coordinates for each object. This is done by building a unique uv table texture for each receiver group that encodes the lightmap scale+offset for all objects in the group. That uv table texture gets added to each receiver group material and each object's index into that table is encoded into lightmapScaleOffset in a way that it can be recovered both before and after static batching.
Fading the green pointlight layer while leaving the spotlight unaffected
Stay GlobalThe layers are useful for the "present day" part of the game where stuff actually moves. On the other hand, everything is frozen still for the flashbacks so the layers/receiver groups/animation/etc is all overkill. In those cases, the system supports collapsing all the layers to a single set of lightmaps that can be slotted into Unity's built-in lightmapping table. No additional materials or tricks are required for that to work.
The layer data is still kept around even in global mode though so one nice thing is that individual layers can be re-baked, then re-combined into the global lightmaps without having to re-bake the entire level.
SpeedExcept for jittering, all the shadowing techniques are blazingly fast when run offline. Going through all the steps can take a while though, especially with lots of lights and receivers in the scene. On my relatively fast iMac, the small test scene bakes in about 3 seconds. A huge scene like the Obra Dinn takes around 30 seconds with a single large area light.
Baking the lightmaps in the small test scene
Open SourceI'd like to eventually release this code as open source. It still needs some more production testing, and I want to figure out a license that prevents people from trying to just resell it on the asset store, but it's modular enough that someone else may get some use out of it.
 Community
