|
DDRKirby(ISQ)
|
 |
« Reply #60 on: February 09, 2023, 04:41:24 PM » |
|
Level 5-1I've completed work on level 5-1, tentatively titled "Gleaming Glassway"! This is the first level in world 5 (Crystal Caverns). I've got a =ton= to talk about for this level, but first, here's a video of a full playthrough of it: Mechanical IdentityWorld 5 is going to focus on the green "combo" enemies where you need to press attack and jump simultaneously. There are a bunch of different ways in which these can be used, such as: By themselves In the middle of an air jump pattern Combined with the beginning of a flight path (press attack + hold jump) Combined with the end of a flight path (press attack + release jump) In combination with a spike enemy Mixed in with water zones / ghost enemies  I'm hoping to introduce these slowly over the course of the world, especially the flight path-related ones since those might be tricky to get a handle on. Musical ReferencesI've been trying to mull over musical style ideas for world 5 for a while now, and only recently had much success settling on something. I don't know exactly how to describe it succinctly, but it draws a little bit on "kawaii bass" influences, featuring big synth chord stacks that are sidechained to the kick drum. World 4 was pretty "lush" and "atmospheric" in its overall sound so I wanted to contrast that a little by going for something a little more punchy and crisp. Not "dry" like the 8-bit style of world 3, but something a little more "upfront" if that makes sense. I referenced things like the vibe of the chorus in nachi - 賢者の極北 (Nhato Remix) and especially the big chords in the drops of Snail's House - Pixel Galaxy and did a during One Hour Compo. That sketch worked out really well, so I took most of the same ideas and put them into the track for level 5-1. Block ChordsThe main chorus features these characteristic chord stacks that I was mentioning earlier, along with some added arps to spice things up a bit. After freeing ourselves from the pentatonic scale limitation that I used in world 4, it's nice to go back to using 7ths and 9ths everywhere in these chords: https://rhythmquestgame.com/devlog/50-chords.mp3One interesting issue that came up with writing these sections was the rhythmic structure of the second chorus, which initially sounded like this with a "four on the floor" beat: https://rhythmquestgame.com/devlog/50-fouronthefloor.mp3It sounds okay, but in the context of the game, those first three quarter note chords (red enemies) are quite boring. In fact, the attack/jump patterns here go along with the main rhythm of the block chords, so there's really only one thing going on, which makes it very...monotonous, rhythmically. I ended up changing the drum beat around, adding another bassline layer, and ended up with this instead: https://rhythmquestgame.com/devlog/50-interestingbeat.mp3The tweak is subtle, but I think having two different rhythmic things going on at once really helps make it less boring and one-note. Musical CuesWriting Rhythm Quest music is fascinating because there are rough rules that I find and discover for myself, but they usually aren't very strict. There are common patterns that I'll use a lot -- for example, flight paths are usually represented by sustained notes -- but those aren't always true: flight paths are sometimes represented by arpeggio patterns instead. It's the same thing with these green enemies. Sometimes I represent them in the music with chords (jump + attack at the same time = 2 notes at the same time), but I've also developed 16th note rhythms that I've started to use for them instead: https://rhythmquestgame.com/devlog/50-16ths.mp3 Other Details Other DetailsI actually really love everything going on in this song, there are so many little details here and there that I want to talk about that I enjoyed putting in. One is this washed out glassy synth layer in the background that fills everything out and provides another element of rhythmic contrast. Here's what the first chorus sounds like =without= that synth: https://rhythmquestgame.com/devlog/50-withoutlayer.mp3And here's the version with it added in (listen for it!): https://rhythmquestgame.com/devlog/50-withlayer.mp3Listening to the first example you might not think that anything is "missing", but I really feel like this element helps fill in the space effectively even though it's in the background. Just one more audio snippet for you all: https://rhythmquestgame.com/devlog/50-outro.mp3You'll notice that some of the leads have different timbres here than in earlier worlds -- I'm going to be trying to use alternate waveforms for my leads in world 5 to break away from the pulse/square waves that I use all the time. Really love the high filtered noise fill that happens midway through this snippet as well, that's just a simple synthesizer using white noise that goes through a high-pass filter. Also, there's that glassy synth line in the background again! Visual IdentityWorld 4 used a lot of these translucent cloud layers (easy to draw!) to provide a lot of depth and adding additional colors to the scene without actually increasing the number of colors in my main palette (still always limited to 4 or 8 at a time!):  I knew I wanted to do something different in world 5, but I still liked the translucency effects, so I decided to take a different spin on it and instead of clouds, thought about other large transparent shapes, like bubbles and gemstones:  So here instead of having large bright cloud layers, I'm using geometric shapes (triangles, circles, diamonds) and using decorative outlines with translucent fill areas. You'll notice a lot of parallax scrolling with the light beams, which I think really makes the scene click visually. They vary in width, sorting layer, and color/intensity, so they create nice subtle visual appeal when they scroll past / through each other. Something else you'll notice is that the ground is also partially transparent here! I happened to stumble upon this idea and I think it really works for this world to set it apart from the others. It also makes it much easier to create visual interest on the bottom half of the screen since you get to see the (mirrored) bottom half of all the backdrops now. I actually ran into some issues when I first implemented this, since my level generation code previously generated overlapping ground areas in some cases. This wasn't an issue when the ground was just a single opaque color, but when it's translucent, it's a problem: 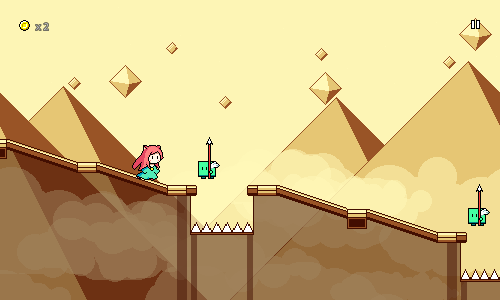 Luckily, those cases weren't too rough to track down and fix. During the chorus sections, I spawn simple diamond-shaped particles that fade in and out as they scroll by. Simple effect, but it fits the aesthetic of the level nicely and provides another element of parallax scrolling to add depth.  Menu Work Menu WorkSince this is a new world, I also needed a new menu theme for it. Here's a video of the transition between world 4 and world 5, so you can see what that sound like when you unlock world 5: Again, you can hear the use of block chords and sidechaining here, same ideas as within the level itself. I really like how different all of the menu themes are; you can actually hear my styles evolving and shifting over the course of the years as I work on the game and experiment with new sounds. That's it for now! Next up is going to be level 5-2, which is probably going to start touching on green enemies + flight paths!
|
|
|
|
|
 Logged
|
|
|
|
|
DDRKirby(ISQ)
|
|
« Reply #61 on: April 06, 2023, 02:20:37 PM » |
|
Levels 5-2, 5-3, 5-4The bad news is that it's been 2 months since my last devlog post! The good news is that I've finished 3 entire levels in that time: https://www.youtube.com/watch?v=IGpfwxg46F8Level 5-2This level introduces green enemies that are placed at the beginning of a flight path, so you need to pretty both buttons and hold down the jump button as you do:  As with level 5-1, I wanted to try using large partially-translucent shapes for the backdrop. One of my experiments while drawing level 5-1 was these large circular bubble shapes that I didn't end up using, so I used them here instead, along with an "undersea" theme.  Level 5-3 In this level we have green enemies combined with spike enemies:  We also get green enemies plus water columns:  Visually, I decided to stick to the generally "geometric" theme for backdrops (matching level 5-1 pretty closely) and just used a bunch of thick lines at 45-degree angles that form a sort of maze-line pattern. Again, there's large translucent shapes at play here.  Level 5-4 Level 5-4Level 5-4 introduces the tricky notion of placing a green enemy at the =end= of a flight path, so you need to release the jump button while pressing the attack button. This can be pretty tricky to get the hang of, so I made sure to dial the tempo back for this level to compensate.  For the visuals here I kept things pretty simple and just used translucent rectangle shapes with colored borders. It may seem like I'm being lazy here, but at least I've managed to get away from the big cloud layers that I was seemingly using in every level for worlds 2 and 4!  The patterns in world 5 actually introduce a new physical tapping motion, so I can see the potential for mixed reception of the charts and mechanics here -- something that I'll have to prove out and test in future user tests. For now, though, there's only one more level to complete in world 5, which means I'm about 80% done with all of the 30 main levels in the game! Level 5-5 won't have any new mechanics, just putting together everything on display that we've encountered so far. Unfortunately there are some extenuating circumstances going on in my life that are pulling my attention a little bit away from Rhythm Quest. This isn't anything new (I had similar "real life" stuff to deal with in January, and late last year as well), just thought I'd note it in case anyone wonders why things might feel a little more quiet around here for a bit. My current focus is still on finishing out the 30 main levels before I turn back toward polish and other game features.
|
|
|
|
|
Logged
|
|
|
|
|
DDRKirby(ISQ)
|
|
« Reply #62 on: April 18, 2023, 10:18:25 PM » |
|
Level 5-5Despite not having a lot of time/energy to throw around this month, I somehow managed to finish working on level 5-5, tentatively titled "Brilliant Boulevard": As is usual with the last level in each world, there are no new mechanics here, so it's just combining everything from the previous levels and amping up the difficulty. The tempo is significantly faster than the slower-paced level 5-4, which makes the chart a lot more dense in terms of inputs.  For visuals, I experimented somewhat aimlessly with different shapes until I settled on this sort of "spiked" design, mirroring the top and bottom so it kind of feels like stalactites and stalagmites. It's reminiscent of the design from level 5-1, just with different shapes. Again my lack of visual "complexity" is showing here with the simplistic shapes -- the visual detail really lies in the layering (translucency!) and parallax scrolling. I also experimented with having syncopated / offbeat spike enemies in the tail end of this level (so far they've only been on downbeats). Normally this is a little hard to read, but adding the green enemies actually makes it fine since it gives you a static marker to read the rhythm (even if the spike enemies were invisible you could still play this section fine):  This is one of those curious instances where adding additional obstacles (having green enemies, instead of just rolling spike enemies) actually makes the chart easier, not harder. There are many types of possible difficulty in Rhythm Quest charting ("random" notes that lack patterns would be incredibly awkward and difficult to read), but I'm following rather specific charting philosophies in order to feature difficulty in the "right" ways -- at least, for the main campaign. That wraps up the entirety of world 5, which means next up I'll have to find some sort of musical and visual identity for world 6, where I'm supposed to introduce triplet-based speed zones!
|
|
|
|
|
Logged
|
|
|
|
|
Ordnas
|
|
« Reply #63 on: April 20, 2023, 09:52:12 AM » |
|
I really love rhythm games! The parallax and color-changing background is simple but spectacular!
|
|
|
|
|
Logged
|
Games:   |
|
|
|
DDRKirby(ISQ)
|
|
« Reply #64 on: May 06, 2023, 01:55:20 AM » |
|
Level 6-1I'm continuing to just roll ahead with levels! It's funny, I feel like there was a long period of time when working on new levels and thinking about the mechanics felt intimidating, so I would just procrastinate on it and work on other miscellaneous things. But now I think it's the opposite (probably partly because all of my mechanics are known now), where I've gotten into the habit of just working on only levels. It's good though, the levels are something that need to be done 100%. Anyways, I went straight ahead and finished up the first level in world 6, level 6-1! Speed ZonesWorld 6 introduces one new mechanic, the red "speed zones" that increase scroll speed and change up the rhythmic meter into triplet patterns (quarter note triplets) temporarily:  As with some of my other mechanics, this might get mixed initial reactions from players (or at least, that's the expectation I'm setting up for myself...). For people who don't "get" triplet meter, it might seem sort of like an arbitrary changeup/speedup that's hard to react to. I experimented with having a sort of 2-beat "lead-in" to prep you for the new meter, but I was pretty unhappy with how that sounded (messy...) so I took it out. (Maybe that'll be an optional toggle someday?) For now I'm just trying to give the player some easy speed zones at first so that they can listen to and get used to the rhythm, before I throw actual quarter-note triplets at them:  You might not have noticed it until I pointed it out (now it'll stick out like a sore thumb...), but none of the speed zones have any height ramps -- they're all completely flat. I couldn't really get the "conveyor belt" graphic to look reasonably good at an angle, so I just decided to add that as a restriction (the level generator will probably be really confused if you try to add ramps in the middle of it). I'm totally ok with that though, it makes them simple to read...and I actually have the same restriction for spike enemies (they can travel across ramps, but the actual jump needs to be on flat ground), so it's not really a new thing. I guess technically I can support height changes in the form of air jump combos and flight paths, but those haven't come up yet. Visual IdentityThis one was easy since I had already been thinking for a long time to do an outer space theme for world 6 (maybe sort of a trope to have the final area be space-themed?). One of the worries here is that all of the level backdrops are just going to look similar since they'll all just be dark skies with stars, but hopefully I can make them a little bit distinct by experimenting with different foreground elements and such.  For this level I went with sort of a "spiral galaxy"-type drawing with a bright orb in the middle. In hindsight, I probably could have drawn it bigger...but I guess this way it's more of a single element rather than filling most of the screen, which works too. It looks like there's all sorts of colors in there, but it's really just the 8-color palette, but with a bunch of translucent layers. It was actually quite fun to draw, as it felt like more of a painterly (impressionistic?) approach throwing blobs and dots of colors everywhere rather than the geometric shapes from world 5. You can also see that I'm making heavy use of the spraypaint tool for the first time here, particularly in the soft "nebula"-like patterns in the background. As usual, I tried to add in some amount of variation in the color palette depending on the different sections of music. Here I switch to a completely black background color for the first "main" section of the song to up the contrast level a little bit:  I'm hopeful about this art style for world 6! Hopefully I'll be able to draw some nice backdrops by experimenting with this general direction. I was a bit worried at first since I feel like "space" art tends to not do well with such limited color palettes, but it's turning out fine with clever use of dithering-like effects and translucency. Musical IdentityUnlike with world 5, I didn't do a whole ton of musical exploration before starting off on this level...I sort of just "winged it" and went with some rough ideas, seeing what came out of them. I knew I wanted to try playing around with whole-tone scale melodies, but I was also interested in exploring more varied bass sounds (maybe even dubstep-esque), as well as featuring prominent use of arpeggios and low-pass/high-pass filter automation. Here's a snippet showcasing the "wub" bass featured in this track, as well as a triangle wave synth that plays a whole tone scale pattern. I dunno, somehow wobbly basses and triplet rhythms almost seems like a bit of a musical trope... https://rhythmquestgame.com/devlog/53-wholetoneandbass.mp3Here's another snippet, showing off some low-pass filter automation on gated chords, as well as an arpeggio that has some long reverb on it (spacey!). https://rhythmquestgame.com/devlog/53-arpfilter.mp3And here's a longer snippet of the main buildup in the song. I use a different (but still-prominent) bass here, and slowly open up the filter as it builds. As with world 5, I'm making heavy use of triangle-wave tom fills to accentuate the rhythmic changeups. https://rhythmquestgame.com/devlog/53-buildup.mp3Level SelectA new world also means a new level select theme! Here's a short video where you can hear that in action: I had a few false starts on this one before I landed on the idea, but it sounds great! I love how the major IV -> minor iv progression works here. You can hopefully hear the low-pass filter automation on the chorded synth, as well as the reverbed short arpeggio pattern -- same ideas as in the level. There's still a bunch more to explore with speed zones and how they combine with the other mechanics, which should be interesting to figure out over the course of these next 4 levels! I might have to tread a tricky balance since fast rhythms (e.g. double-hit enemies) are =really= fast in speed zones, so those will only be feasible if I take the overall tempo down a notch...
|
|
|
|
|
Logged
|
|
|
|
|
DDRKirby(ISQ)
|
|
« Reply #65 on: May 22, 2023, 07:38:32 PM » |
|
Backdrop OptimizationsSomewhat unexpectedly, I took a break from working on levels this month to focus instead of **performance and memory optimizations**. This was brought on by the fact that I made some release builds for the first time in a while and found that my iOS build crashed on startup because it was running out of memory loading the main menu! The main culprit? These huge backdrop texture atlases...(this one is 64 MB!)... 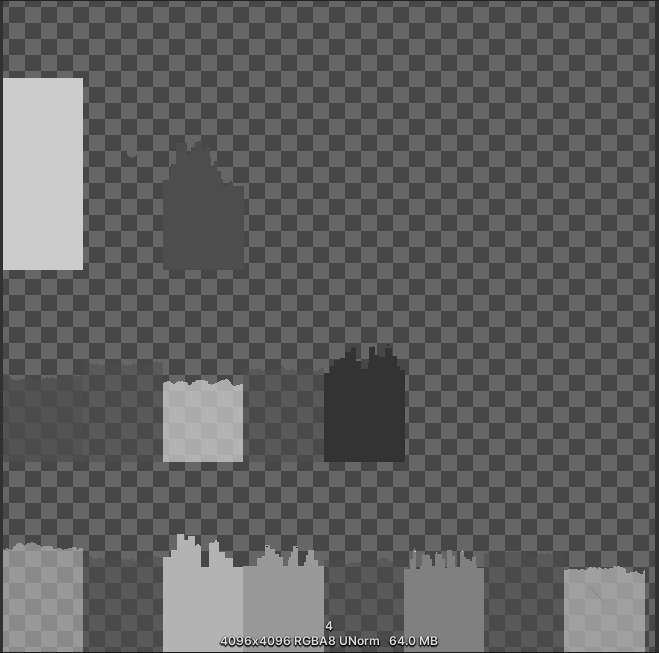 The Problem The ProblemYour first thought upon seeing these atlases is that they're really wasteful. Why is there so much empty space in the upper-right? Well, that one is because the texture atlases need to be even powers of 2 in dimensions (1024, 2046, 4096). I could, of course, have each layer be separate, without packing them into a single atlas, but then I'd lose all the performance benefits of being able to batch the draw calls for all of the background layers together. The better question is why does each backdrop layer have so much vertical padding? Well, I didn't want to make any assumptions about the player's aspect ratio, resolution, or zoom settings, so the easiest way for me to solve that was to just author all of my backdrop layers with loads of vertical leeway, so that they'll always be fully in view.  Each separate layer is exported at 500x1200 pixels (very tall!), and then tiled horizontally by the game. Some of the levels have upwards of 10 or 15 separate backdrop layers, so that's quite a lot of pixels... Texture EncodingThe first thing I wanted to do was see if I could just store the textures more efficiently without changing anything about my authoring workflow. You may have noticed that the texture atlases are all grayscale (no color). This is a change I made a long time ago, back when I decided to use a palette shader for the backdrops. Essentially, I only really need to represent indices into my color palette (currently, one of 11 colors), so during my export I just use grayscale colors that the pixel/fragment shader can read and then interpret as color 0, color 1, etc. I also sometimes have partial transparency, so the alpha value is also important. However, the textures are still encoded as 32-bit RGBA, which means 8 bits are assigned to each of the red, green, blue, and alpha channels! That's pretty wasteful, so I wanted to look into whether Unity supports other lossless texture formats (across multiple platforms). It does, in fact you can actually use the "R 8" texture format, which exclusively encodes a red channel (nothing else!), and only uses 8 bits per pixel (25% of what I was currently using!). That seemed perfect, as really all I needed was grayscale values anyways. The one problem was that I still needed to store alpha values to handle partial transparency. Could I somehow pack both the color index, and the alpha information, into 8 bits? Since I only have 11 different colors in my color index, 4 bits is enough to encode that (2^4 = 16). That would leave the other 4 bits to store alpha information, which would mean I could have 16 different possible alpha values. That's more than enough for my purposes, so I went ahead with this strategy of using 4 bits for color encoding and the other 4 bits for alpha values: 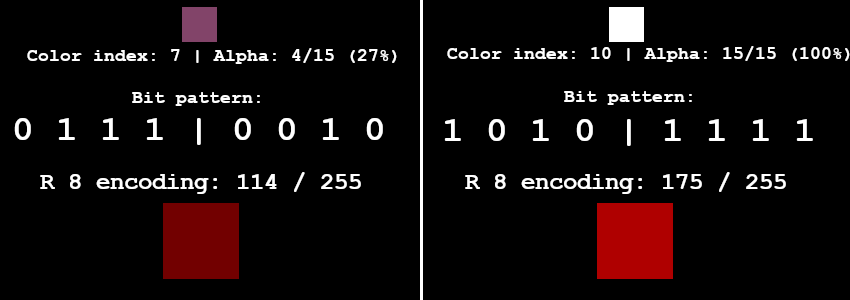 To get this all working, I needed to first write a python script to take all of my original backdrop exports and encode them into an 8-bit red channel like you see above. Then I needed to modify my palette shader to do the reverse: take the 8-bit encoding and parse it into a color index and an alpha value. After a bunch of shader math debugging and fussing around with bit arithmetic, it was all working (everything looked the same as before) and the iOS build was no longer crashing. Hooray! Texture CroppingWe can still do better, of course. The next step was to see if I could get rid of all of the extra padding on the top and bottom of many of these images. Take this cloud layer for instance: 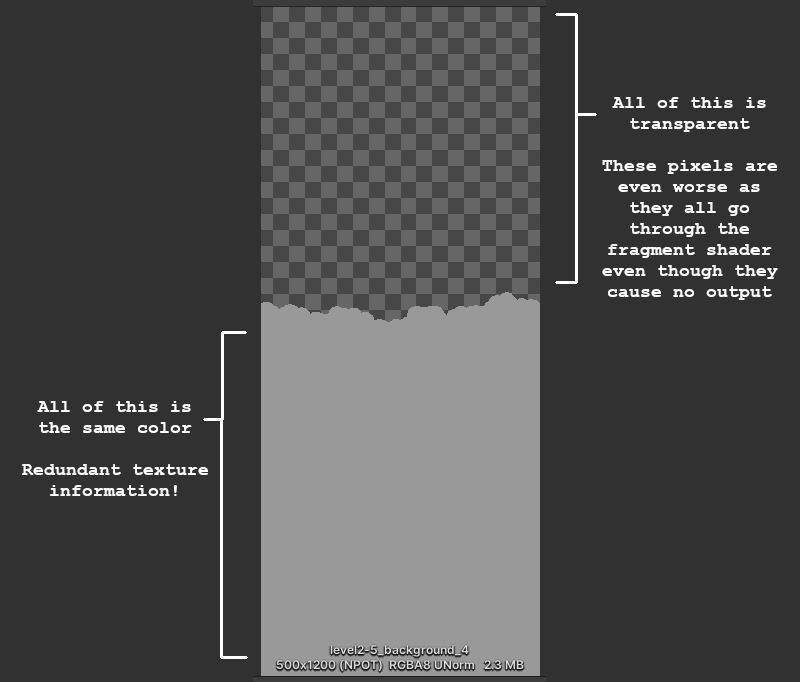 Ideally we could only store the actual texture data that really matters (the middle section). The top half is all transparent, so we can just discard that, and then for the bottom half we can just "clamp" the texture lookup so that the bottom-most opaque row is essentially repeated indefinitely. Doing the crop itself is simple enough -- I just modify my python image-processing script to analyze the rows of the image and trim it accordingly. We end up with this nice cropped version of the image:  The trickier part is that we now need to render this in the same way as the original texture. There are a couple of problems with this... First, the new origin/center point of the sprite is different than before, since we trimmed an unequal amount of rows from the top and bottom, so it's going to be offset from where it was supposed to be drawn. To fix this, I added processing to my script to keep track of how much the new cropped sprite is offset by. I also track some other important metadata, such as whether the top or bottom sections (or both) should be repeated transparency, or a repeated opaque row. Then I output that all to a C# file that I can read in: { "level2-5_background_4", new Entry {
Offset = -62.5f,
TopTransparency = true,
BottomTransparency = false,
OpaqueBelow = 1,
OpaqueAbove = 55
} },
My backdrop tiling script is responsible for taking the stored offset metadata and shifting the center position of the rendered sprite accordingly. The second issue is that while Unity supports texture coordinate clamping, there's no way to do that when the sprite in question is one of many sprites packed into a texture atlas! Unity's sprite renderer only handles tiling in a very specific way, which no longer applied to what I wanted to do, so I had to modify my fragment shader to handle the texture clamping part. In order to do this texture clamping correctly, I also needed my fragment shader to understand what UV texture coordinates it was supposed to be working with inside the texture atlas. Normally the fragment shader is completely oblivious of this -- the Sprite renderer is responsible for handing it a set of UVs to render and then the shader just does the texture lookups blindly. It also turns out that you don't actually have access to the sprite UV metadata from within your fragment shader =/. So I needed to pass those into the shader, =and= I couldn't use uniform variables since that would break batching. Luckily, Unity happens to expose a SpriteDataAccessExtensions class which allows you to write to the UV texture coordinates of the sprite mesh used by a sprite renderer internally. In addition to allowing you to modify the main UVs, it also lets you set additional texture coordinates on the mesh (TexCoord1, TexCoord2, TexCoord3, etc.). I used those to pass extra data to the vertex shader -- and then through to the fragment shader -- including the sprite UVs from the texture atlas. This took a lot more debugging to get right, but at the end of all that, it was working! Here's the new version of the texture atlas from before (in all its red-channel glory), which is 1024x1024 instead of 4096x4096, and 1 MB instead of 64 MB! 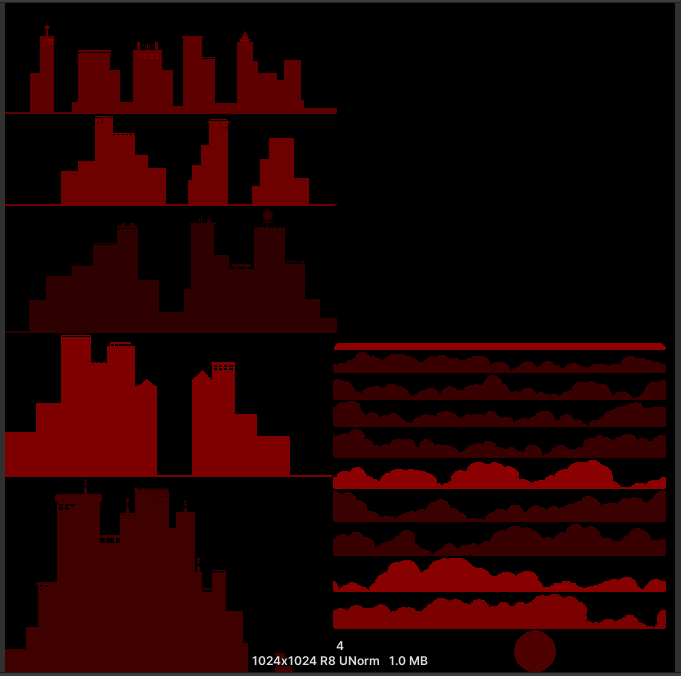 Alleviating Overdraw Alleviating OverdrawRhythm Quest isn't really a performance-intensive game, so it runs fine on most systems. That said, there are a couple of areas where it can get into performance issues on lower-end devices (surprisingly, the Nintendo Switch is the main culprit of this so far). One major performance bottleneck involves overdraw, which is a term used to describe when pixels need to be rendered multiple times -- typically an issue when there are many different transparent / not-fully-opaque objects rendered in the same scene (*cough* backdrop layers *cough*). Unlike in a generic 3d scene (where we would try to render things from front-to-back, to minimize overdraw), for our backdrop layers we need to render things from back-to-front in order to handle transparency correctly:  Unfortunately, this results parts of the screen being rendered to many times over and over again, particularly the lower areas (all of those overlapping cloud layers...). The good news is that the cropping we did above already does some work to alleviate this a bit. Before, the large transparent portions of backdrops would still need to go through texture lookups and be rendered via the fragment shader, even though they were completely transparent (i.e. didn't affect the output). But now, we've cropped those areas out of the sprite rendering entirely, so they aren't a concern. We can still do a little more optimization, though, for opaque backdrop sections! Take this layering of opaque cloud layers from level 2-5 as an example:  There's a lot of overdraw happening on the bottom sections of the screen. What if we were smart about this and kept track of which portions of the screen are being completely covered by each layer, front-to-back? That would let us render smaller screen sections for all of the back layers: 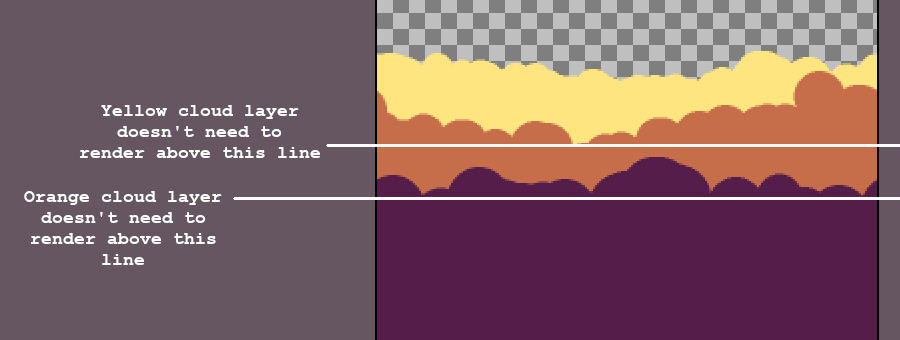 We can handle this by having our image processing script store some additional metadata (the "OpaqueBelow" and "OpaqueAbove" fields) so we know at which point a background layer obscures everything above or below it. We then need to modify the backdrop script to adjust the drawing rect and UVs accordingly (easier said than done...)... The end result of all of this is...that everything looks exactly the same as before...  But! It's significantly more efficient both in terms of memory usage and rendering time. I'll have to patch the existing demo builds with this optimization at some point, but the Switch build is already showing some improvements, which is nice. We're not completely done with performance though, as right now the rendering of the water sections are also quite inefficient! I may try to tackle that next...
|
|
|
|
|
Logged
|
|
|
|
|
DDRKirby(ISQ)
|
|
« Reply #66 on: June 25, 2023, 12:21:28 AM » |
|
Gamepad Rebinds, Odds and EndsI'm continuing my break from working on world 6 levels for now. I've sent out the current build to some internal beta testers to get some feedback on the difficulty scaling and reception to the newer mechanics, so I want to give myself a chance to let that feedback come in and stew on it for a bit before I continue on with the last 4 levels of the game. In the meantime, I've been trying to tackle some improvements and fixes that have been laying around in my backlog for a while... Gamepad RebindsThis one has been desired (and requested) a long while ago, but I kept on putting it off because I wasn't sure exactly how I wanted to handle it. I already had control rebindings working just fine for keyboard controls, which have a single key assigned to each action:  The problem with gamepad bindings is that by default the gamepad controls have many different bindings: to jump you can use the d-pad, the left analog stick, the south or east face buttons, or even the left shoulder button. I was sort of at a loss for how to deal with this, both in terms of the UI (how to show the combined default bindings?) and in terms of implementation (how to override the entire set of bindings at once?). Like many other tricky problems I've run across in Rhythm Quest, letting it sit in the back of my head for a while allowed me to come up with a different approach:  Gamepad and keyboard bindings now each have their own standalone submenu (not available on platforms where they don't apply). More importantly, there's an individual setting that toggles between a "default binds" set and a "custom binds" set. The default binding set features multiple binds, whereas the custom binding set only has two (that can be overriden by the user). This elegantly (?) solves the issue I mentioned above. This also lets me illustrate the controls in a hand-drawn diagram, something that's probably easier to parse than "Jump: DPad, Left Stick, Left Shoulder, A, B, ..." Using the same system, I'm even able to detect whether a (supported) gamepad is plugged in at all, and dynamically update the screen accordingly:  I adopted the same tech for the keyboard bindings screen as well (had a bit of fun trying to draw a keyboard layout):  You'll notice that I decided to also expand the default bindings to just encompass the entire left/right half of the main keyboard keys. Unity does a reasonably good job (?) of detecting keys based on physical location, so this should work even if you use a nonstandard key layout like I do. I'm not sure what will happen for non-ANSI physical layouts, but I'm assuming the custom binding system will suffice for any odd edge cases. For now I'm providing two custom binding slots for each action (an improvement over before where you could only use one key), in case you want to alternate keys for faster sections. As usual, there's a ton of silly little details that need to be handled with input rebindings, and as usual, Unity provides just enough functionality to be helpful, but also forces you to work with a ton of abstractions like "InputControlPaths", "InputActions", and "ControlSchemes" that end up making your head spin when you think about them too much. You need to, for example, make sure that a rebinding can be cancelled via either Gamepad OR Keyboard input (the input system by default only allows you to define a single cancellation binding...)... Rendering ArtifactsThis is a really silly one, the kind of thing that you'd never imagine would be an issue, but somehow it is. Rendering the game to a width or height that's an odd number (e.g. 1013x533) causes weird visual artifacts:  This is caused by camera scaling and such -- here, the resolution is 501x301 and the game has decided to render the pixels at 2x, which means the base resolution is 250.50x150.50, which doesn't work out too nicely. I tried to address this before by automatically resizing the game window and forcing it to be a multiple of two, but that didn't work too well. My new solution is to handle the rendering properly by shifting the camera by a similar fractional amount, so here we simply shift the camera over by a half pixel and fortunately that works to fix things. Released Early/LateSuggested by one of my playtesters -- the "Too Early / Too Late" text for holds is now more specific in calling out "Released Early / Released Late". A super easy fix that hopefully helps clarity a tiny bit:  I'm glad I got around to some of these improvements and fixes (which should be coming to the demo soon), but I feel like I've only just scratched the surface of the work that needs to be done. Even for the gamepad rebinding system, I still need to test how it works on Switch / for other types of gamepads, and could even stand to draw different graphics (especially for the Switch joycons). There's also some tweaks that I'm going to be trying to look at after seeing how playtesters fared with the current build... The year is about halfway over and unfortunately my progress hasn't been super great -- I've only managed to finish off 6 levels in that time, plus some optimization work/etc. Of course, I had some real life stuff happen that drew my attention away, but that's also sort of true in the upcoming months as I help mentor for a video game tournament. That "end of 2023" date is starting to feel really scary when I think about it...
|
|
|
|
|
Logged
|
|
|
|
|
DDRKirby(ISQ)
|
|
« Reply #67 on: July 15, 2023, 02:24:22 PM » |
|
Gameplay Modifiers and MoreDespite what it might seem like, I've actually been working on quite a lot of different things for Rhythm Quest recently! Let's get right into it... Game/Music Speed ModYou can now change the speed of the music to make the game more or less difficult: Some of you might be wondering why this took so long to come to the game, considering how this has actually been a debug-only feature for a while. Changing the speed/pitch of the music isn't actually very hard, the problem is getting all of the music synchronization (and respawn, and pause) logic to work properly in tandem with it. I'm happy to report that this has been implemented properly now! It's definitely not as simple as it might seem...every time you change the setting in the pause menu, what I'd =like= to do is to immediately increase the speed of the currently-playing pause music loop, then adjust the audio timing variables accordingly. But there's no way to do that in a way that respect the audio synchronization perfectly, since the audio timings are all running separately. Instead I have another copy of the pause music which is set to play at the new pitch/speed. Instead of trying to play that one immediately, I schedule it to start playing 0.2 seconds from now (scheduling sounds in advance is the only way to ensure that they trigger at a precise time on the audio timeline). Unfortunately, I can't schedule a "stop" command in the same way for the first version, so instead I simply wait for roughly 0.2 seconds and then do a flip where I set the volume of the first loop to 0 and the second one to 1 at the same time. Doing all of this lets me keep the beat synchronized with all of my timers correctly. Of course, since the whole process does take a little bit of time (0.2 seconds), I also needed to implement a simple wait, in case you trigger the button twice in quick succession -- the second music speed change doesn't occur until the first one is finished. Anyways, this will be available in the upcoming 0.28.0 patch, so players can either use lower speeds to practice / get through difficult sections of the game, OR use higher speeds to give themselves an extra challenge. Timing WindowsI also have a brand new setting for modifying the lenience of the timing windows for obstacles: 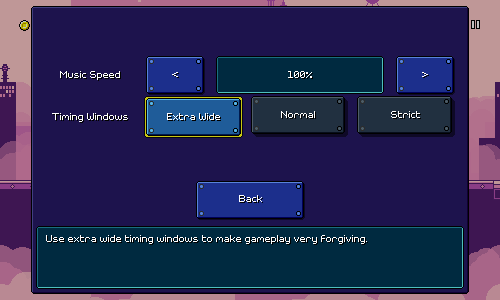 This affects the collider sizes of the various obstacles in the game. Here's how that looks for a basic flying enemy:  Originally I had a crazy half-baked idea in my head that to implement "extra leniency" I would actually buffer inputs for you and delay them automatically to "auto-correct" your early inputs...and for late inputs, I would just "freeze" the character in place for a split second to give you extra time to hit the correct button. I realized, though, that this would make empty jumps and attacks (the ones you do for no reason) feel really sluggish and awkward. I could try and do some tricks to correct for it, but in the end I figured that modifying the sizing of the colliders was simpler and just as effective, while maintaining the tie between your input and the game reacting immediately. One cool thing is that the setting works for jumps too, even though you wouldn't think they have a "collider" to modify. This is because every jump (even if it's just a normal one over a pit of spikes) has an invisible trigger object (this is what spawns the blue "spinning square" visual effect). As long as you jump while you're inside of that trigger zone, my jump logic will autocorrect the length of your jump to make you land in the appropriate spot. I also already implemented "coyote time" jumps that will allow you to jump even after running off a cliff (as long as you're still within the correct trigger area), so it all just works. Here's that in action with the extra wide timing windows:  Ghost Helpers Ghost HelpersI got to see and/or hear about a variety of play experiences when I did my last internal playtest. I won't lie: the design of Rhythm Quest is almost entirely driven by my own sensibilities, but it's still useful to see other perspectives so I can make small course-corrections and admissions when I feel necessary. Interestingly (or maybe this shouldn't really be surprising), different people seemed to struggle more or less with different aspects of the game -- for some, the water zones really threw off their ability to read the charts, while other people mentioned the ghost enemies being difficult to read since they felt like they needed to react to each of the new positions. For people who struggle with the ghost enemies, I've added a new helper option that will display guidelines for the second and third positions of the ghosts:  This does, of course, take away from the entire conceit of the ghost enemies to begin with (with the helpers, it's no different than three red enemies), but I really don't mind adding these sorts of modifiers when the implementation is so simple (and I'm not busy working on other things). You can play Rhythm Quest however you want! Performance SettingsI already did a bunch of work on performance optimizations in a previous stint of work, but I'm happy to report that I've also made the rendering of the water sections more performant: previously, the render textures used to implement the "wavy" water shader were way bigger than they needed to be...now they don't extend past the height of the screen, and dynamically shift based on the camera to be more efficient. However, I also wanted to give a nod to some lower-end devices, and ended up adding a graphics quality toggle that will disable the fancy water shader entirely, as well as cut out some of the translucent backdrop layers (that I pick by hand) in an attempt to make rendering more performant. I also added another engine-level setting for controlling frame queueing. Those all live on a new sub-settings page that comes complete with a quick-and-dirty FPS counter and some water zones in the background so you can see the effects of the settings live:  Other Stuff Other StuffSome miscellaneous other stuff was added too, like a "screenreader" command-line flag that will force the game to start in screenreader mode even if it doesn't auto-detect that one is enabled. In an attempt to add a little more discoverability to the shop menu, I also made that accessible from the "Extras" menu in addition to the normal place in the level select screen. I also renamed "Cheats" as "Game Mods" since I'm throwing in all of the timing and visual modifications that I've added there. Most of those are also accessible via the in-game menu, which can be helpful if you need a temporary assist for a tough checkpoint that you're struggling on.  I think that about covers it for what I've been working on lately!
|
|
|
|
|
Logged
|
|
|
|
|
DDRKirby(ISQ)
|
|
« Reply #68 on: August 28, 2023, 01:02:32 PM » |
|
Level Editor, Scoring ReworkI've been kinda radio-silent over the past month. The first part of that was due to simply not getting that much done, but in the latter half of the month I had a better (and more exciting) reason for foregoing updates: I've been hard at work building out the initial skeleton of the Rhythm Quest Level Editor! Changing My Mind on the Level EditorThose of you who have been following along for a while will probably know that I've always had plans to build out a Level Editor for Rhythm Quest, but that I had initially pegged it as a post-release feature -- something that I'd build after the release of the initial game. I wanted to make sure that I focused my efforts on bringing the main game to a finished state, even if it meant sacrificing some extra features that couldn't make the cut. Building a level editor is no small task and I wasn't even sure exactly how I would be able to do it. Would it be an entirely separate application? What would the interface look like? Would I have to refactor the entire level generation process again? What formats would levels be saved in? How would I load in external music files? How should I handle copyright disclaimers? Despite my strong belief that Rhythm Quest levels work best when you have someone (like me) carefully crafting both music and charting together, and ensuring that the levels follow canonical Rhythm Quest charting conventions, I understand that the level editor is a popularly-request feature and could really help to bring excitement to the game in a multitude of ways. But the reason that I decided to change my mind and start working on the level editor now (instead of post-release) is much simpler: I simply got interested in building it.  On-Demand Level Generation Like so many other challenges that I've come across in working on Rhythm Quest (like the new coin/medal rework, which I'll talk about later), the level editor conundrum was one of those things that sort of just sat in the back of my mind for a long time until I had finally devoted enough spare idle cycles to it and was beginning to have some ideas of how to actually get started working on it. There is of course something to be said for keeping feature creep down, but I've learned that "working on whatever I'm excited about" is usually a good approach for keeping me going. Rhythm Quest levels are authored as strings of events. Here's how the charting for level 1-3 is written out, for example: "Obstacles": [
"#... .... *... *... *... *...",
"#^.^ .-11 .^.^ .+11",
"#+.- .*.* .+.- .*.*",
"#.11 ..^1 ..^^ 1111",
"#*.* .*.* .111 1.11",
"#.^^ ..** ..^^ ..**",
"#.^^ ..** ..^^ ..**",
"#1.+ .1.^ .1.- .11*",
"#1.+ .1.^ .1.- .1**"
],
The different symbols here are a representation of different types of events. '#' represents a checkpoint, for example, while '1' is a basic enemy, and '^' is a normal jump. ('*' is shorthand for a jump followed by a flying enemy.) When the engine parses this string, it converts it into its respective sequence of timed events, so something like: _events = {
new EventData(0.0f, EventType.Checkpoint),
new EventData(8.0f, EventType.NormalJump),
new EventData(8.5f, EventType.SingleEnemy),
new EventData(12.0f, EventType.NormalJump),
new EventData(12.5f, EventType.SingleEnemy),
...
};
This (along with other metadata about the level) then gets passed off to the level generation procedure, which is responsible for processing all of the events in order and building the actual level out of them. Normally this is all done ahead-of-time when I author the levels (in a process I call "baking" the levels), so the end level objects are saved into the scenes directly to optimize load time. Now, the way that the (work in progress) level editor works is simply by maintaining a similar list of events that compose the level being edited, and re-generating the level again every time there's any change. It might seem terribly inefficient to keep rebuilding the level compared to just editing the resulting level objects directly, but there's a lot of reasons why it makes sense to do things this way. For example, changing a list of events is simply more efficient than having to worry about editing the actual level objects (moving floors around, etc). and I already have the code to do all of this, so I just have to worry about providing an interface to visualize these changes well. Testing the PrototypePart of the reason I wanted to dive into working on the level editor right away was simply because I was curious whether this approach would even be feasible at all. I was worried that re-generating the level at each change might be too slow, for example. So I created a quick editor scene and made a script to hold a list of events, populated with some test data. I could then invoke the level generation process at runtime from there... ...and have everything be totally broken. All of the objects in the game are all built assuming that if the game is running, the level is supposed to be playing. They also assume that a song is playing, that they can query for the current music time, that a player instance exists, etc. So I had to do a bunch of refactoring to handle this unplanned-for case where we have all of these level objects, but they're not actively updating because we're in the level editor. One thing I wanted to shoot for was to be able to instantly jump from the level editor into playing the level, without having to go through any sort of scene transition or anything like that. So I needed to make sure the level editing scene also contained everything needed for the base game, including the player instance, the music controller, etc. I also wanted to see if I could successfully load in audio files specified by the user. Here's what all of that looks like in action:  After doing all of these refactors, I had a simple prototype and I could add in basic enemies or ground ramps by pressing a key on the keyboard. One of the first things I did after that was to see what the performance was like when I triggered level generation, especially after I added a ton of events and made the level longer. To my delight and surprise (especially because the full level baking process normally takes a bit), the performance was actually pretty acceptable! I was initially expecting to see like 1-2 second pauses once the level got longer, but it seemed like it was only a minor hiccup most of the time. This is also without any sort of optimization -- of which there could be many. Besides just raw "cache things, do work ahead of time, make the code faster", there's also the fact that most events shouldn't require the =entire= level to be rebuilt. Yes, a change in the ground ramp early on does mean that the height of the rest of the level will change, but at least you can skip re-generating everything that came before that. And adding or removing enemies shouldn't require the entire rest of the level to change. If it came down to it, I could force you to work on only one checkpoint section at a time. But it looks like I don't have to worry about any of those optimizations (yet). Input TimelineThere's going to be a lot of work for me to do in the upcoming weeks for implementing various tools so that the editor can actually provide enough functionality to create a full level -- both in terms of all of the actual level obstacles (water zones, flight paths, etc.), as well as the level metadata (music BPM, scroll speed, background palettes). One thing I did in the meantime was to implement what I'm calling an "input timeline" feature, where the expected inputs are displayed as colored diamonds in a separate track below the level. I added this mostly for use in the level editor, but I also made it function in-game in case you want to use it there:  The exact look of this will probably need to be adjusted (not very colorblind-friendly right now either), but this is a really useful view for the editor already, and will probably become even more important once I look into more advanced editing features (editing via keyboard or even a "record" style live play). One thing about this input timeline is that you can see just how boring of a game Rhythm Quest is in terms of the raw inputs. A big part of the appeal of the game (to me, at least) is parsing the platformer-like obstacles into rhythmic elements; if the chart is just laid out in front of you like this it's really not too interesting. Scoring ReworkI did this a while ago but never wrote about it. Despite the fact that I've already tweaked the coin / respawn / medal scoring system a few times (at various points in time it's alternatively been based on respawns and coins), I've iterated on the system once again. I was never happy with how the medal thresholds felt both arbitrary and also not very visible, so I worked out a "progress bar"-style animation in the level end screen to show that off visually: The thresholds are now straightforward and easy to remember based on the visual (25% = bronze, 50% = silver, 75% = gold, 100% = perfect). Previously you were awarded a bronze medal simply for completing a level, but I've changed that, so you'll just have no medal if you finished with less than 25% coins. Along with this, I'm trying out a new system for coin loss amounts. Previously you always lost a fixed amount (5 coins) on every respawn, but this usually led to people either getting very close to perfect, or losing almost all of their coins on a particular section or two that they had trouble on, even if they performed very well through the rest of the song. I've always wanted something that scales more cleanly, like for example every time you respawn you lose 50% of your coins, but that by itself doesn't work well because it's extremely punishing for single mistakes that are made late in a level. The way it works now is more complicated, but should hopefully be more "balanced" in terms of coin losses. The new system internally maintains two different coin numbers -- the coins that you have recently collected, and the coins that you have "banked". At every checkpoint, half of the coins you have on hand are put into the "bank" and can never be lost from then on. And at every respawn, half of your non-banked coins are lost. The idea is that this system rewards you for performing well, and can't fully "take away" that reward even if you mess up a lot afterwards. It's a bit obtuse in that it's a pretty hidden mechanic, but I like the simplicity of implementation and the fact that I'm not using some really random number like 5. We'll have to see how it works in practice, though! That's going to do it for now. I'm trying my best to get the level editor off the ground...it's a lot of work, but also interesting and exciting since there's so many little systems that need to be written, for the first time! There's unfortunately a good chance that this will end up pushing back my launch date to 2024, but...I'm hoping you'll all agree that the custom levels that will come out of this will be worth the wait.
|
|
|
|
|
Logged
|
|
|
|
|
DDRKirby(ISQ)
|
|
« Reply #69 on: September 24, 2023, 03:53:37 PM » |
|
Level Editor ProgressI've been continuing to try my best to clock in some hours toward fleshing out the Rhythm Quest level editor! Here's some quick demos of what is now possible in the editor:   More Tools More ToolsThe level editor has a LOT of functionality that needs to be built out, so a lot of the time was spent just toward implementing additional tools, which you can see in the demos above. A no-so-short list of what I ended up implementing tool-wise: - "Insert Floor" tool to insert blank sections of track
- "Delete Floor" tool to delete sections of track + included obstacles
- Undo/Redo, (with Ctrl+Z / Ctrl+Shift+Z/Ctrl+Y keyboard shortcuts)
- "Jump" tool which inserts either ground jumps or air jumps
- When inserting or deleting jumps, the other obstacles adjust (e.g. ground jump becomes air jump)
- Visualization for jump arcs (also provides something to click to delete jumps)
- "Flight Path" tool lets you click and drag to insert flight paths
- "Ghost Enemy" tool for purple multi-hit enemies
- "Edit Ramp" tool for adjusting the slope of ground / flight paths
- "Checkpoint" tool for adding checkpoints
- "Spike Enemy" tool for adding spike enemies
- "Scroll Speed" tool for adjusting the relative scroll speed of each section
- "Water/Speed Zone" tools let you click and drag to insert those zones
Character PreviewSomething cool you'll notice in the gifs is an animated character preview that goes through the level. It's not too fancy, as it doesn't actually interact with any of the obstacles, but it's a fun little visual preview that didn't require a ton of effort to make happen. During level generation I actually already calculate the entire player path through the level -- this is needed to understand where to place obstacles such as coins, flying enemies, and the like. (This is actually just one of several such calculated paths; there's another one for the camera, for instance) You can see that in this debug view in red here: 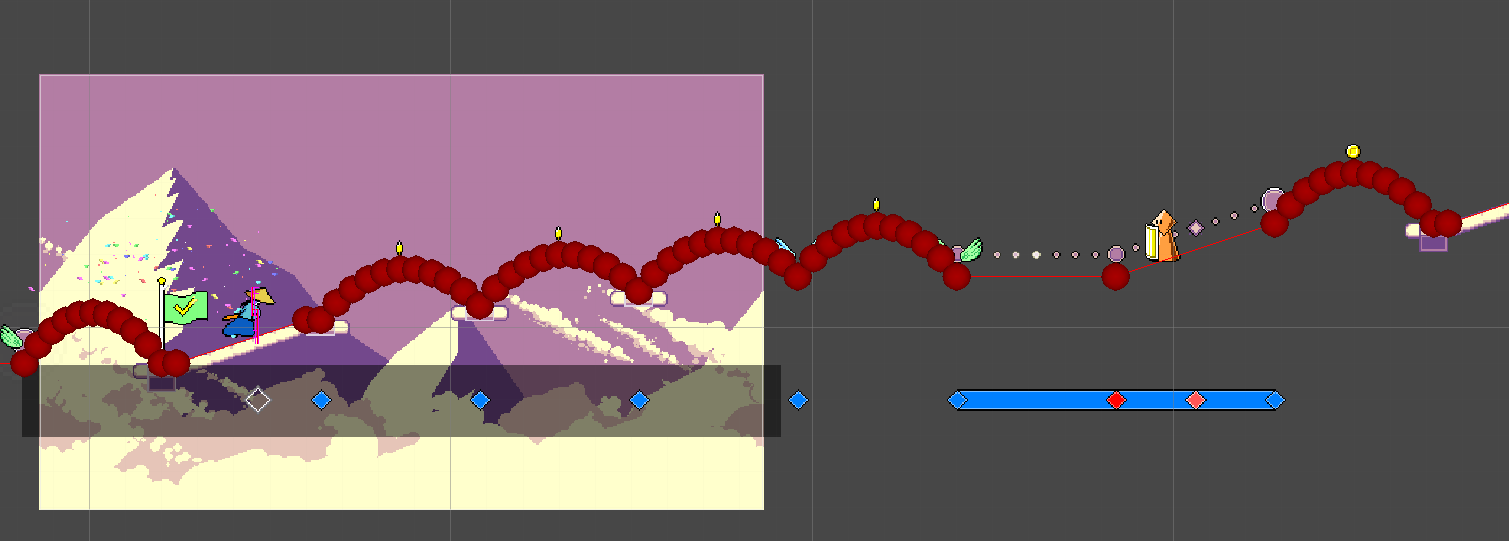 Since I already have this path on hand, it was simple to just create a preview sprite that traced along the same path at the correct speed. The only other work I needed to do was to trigger the appropriate animations based on the obstacle timings. There's no collision detection or anything like that, so it's very simple!  Tooltips and Notifications Tooltips and NotificationsAnother thing you may have noticed is that I've added tooltips for the different buttons in the editor! Right now most of them are on a big palette on the left (with some additional ones on the bottom-right), and they're just icons, so I thought it would be nice to show a little tooltip when you over over each button:  Along with that, I also implemented a notification system at the top of the screen! This not only gives you a little more context for how to use each tool (some of them involve dragging, others just require clicking), but also displays information on actions such as undo / redo history:  I wanted this to look nice, so it supports the ability to either show multiple notifications at once (automatically scrolling them as they fade out), or replace an existing notification. The way this works is that there are different "slots" for notifications, so for example if there's already a tool selection notification showing, it'll just replace that existing one instead of showing a brand new one. Menu HookupI also took a second to make the level editor accessible from the main menu:  Right now the "Custom Levels" menu is empty otherwise, but eventually there will need to be some way to import / browse existing levels (more work for later...). As a side note, the buttons in the main menu now adjust their height dynamically instead of always being the same. This is because the main menu actually has more or less buttons depending on a whole slew of factors: - The "Quit" button isn't shown on web or mobile builds
- The "Wishlist" button is only shown on demo builds
- The new "Custom Levels" button may also have some restrictions (?) (TBD)
I don't know why I didn't do this earlier, but it was simple enough to set up with Unity's layout groups. I still wanted the "Start Game" button to be a little larger than the others, but I was able to set that up using custom LayoutElement components, so now that one is 125% the size of all the others, and it all happens automatically. Yay! Waveform RenderingI also ended up taking a little detour figuring out how to take a music file and calculate + render a waveform into a texture to display on the screen: 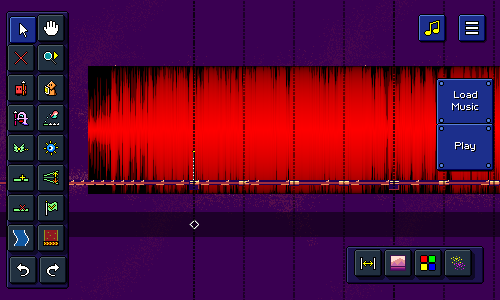 This task involves a surprising amount of technical finesse! A 1.5-minute song has some 4 million stereo audio samples, so obviously trying to plot and process all of that data is a little tricky to do in a performant and sensible way. Trying to draw a line between each of the 4 million points is pretty futile, so I didn't even bother doing that. Instead, a common approach is to separate the audio samples into chunks -- in this case, one chunk for each column of the final output texture. Then for each audio chunk we can simply take the min and max signal amplitude for all of those samples and draw a line representing the magnitude of that. (you could also use other metrics, such as the average signal magnitude) Because you're processing 4 million samples, this works OK, but is still a little slow. The other problem is how to actually draw all of the lines / pixels into the resulting texture in a way that's more efficient than simply calling Texture2D.SetPixel(...) thousands of thousands of times. This is a rare case where I actually dug into the technical details of how to optimize the performance here -- luckily, there's a Unity blog post from earlier this year that describes some details of how to write to textures efficiently, and there's a link provided to some sample code that leverages the parallel job system and burst compiler to speed that up. It seems a little bit black-magicky, but it did the trick and I'm able to generate that texture on the fly without a noticeable hitch in framerate (woohoo!). Right now since I'm just testing, the waveform appears as an ominous black-and-red texture behind the stage (haha), but eventually I hope to integrate this display into some sort of UI (?) that will help you tune the BPM and beat offset of the audio that you load into the editor. In case you're wondering, the texture is red-and-black because I'm using the lightweight one-byte-per-pixel R8 texture format (the same one I talked about in my backdrop optimizations post). Next StepsDespite all of the good work that I've been able to accomplish, there's still no shortage of work needed in order to bring the level editor into a fully-functioning state (not to mention a slew of extra quality-of-life features that I've thought of already). Chief among those is the menu interface for adjusting song timing properties (BPM/beat offset), which is why I started looking into the waveform rendering tech...but, there's also things like export/import functionality, backdrops, color palettes, particle effects, (the list goes on...). Hopefully I'll have even more to show off the next time I write an update!
|
|
|
|
|
Logged
|
|
|
|
|
DDRKirby(ISQ)
|
|
« Reply #70 on: October 26, 2023, 09:52:50 PM » |
|
Music Loading, Automatic Beat DetectionIt feels like I've been really inconsistent with these devlog entries, but looking back it seems like I have been basically putting out one per month quite regularly, so maybe it's not as haphazard as I thought! Music Adjustment UILast week I talked about the waveform display that I implemented using some fancy parallel burst compilation. My main use case for that functionality was to build out a UI for loading a music file and (more importantly) specifying and adjusting the tempo and start time for that file. After a lot of work, here's what I ended up with:  It's working pretty well! You can preview the song, zoom into the waveform, and drag around the beat markers to adjust the timing to your liking, or simply type in the tempo and start time manually if you already have it on hand. There's also a built-in metronome function so you can verify your work. This seemingly-simple UI widget really involved a lot of different moving pieces and little quality-of-life touches. There's smooth scrolling and zooming, and I needed to make sure that the beat markers appear and disappear as you scroll through the track. Dragging the beat markers past the end of the current view also makes it scroll automatically, and some of the beat measures fade out if you zoom out far enough (to avoid clutter). It's worth noting that I took some of the functionality that I developed along the way and added it in other places. For example, since I needed to implement a metronome to give audio feedback on whether your song timings are correct, I also added that as an option to use in-game. I also added the waveform display to the background of the input timeline while editing, to serve as an additional reference:  Automatic Tempo Detection Automatic Tempo DetectionWhile the "respawn loop" button does nothing at all yet (that is supposed to be a separate dialog that allows you to provide an optional short audio loop that will play during respawns), the rest of this big devlog post is going to be talking about that other rather inconspicuous button, "Auto-detect". You might have already guessed it, but clicking this button performs a whole bunch of math and signal processing in order to procedurally analyze the music file and attempt to automatically determine both the tempo and start time of the music file. Here's a short video of that magic in action! It's definitely not perfect, and it takes a few seconds to churn through all of the calculations (video above has that processing time skipped), but it actually does a pretty good job in a lot of cases! It looks easy since it's just a single magic button, but I ended up diving quite deep into the rabbit hole of audio signal processing and beat/tempo detection algorithms in order to implement this... Before I start explaining the methodology here, I wanted to point out something that might surprise you a bit. You might think that my goal with this automatic tempo detection is to make it work so well that manually setting the timing data for a song is no longer necessary. That's a nice hope to have, but I'm not really confident I can do that. On the contrary, I actually think for me that it's the other way around: I want the manual beat-setting interface to work so well that the automatic tempo detection is unnecessary! In that sense, you could say that the automatic detection is really just a secondary nice-to-have feature that I could honestly have dropped altogether. But, I'm a perfectionist, and I found the problem interesting, so I dove in... Resources and ReferencesWhile Unity provides basic access to audio data (get the samples out of an audio clip as a looooong array of floating point numbers), doing any sort of more involved operations (normalization, convolution, filtering) is something you'll want to use a specialized C# library for (don't reinvent the wheel!). NWaves was by far the most user-friendly and sensible one that I personally found (though I did end up re-implementing particular parts using Unity's job/burst systems, for performance reasons). NWaves was a huge boon for me and let me do things like Short-time Fourier Transforms without having to learn a bunch of new complicated math and attempt to implement it from scratch. Also, I rarely find myself doing this, but for this particular problem I ended up consulting a whole bunch of research papers that have been written about the topic, some of which were extremely helpful. "Evaluating the Online Capabilities of Onset Detection Methods" by Böck et al in particular provides a pretty nice survey of various approaches to detecting note onsets -- this is not 100% equivalent to tempo detection but is closely related. Accurate Tempo Estimation based on Recurrent Neural Networks and Resonating Comb Filters, also by Böck et al, was one of the other more helpful reads. Detecting a TempoThe process of tempo detection basically consists of the following steps at a high level: Do some preliminary processing on the audio signal to prepare it for further steps Run the audio through some sort of detection function(s) that is designed to highlight beats/onsets Determine what tempo best lines up with the detected beats Preliminary ProcessingThis step is pretty boring, we basically make sure that the audio is normalized, and converted from stereo into mono. I also add some silence to the beginning as a buffer and scale the audio levels a bit (apparently working in a logarithmic scale tends to perform better). In some approaches the audio is filtered and split into multiple parts -- for example one copy with only low frequencies, another with mid frequencies, and another with higher frequencies. I didn't find this to work super well for me and it also adds additional processing time since each filtered copy needs to be processed separately, so I just stuck with a single unified copy of the audio. But it's worth noting that filtering is a relatively common technique here, and your mileage may vary. Spectral AnalysisNow we need to take the music track and come up with some way to detect onsets or "strong attacks" in the audio. The first thing you might think of is to look at the places in the audio where the volume is loudest. That might work decently well for a single section of music with an isolated instrument that looks like this:  But for a loud song that has many different elements going on at the same time, the waveform looks more like this:  Part of the problem here is that all of the different sound frequencies that make up the song are represented together in a single waveform (one big array of floating point numbers), so it's almost impossible to isolate different musical events. The Fourier Transform can help us here by converting a single audio signal into a breakdown of the different frequencies that comprise that signal. If you've ever seen any sort of spectrum visualizer like this one, the Fourier Transform is what's being used to evaluate how tall each "bar" in the spectrum is:  Here's the same complex waveform from earlier above, but this time displayed alongside its spectrogram (generated using a form of the Fourier Transform). Notice how you can not only see a vertical line pattern (corresponding to the big kick drum hits), but you can also see distinct horizontal bars that correspond to different notes being played on the lead melody synth. 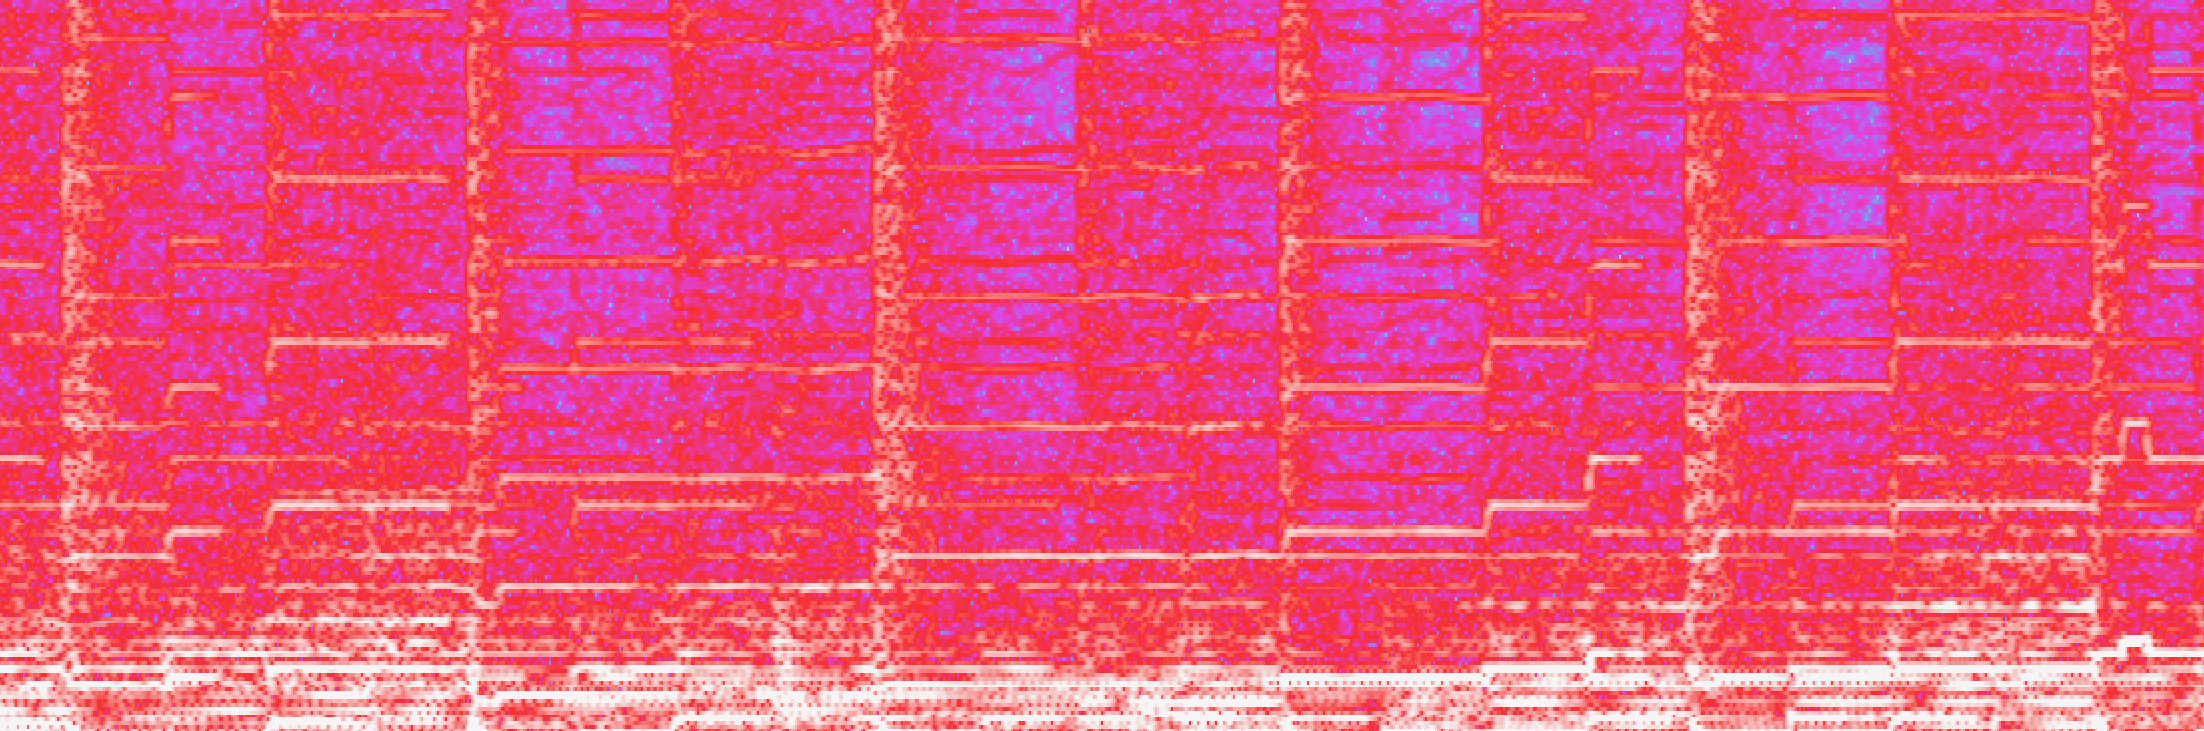 Onset Detection Onset DetectionNWaves can perform "Short-Time Fourier Transforms" in order to generate the equivalent of the above spectrogram, which is great. However, we still need a programmatic way to get from the spectrogram to some sort of evaluation of where note/beat onsets are. There are various approaches to doing this. In fact, some of the best results are done using neural network techniques...which unfortunately are a little too far out of my wheelhouse for me to implement. Instead I went with a simpler (well, kind of) approach, detailed in this paper. I basically take each of the sinusoidal frequencies (that are given by the Fourier Transform) and at each point in time, evaluate the change in energy and phase of that frequency. So if the energy level in a certain frequency goes up suddenly, that's a good indicator of a note starting. Similarly, if the phase of that frequency changes significantly, that's also a indicator of a note starting or changing. I add up all of the "change amounts" for every frequency and end up with a single number for that moment that describes "how much did the frequencies change in total at this moment?" Here's a rough visualization of what that "total change amount" looks like, along with the other signal representations. The yellow spiky line is the raw "total change amount" data that I use for the rest of the computations, the green graph is just a smoothed out version of that to show that it does indeed map onto the beats of the song. 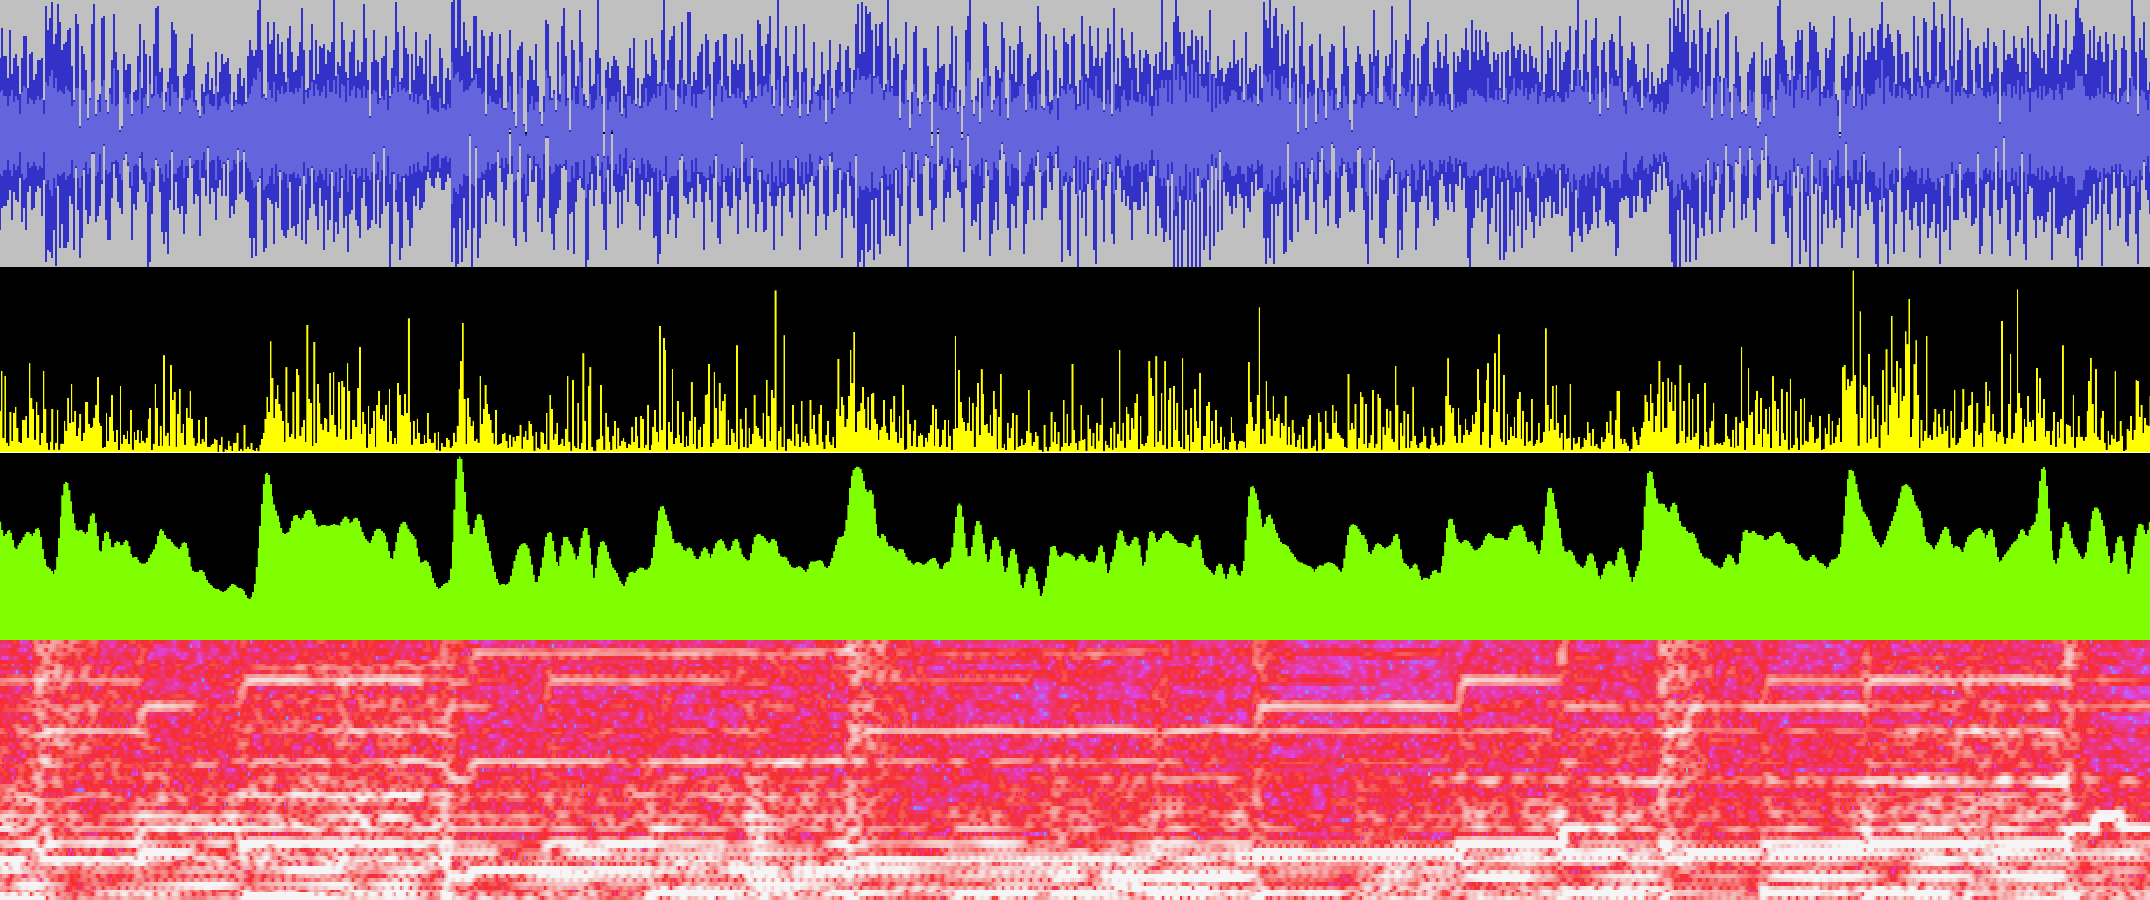 Here's a simpler example where you can see it a little more clearly: 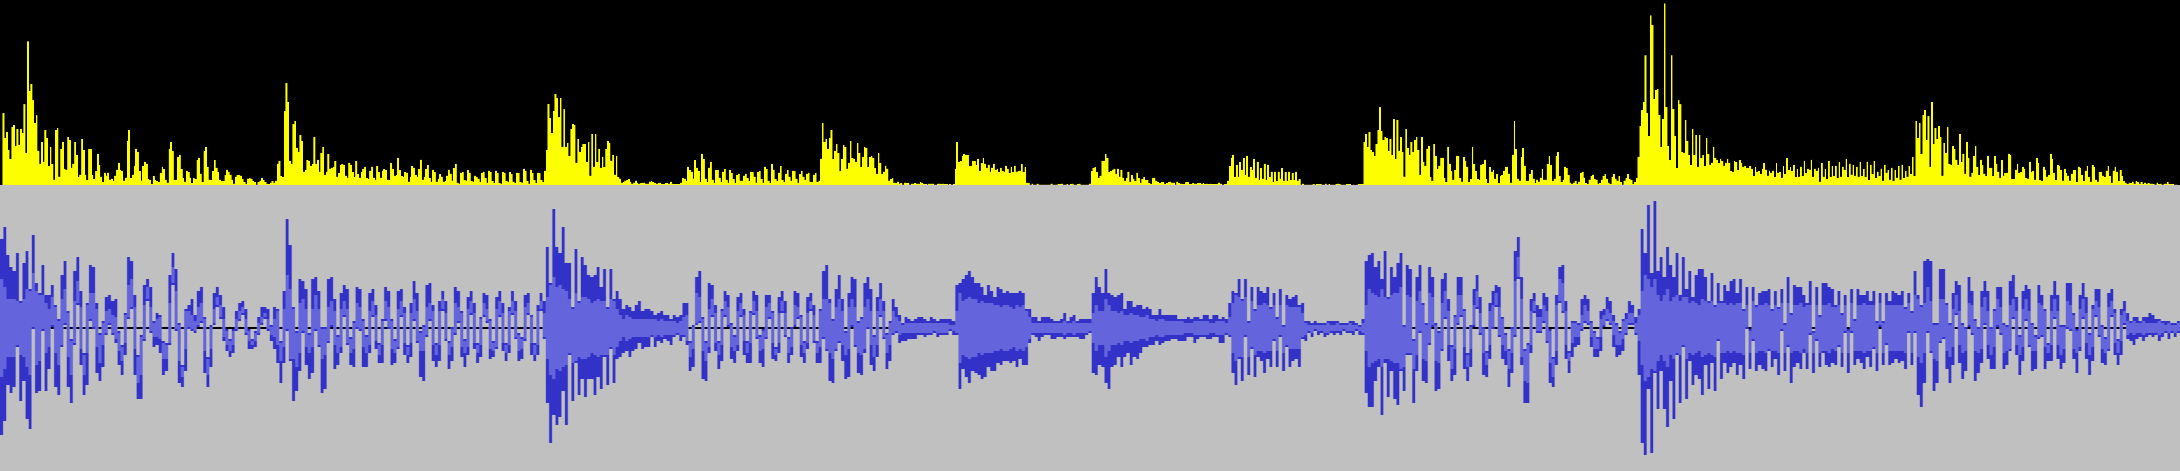 In some approaches, you take this "change amount" and try to run some sort of thresholding to pick out discrete onset/beat events. I chose not to do this and instead leave the signal as a continuous one. As you'll see in the next section, we don't actually need to pick out discrete beats in order to find the tempo. (One advantage of this is that we can also make use of information that lies in between beats.) Comb FilteringThe next step is to look for regularities in the onsets (the yellow graph) so we can determine the actual tempo. The way I do this is simply to try many possible tempos (all the way from 60 BPM to 180 BPM) and see which one(s) "matches" the graph best. How do we measure how well a given tempo "matches" the graph? The way I chose (referenced in some of the literature) is to use comb filters. A feedback comb filter is basically a fancy way of saying we are going to put an echo on the signal. I run the onset graph through many different comb filter delays (echo lengths), corresponding to each candidate tempo. The hope is that if the delay matches the actual tempo of the song, then we end up getting more feedback resonance than if not, so the resulting signal amplitudes will be higher. That ends up being true! In the below graph the blue/cyan line represents the comb filter output for an incorrect tempo, and the green line represents the filter output for a matching tempo.  Both of them start out relatively similar, but you can see that as the resonance kicks in, there's a feedback effect on every beat (since there tends to be note onsets there more often), which causes a higher signal amplitude. After calculating the comb filter output for all possible tempos, I simply go through and choose the tempo whose comb filter values are highest more than all of the other ones. Sometimes there is more than one different tempo that is higher than the rest -- often times this happens when the song has strong syncopated patterns, so for example instead of 120BPM the detector could also find 160BPM as a valid candidate. Right now I just have it pick the top one, but in the future I could build some sort of UI to suggest multiple tempos when it isn't quite sure. Detecting Beat OffsetNow that we have our song tempo calculated, the next order of business is to try and figure out what the beat offset is. I'm still working on tweaking this part a little, but what I do right now is take the comb filter output and process it even more using averages and thresholding. I end up with a more discrete selection of peaks:  I use various rules for selecting these peaks -- for example, the signal at that point has to be much higher than its average, it needs to be the highest point in some proximity, and there can't be two peaks too close to each other. Note that this attempted "peak selection" isn't perfect, and usually tosses away some otherwise-relevant information (which is why I didn't do it in the previous step). But as long as I get "enough" of the correct beats, it's fine! The last step is simply to go through all of the possible beat offset values and see which one of them lines up most with the peaks from this step. I just do this by adding all the on-beat amplitudes that would result from a given beat offset. It Works!Amazingly, the entire system works fairly well most of the time! It still has some troubles with certain songs, and often the start time is wrong by half a beat (I'm guessing this is because off-beats tend to be featured prominently as well), but there are always going to be exceptions like that. Again, even when it's wrong, it usually has the correct option as its second or third choice. After I ironed down the main algorithmic implementation, I ended up doing a pass over most of the computation logic and rewriting it to make use of Unity's parallel job / burst compilation system, which helped speed things up drastically. Right now the algorithm looks at the first 30 seconds of a song, which is over a million floating point samples, so there is quite a lot of data to parse through! Before the optimizations this process was taking over ~10 seconds, but it's now down to just a couple of seconds at most. I could go on and on trying to fine-tune all of the different parameters in the system (there are a lot...), and I actually found a couple of silly bugs and noticable improvements even while writing this devlog (hooray!). However, it's about time that I call it a wrap on this particular system and get back to making sure that everything else in the editor is well-integrated...
|
|
|
|
|
Logged
|
|
|
|
|
DDRKirby(ISQ)
|
|
« Reply #71 on: December 01, 2023, 02:04:22 PM » |
|
Custom Level Browser, Stats/MetadataOops, I missed my monthly devlog post for November. On the plus side, I've been doing a lot of good work over the past few weeks! I've found that my time and motivation for Rhythm Quest tends to oscillate a little bit over time -- sometimes it's because other parts of my life are busy, other times it's because I'm working on something that's tougher to get motivated about. But I do my best to just keep plugging away slowly and steadily... It's a little crazy to think that ~3 months ago the Rhythm Quest level editor didn't exist at all! Now we've got an entire editor tool palette UI, notifications, undo/redo, saving and loading, input timelines, waveform displays, animated preview sprites, automatic beat detection, level validation, ... There are like, infinity different things that go into custom level support, which is why I initially wanted to put it off until post-release...but I'm actually having a lot of fun developing it all, so that's great! Custom Level BrowserMost recently, I've been doing a bunch of work on a custom level browser that will let you navigate through the custom levels you've downloaded:  A lot of it is already working pretty well! It's able to parse all of the song files in the custom level folder, show them as options, and even allow you to drill down into subfolders in case you want to organize your custom levels into various different directories. Since the menu is dynamic (can have any arbitrary number of buttons), I decided to go with a scrolling menu layout. It works simply enough with keyboard/gamepad, but if you're using a mouse you can also scroll to a given song by clicking it (or even use the scroll wheel!). You'll notice on the left panel that selecting a level brings up a bunch of details about the level, including a stats display of how many obstacles of each type are in the level. These weren't too hard to derive and save as part of the level metadata, and they should hopefully provide a nice way of judging the flavor of a chart, or in case you want to just avoid any levels that have speed zones or green enemies or whatever. It's a little busy, in terms of the visual look, but I do think that it's useful information to display. (Maybe there could be a toggle for it?) There's still some additional work that needs to be done here...for one thing, I'm not a huge fan of the way that folders are handled...instead of drilling into separate submenus, it would probably make more sense to just have all songs be listed as one (indented?) list and then be able to open and collapse folders from there. I also don't have a way to access the shop or change characters/speed settings easily from here yet. =( I also need to think about handling music previews...the easy thing to do would be to just load the entire song on-demand and start playback, but that's really slow, so I'll have to instead stream the music from disk. Of course, ideally you'd be able to edit which region of the song gets played in the preview... Difficulty Estimation CurveThere's a new "estimated difficulty" scale from 1-100, which is automatically calculated based on the density of actions required for the level. Of course, it's hard to be very precise in determining how much trouble any given player will have on different levels, but I figured it would be nice to at least have some rough estimation available. Having a difficulty scale go from 1-100 is actually an interesting conundrum because there's no theoretical limit on how difficult a song can be (you can just add obstacles on every half beat and increase the tempo higher and higher). Right now the primary heuristic I use for determining difficulty is the number of button presses required per second, which ranges from 0.86 for level 1-1 all the way to 3.79 for level 5-5 (and probably a little higher through the end of world 6). I could of course just pick an arbitrary maximum limit (5.0?) and then come up with a linear scale, where 0 presses/second = 1 and 5 presses/second = 100, but I don't think that would be a great scale, because the differentiation within the low and high ends of the scale would be pretty useless. Does it really make sense for level 1-1 to have a difficulty of 17/100? It feels like the lower numbers below 15 would just never get used. Also, perceived difficulty isn't really linear based on presses per second either -- the jump between 1 and 1.5 presses per second isn't nearly as big of a deal as the jump from 3 to 3.5 presses per second. So instead of a linear mapping, I tried to find some sort of non-linear function that I could use to estimate difficulty. Ideally I wanted something that would ramp up very slowly from 0, then increase more rapidly toward the middle end of the range, and then taper off so that the crazy charts with 5 or 6 presses/second can just all be lumped in the 90s or whatever. In other words I wanted something that kind of has horizontal asymptotes... If you've studied enough trigonometry (sorry, yes, math is back) you'd remember that the graph of y = tan(x) has vertical asymptotes. Which of course, means that the inverse, y = arctan(x), has horizontal asymptotes. The inverse tangent function graphs like this: 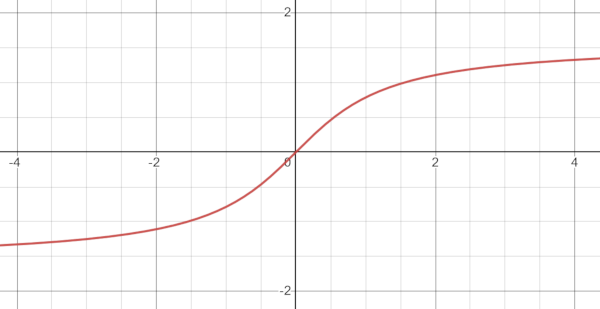 Which is pretty much what I was envisioning! All that was left was to apply some scaling constants to shift and scale everything around, and then I had my non-linear difficulty curve from 1-100 (currently caps out at around 4.8 presses per second):  Here are some values and what they map to, so you can get a sense of how this non-linear difficulty compares to what a linear mapping would provide: Level | Actions/Second | Linear Difficulty | Arctan Difficulty
1-1 | 0.859375 | 17 (Easy) | 3 (Easy)
1-5 | 1.560284 | 31 (Medium) | 9 (Easy)
2-3 | 1.718750 | 34 (Medium) | 11 (Easy)
2-5 | 1.984972 | 40 (Hard) | 17 (Easy)
3-4 | 2.195684 | 44 (Hard) | 20 (Medium)
4-5 | 2.761905 | 55 (Hard) | 41 (Hard)
5-5 | 3.345877 | 67 (Expert) | 70 (Expert)
| 4.000000 | 80 (Impossible) | 93 (Impossible)
| 5.000000 | 100 (Impossible) | 100 (Impossible)
Of course, this is just a first attempt, so it's definitely possible that it'll need some tweaking or shifting around... Level Metadata EditorI also put together this screen for inputting all of the metadata that you see in the level browser: 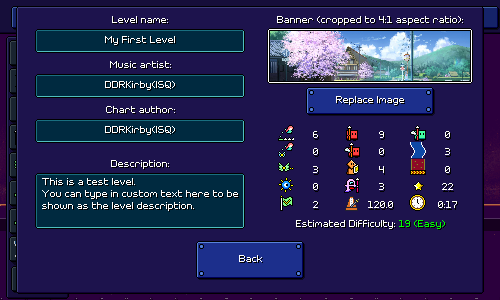 Not too much to say here except that I had to program in the ability to load in a custom image that you provide, and then automatically crop it to the right dimensions when displaying it. This image will also be used for if/when you upload the level to the Rhythm Quest Steam Workshop (have to implement that at some point, too...). Lots of Other StuffThe new level browser was the main exciting piece of work, but I've also been doing a ton of other things as well...for instance, I implemented a blur filter for the background that you'll be able to enable in the screen filter settings:  In general this sort of quick and simple post-processing effect tends to break the clean look of pixel art, but I won't judge you if you just think it looks cool and want to just enable it for normal gameplay. It does tend to help with foreground/background readability, for sure. I also implemented the ability to drag obstacles around using a move tool. This is a little less straightforward than you might think...you're essentially doing a delete followed by a new action, but you need to validate that the new action will make sense after the delete and handle the preview accordingly.  The same tool also lets you resize flight paths, water zones, and speed zones, by dragging the left or right side of them. Of course, the other obstacles need to all adjust based on the change...  The level end object automatically moves when you insert new obstacles past the end of the level. You can also move it around now!  Water zones and speed zones will now automatically merge together if they overlap or are placed end-to-end:  The jump tool now features multiple subtools for specifying whether you want to prefer (when possible) placing winged air jumps, grounded jumps, or grounded jumps with a vertical height difference:  What else...? I'll preview this in the future, but I also added an initial set of editor sound effects, so you can hear a nice little [pop!] when you place something. There was also a ton of work done on minor things with level validation logic, as well as general UI polish (the way that grid snapping worked, etc.). I still need to release this in the next patch, but I also finally implemented the ability for separate keybindings to work independently instead of being summed together, which means it'll work if you press a second attack key without releasing the first one -- this one should help players out with faster charts or if you're playing with a high speed mod. More Work to ComeAs we approach the end of 2023 I want to thank anyone who cares about my game enough to keep reading these devlogs. I may or may not take a little break from updates over the holiday season, but either way I'll be continuing to chug along as always with slow progress toward the mountain of work to be done. Sometimes I start to get really self-conscious of all of the expectations people must have about the game -- like, ~18,000 Steam wishlists and ~700 Discord members, that's a little ridiculous for my little project, isn't it? Cultivating an active community presence is really not a strong point of mine, but I'm optimistic that when the time comes the level editor will be able to inspire a lot of new content and excitement. We're still a long ways from that, though, so I'd best not count my chickens before they hatch...
|
|
|
|
|
Logged
|
|
|
|
|
DDRKirby(ISQ)
|
|
« Reply #72 on: January 12, 2024, 01:21:02 AM » |
|
Dotted Yellow Ghosts, More Custom Level WorkIt'll probably be good if I can try to write my devlogs more concisely so they don't feel like such a chore to post...let's just get right into it. Dotted Yellow GhostsLet's start with the most interesting news first: while playing around with the level editor I realized that it felt really awkward to chart certain styles/sections of songs because of the lack of 16th note rhythms in Rhythm Quest. All of my obstacles (minus speed zones) are done at the granularity of half-beats (8th notes), which has been fine so far since I've been able to tailor all of my music to it, but a lot of the music out in the wild features other sorts of rhythmic patterns. I don't want to go wild with facilitating =all= possible rhythms; I feel like Rhythm Quest chart design is good when it's constrained, just like DDR charts are at their best when they capture the "flow" of a song rather than trying to stepchart e-ve-ry in-di-vidual syll-able in the vo-cal ly-rics. But I decided to try adding in a new variant of the multihit ghost enemies:  These go at dotted 8th notes, so exactly twice as fast as the regular purple ghost enemies. They're not only colored differently but have a little orb accent to distinguish them visually. Right now these are the only obstacles that are allowed to be offset at this granularity. You can, of course, mix these in with other obstacles if you'd like to be extra devilish, but I don't plan on doing so very often. I think if your chart makes frequent use of 16th-note granularity it might be a sign that you should chart it as double the tempo. I haven't yet decided if or how these new ghosts should be incorporated into the main Rhythm Quest levels, but if I do include them they'll show up in World 6. It might actually be nice to do so as it would give players something else to learn besides the triplet speed zones, which might get old after a while if all 5 of the World 6 levels are primarily about them. Hah! See, it's actually not a bad thing that I've been putting off the rest of World 6 for so long...;P You'll also notice from the above gif that I've added a debug toolbar with shortcuts that you can use while testing your levels to quickly jump between checkpoints and toggle autoplay. Basically the same tools that I've been using all along to develop my own levels, except as first-class UI elements instead of hidden developer-only shortcuts  Camera Scrolling Tweak Camera Scrolling TweakThe beatgrid markers break up the otherwise-continuous slopes in levels, and therefore, the camera followed suit, panning smoothly across the slope but the pausing for a brief moment at each flat beatgrid marker:  I didn't want to change the design of the beatgrid markers, but I'm trying a change where I instead modify the camera plotting so that it ignores them and instead acts as if the slope is continuous all the way through. This makes the camera scrolling smoother, with the downside that the player character's y-position on the screen doesn't stay centered for that brief moment.  It's a subtle change, but I think (?) I like this new version better. The little camera "bumps" were honestly something that I just got used to a very very long time ago and didn't think very much of...I think I'll have to play some levels here and there and see if the new version bothers me at all. Hierarchical Folder DisplayLast time around I showed off the custom level browser, which featured the ability to drill into subfolders of the root custom level directory: I've tweaked this so that folders (and nested subfolders) are all shown in the same singular display instead of jumping to a new set of buttons. I use indentations and arrows (like in a Windows Explorer view) for this, and animate the indented buttons as they appear and disappear:  Preview Clips Preview ClipsBack in the editor UI, I've added a new section to the music loading menu where you can specify a section of the song to use as a preview clip when browsing custom levels.  Thankfully I was able to reuse the same audio display component that I already made, and just add some new handles to it, but this wasn't really a trivial task; there's a lot of subtle things that need to happen to make this editor feel good, such as automatically scrolling when you drag past the end of the window, automatically clamping the preview clip length (right now it's a minimum of 1 second and a maximum of 20 seconds), etc. I've gone back and forth a few times on exactly what the format of levels should look like and what different file types to use, as well as how music, levels, banner images, and such should be encoded. Initially I imagined the preview audio as simply being played as a segment of the original song, but I've decided to change that and instead I export the preview as a separate .ogg vorbis-encoded audio file -- this makes it easier to stream directly from disk. In implementing this, I had to look for a way to export that segment of audio data and vorbis-encode it. Surely there must be a nice, cross-platform, performant C# library that does exactly that, right? Unfortunately, the answer this time was "not quite", so I had to do some wrangling to get what I wanted, but it's working now... Just Keep WorkingAs always, there's still like infinity more things to work on. I have to add the new dotted eighth note ghost enemies to the level stats displays, I have to come up with a new UI for importing levels from zipped archives, and of course there's artist verification flows and Steam Workshop integration. I do want to give a shoutout to Rhythm Doctor as I've been referencing their level editor and custom level browser regularly to compare how they handle things. It's nice being able to look at an example of how a different team solved the same problems, just to have a jumping-off point. I'm not going to lie, I was feeling a bit burnt out on Rhythm Quest in past weeks. Something about the mountain of work that seems to be ahead of me as I tackle this whole custom level endeavor (this is why I didn't do it in the first place...), but also just the fact that another year went by and I didn't finish my game (understandably so, but still...). I know there are a lot of expectations and external desires about Rhythm Quest and I've felt them weigh heavily on me at times...but I think it's unhealthy for me to give them too much space in my head, it's best if I just focus on finding the "fun" in development and try to minimize the pressure that I feel. Fortunately, I seem to have been able to do that in more recent days!
|
|
|
|
|
Logged
|
|
|
|
|
DDRKirby(ISQ)
|
|
« Reply #73 on: January 24, 2024, 03:03:32 AM » |
|
Custom Level ImporterMy most recent work on custom levels has been this screen where you can import new custom levels, either ones that you've already downloaded, or by typing/pasting public URLs where they're hosted:  Internally this importer needs to handle a bunch of different things -- fetching the level package, making sure that it doesn't already exist in your levels folder, and extracting the appropriate files from the archive. It's all more or less working now, though the "Browse Steam Workshop" button just takes you to an empty page (more on that later)... It currently also supports file drag-and-drop, though only on Windows (sorry, this is a really OS-specific thing and I couldn't find any other implementations!). Level End FastforwardI also took some time to implement a small quality of life feature -- being able to fast-forward through the level end sequence:  This is done by pressing the menu button/key (escape on keyboard, start on gamepad), since you can't bring up the menu during the endgame sequence anyways. For mobile and mouse players, the "pause" icon in the upper-right corner fades into a fastforward button that has the same effect. I'm just doing this by increasing the global timescale of the game to 3x whenever that button/key is pressed. In an ideal world I would fast-forward only the UI animation here, but that isn't really easy to do with my current implementation, so I think I'll just live with this. Object PoolingI don't have any visuals to show for this one, but I also went ahead and did a nice performance optimization for the level editor. If you'll remember, the editor works by regenerating the entire level from scratch every time you make a change. It isn't super slow, but you can definitely notice a hitch every time you make a change when your level gets longer. A lot of the time here was spent reinstantiating all of the level objects from scratch (including not only the obstacles but also every segment of the ground/terrain, timeline helpers, etc), immediately after the old ones were all destroyed and discarded. This is super wasteful as we could have just reused a lot of the same objects that we already had, as long as we reset their state properly. To address this I now have an object pooling implementation in place so that instead of destroying the objects, I disable them and mark them as available to be reused. Then when the level is re-generated I can just grab those same instances and reuse them once I reset their state. My implemention isn't super robust, but it also doesn't need to be since level regeneration is essentially the only place in my game when objects need to be destroyed and recreated like this. This took a bunch of (mostly not too difficult) refactoring to get working, but there's a noticable difference in responsiveness now when changing larger levels. Yay! Custom Level PublishingLooking forward I'm going to be taking a little bit of time to experiment with solutions for custom level publishing and browsing. I had assumed for a while that I was going to look at integrating with Steam Workshop to give players an easy way to share and browse each others' levels, but I'm now having second thoughts about that since it won't work well across other versions of the game (itch.io, mobile, switch...). It's probably worth doing some exploration here, so I'm hoping to see if any other solutions may fit my game well. For example, I may be able to integrate with mod.io and use their service as a way to host and manage user levels. I could either use their built-in whitelabel in-game content browser, OR go the extra mile and implement one of my own (say hello to another mountain of UI work, future me...). In theory this could work cross-platform, but I'll have to start by dropping in their integration and seeing how it actually function in practice.
|
|
|
|
|
Logged
|
|
|
|
|
DDRKirby(ISQ)
|
|
« Reply #74 on: February 23, 2024, 05:53:17 PM » |
|
Graphics Editing, Boring Gamedev WoesI decided to explore the mod.io integration that I mentioned last month, and have decided to move forward with it, but I was getting a little overwhelmed trying to figure out exactly how I wanted to hook up all of the export/import/login flows, so I decided to table that and work on more core level editor functionality instead. Backdrop/Tileset SelectionUp until now all of the progress screenshots I've shown of the custom level editor have just used the level 6-1 backdrops as a placeholder, and there was no way to change that...until now! I've added a "Graphics" menu where you can select between any of the level tilesets and backdrop groups that I've made for the game:  You might be asking whether or not it's possible to import your own background images and graphics and the answer is a definite "I'm not going to implement that yet". The backdrops are authored in very specific ways, using multiple parallax scrolling layers, and are also encoded in the special 8-bit red-channel-only format, with specific color limitations to work with the palette shader...even if I did implement the ability to import your own images, I feel like it would just be a huge hassle for anyone to author for the system as is. It's just not worth it at this time. Palette SelectionThere's also a new tool that lets you change the color palette used in each checkpoint section:  Right now you can only select from the preset palettes that I've already authored for each set of level backdrops. Internally it's actually already possible to specify your own arbitrary custom color palettes, but there's no UI for it (yet?). As with the backdrops, it's probably more trouble than it's worth for people to dial in individual colors, but at least this one is more feasible (just need some sort of color picker interface), so I guess maybe it could happen someday. Panning around the level will also automatically shift the color palette to whatever section is on screen, giving you a quick way to preview the colors as they change throughout the level:  Particle Effects Particle EffectsKeeping with the theme of graphics-oriented editor features, I also implemented the ability to add particle effects to each checkpoint section with another new tool:  I originally designed these particle effects on a per-level basis, so I'm not actually sure they work well across different backdrops (the layering might get messed up...), but at least it's enough for me to give this a passing grade for now. Steamworks RefactorWhile I was experimenting with some of the mod.io integration -- specifically, trying to authenticate to mod.io using a Steam account -- I found it impossible to make some of the Steam functionality work using the Steamworks.NET integration that I've been leveraging until this point. I decided to spend some time ripping that out and replacing it with the Facepunch.Steamworks library instead, which had no such issues. Along the way I decided to revisit how I was handling Steam builds. Up until now I had been making a completely separate set of builds for Steam vs. non-Steam distribution, with the latter having all of the Steamworks functionality taken out via compile flags. I decided to change that and just have it be the exact same build for both cases. The Steam integration will now always attempt to connect with the running Steam client, but if you didn't launch the game through Steam, that will just gracefully fail and it won't do anything. The main benefit of this is that I don't have to make 3 extra builds every time I do a release (Windows/Mac/Linux Steam vs non-Steam), which is great. Functionally it's the same except if you run the Steam version of the game outside of the Steam launcher/client, it won't have any Steam integration. Thinking back, I don't actually know why I didn't do this in the first place; I feel like I've definitely seen this behavior in other games and it's generally better to not have divergent executables if you can help it. Unity Upgrade a.k.a How I spent a week fixing a platform-specific bugIf you've worked in gamedev for long enough you already know how this story goes... So I noticed that on one of my Mac machines the game was totally unresponsive to input when starting up. That didn't happen on another machine I had so eventually I traced the issue down to being introduced with the latest version of MacOS Sonoma, but only in windowed mode due to some weird change with OS window size reporting code which causes Unity to choke. "Luckily" the issue has a fix in later versions of Unity, so I dug in and started downloading gigs upon gigs of Unity Editor + Module updates across two machines to see if it actually helped (it did!). It had been a long time since I had done a Unity update, not only because my project is pretty far along in its lifecycle, but also because I remember there was a specific bug with mouse input not working on the upper-right corner of the game window with certain Unity versions a while ago which caused me to downgrade (sigh). Of course, updating from Unity 2021.2.14f1 to 2022.3.19f1 came with it's own fair share of headaches. Not only did I have to install the new version of the editor, along with the support for WebGL, iOS, Android, etc builds, but I also had to update my Nintendo Switch SDK environment (queue up another big chunk of downloads). The Android build pipeline has its own set of dependencies and OF COURSE Unity 2022 requires a different version of those than Unity 2021, so go ahead and download the Android SDK/NDK/JDK =but= don't you dare download the latest version because Unity won't work with that! You need the specific version that Unity 2022 wants... And of course, a major version update means I had to debug functionality changes, yay! Not only did I have to debug an issue with the audio scheduling, this also caused some of my plugins to stop compiling, such as the one I was using to bring up an OS-native file picker dialog (why is this not built-in to Unity...?). And oh, it turns out the mod.io integration that I was using doesn't actually compile for WebGL, also for some reason the Discord plugins weren't working correctly on OSX anymore?? Wait, why does the Discord SDK plugin have no documentation and why does it provide two conflicting Mac library files with different extensions? Wait, these two files are identical copies of each other??? Anyhow, I ended up with this task checklist over the course of that week: try updating unity to resolve input bug on sonoma tried updating unity but now music sync is broken Test to make sure build is still functional on all platforms How to port Modio to webgl: https://github.com/modio/modio-unity/compare/main...ComputerKim:modio-unity-webgl:main the fuuckkk? when starting osx build, main menu animations are fast, until you go into another menu - bug with cached beat lookups Lots of fixing build stuff with unity / plugins / blahhhhh Mac build discord lib WOW discord is dumb Downloaded new Android sdk/ndk/jdk Fix ios/android/switch builds (steamworks compile) More switch/android updates Finally got both android and switch builds compiling Fix ridiculous unity scriptablebuildpipeline issue causing builds to take hours That last issue with Unity's scriptable build pipeline is particularly egregious because it causes addressable content builds to take egregiously long, we're talking 25 times longer than they should be taking otherwise (hours upon hours). It's also nasty because it only surfaces on repeated builds (i.e. the first clean build isn't affected). Some good soul on the Unity forums tracked down the bug in the Unity package source (literally a one line change) so I was able to just hack that fix in (because OF COURSE Unity hadn't yet integrated the fix into the official package after 3 months). I'm sure some poor developers out there are going to be none the wiser and have this as their first experience using the addressables system and just assume that this is how life is... ...Can we just stick to publishing games via Flash like we used to?
|
|
|
|
|
Logged
|
|
|
|
|
DDRKirby(ISQ)
|
|
« Reply #75 on: March 08, 2024, 02:42:55 AM » |
|
Bonus LevelsSometimes it can be good to bounce around and work on some different things here and there. This time I worked on some additional levels! I'm still feeling hesitant to finish out the levels in world 6, so I decided to work on some bonus levels instead. This is relatively low-pressure for me since the more bonus levels I have, the better, and they don't really have to fit a particular level of difficulty or anything. I also wanted to explore using the new yellow ghost enemies a bit to get to know how to chart with them. Violet HyperwaveThe first level I made is called "Violet Hyperwave". It's a synthwave-styled track that uses all of the mechanics in the game except for the triplet speed-zones. Here's the video of the full track: For now I'm not making new backgrounds for these bonus tracks (maybe later...?), which helps make the process a little easier; I'm able to just churn these levels out in 1 or 2 days, which feels nice. Music-wise, there's a synthwave preset bank that I pull from a lot that slots right in here, and there's plenty of analog/vintage emulation to warm up the sound a bit. I really like the FM arp sound that comes in halfway through! For the chart I didn't want to do anything crazy, so most of the patterns you'll see are pretty familiar, but as I mentioned earlier, I did try to make use of the new yellow ghost enemies. By themselves, they're actually not very difficult! It's a new rhythm to deal with, but hitting a yellow ghost enemy is slower than hitting double-hit enemies, so it's not actually that hard. This makes me wonder whether I should just introduce the yellow ghost enemies at the very beginning of world 6, and then shift over level 6-1 to be level 6-2 instead (?).  Combining yellow ghosts with other rhythms is in theory, possible, but I want to be careful with them, as 16th-note rhythms are quite a bit faster than anything else currently in the game. Maybe they'll be relegated to very specific recognizable patterns...? Something else I've tended to avoid up until now is having a ghost enemy (either purple or yellow) on the same beat as a jump, but I added a few instances of that in this level. Unlike with the basic red/green enemies, there's no special visual distinction for these combo presses, which I'm not the biggest fan of, so I might have to think about whether I can come up with a nice way of making that a bit easier to read. In terms of estimated difficulty, this level clocks in at a 59 (Hard), which is a bit harder than levels 5-3 and 5-4, but not as hard as levels 5-5 and 6-1. A Single Leaf Flutters in the WindThe second level is called "A Single Leaf Flutters in the Wind". It a fast song featuring East Asian instrumentation such as taiko drums and guzheng, and uses a pentatonic scale, just like the songs in world 4. Here's the track video: So one thing with the bonus levels is that a bunch of them are going to involve mechanics that the player hasn't necessarily been introduced to in the main levels yet. I'm not yet sure how I'm going to handle this exactly (initially I was going to gate access to bonus levels, but I might actually just show a warning instead of hard-locking them), but I'm going to try and include some levels that only feature the simpler mechanics, so you have something that you can play if you go to the shop before finishing most of the game. As a plus, these can also sort of serve as "challenge missions" (a la Celeste B-Sides) for players who are finding the main progression a little too easy. To that end, I made this song that only uses the mechanics from worlds 1 and 2 (no ghost enemies, no water paths, etc), but is really fast-paced to present a challenge. It's at 135 beats per minute, so definitely on the faster side considering that it uses a ton of 8th-note rhythms. As you can see from the first few checkpoint sections, I wanted to really pull the gloves off on syncopated 8th-note rhythms here, encouraging you to read the airjump patterns in order to parse out the timings. The song itself was really fun to write! Working on new levels like this always reminds me of why I enjoy working on the game, so this has been a nice break from figuring out the complicated stuff around custom levels. I appreciate that the songs are relatively short (1.5-2 minutes), so writing them doesn't really feel like some sort of gargantuan effort; I can pull it off very quickly. For estimated difficulty, this level is a 73 (Expert) due to the note density, so it's a bit between levels 5-5 and 6-1. That's going to do it for this update. Hopefully people are happy that finally have some new levels to show off again
|
|
|
|
|
Logged
|
|
|
|
|
DDRKirby(ISQ)
|
|
« Reply #76 on: April 15, 2024, 01:35:00 AM » |
|
More Bonus Levels, Readability ModsIt's been a while, so I definitely have some cool stuff to show off from this past month of work! Let's start with everyone's favorite, looking at some more new levels... More Bonus LevelsLast time around I showed off some new bonus levels that I had written for Rhythm Quest. I've actually switched gears a bit for bonus levels and instead ended up making charts for a bunch of existing songs from my past releases. Here's a video sampler showcasing these: Super Mega Zero is a fast-paced song from the Super Mega Zero OST. Nothing too fancy here, just the standard charting that you'd come to expect by now, just at a high tempo. This one will really get your blood pumping!  Standing Here Alone (Expert Mix) is from the Melody Muncher Deluxe OST. The Melody Muncher songs are naturally pretty easy to translate over to Rhythm Quest as Melody Muncher was already based on 8th-note rhythms to begin with. This one is the "Expert Mix" version of the song, which works better for formulating a harder chart.  As the Cherry Blossom Falls is from Volume 2 of the Samurai Shaver OST. This one is a much slower song, so it's definitely on the easier side. As such, I made sure that it didn't feature any obstacles from worlds 3 onwards, so that it can be enjoyed pretty early on.  Let's Have an Adventure! is from my older album, The Ecstasy of Life. It's fast and upbeat, featuring dotted eighth-note ghost patterns that go right along with the melody (really glad that I decided to introduce this as a mechanic!). Some of the rhythms in this one are a little tricky, which led me to implement some readability mods that I'll talk about later in this post. There are also some 4-note dotted eighth patterns here that I had to chart with one basic enemy plus a yellow ghost. Because of this, I briefly contemplated what it would be like if I had designed the ghost enemies with variable counts, so for example with some sort of counter, that way you could have 4-hit ghosts, or 5-hit ghosts, etc. In the end, though, I think I like the simplicity of the ghosts as is. There is something to be said about trying to make the most of a limited toolset!  What Lies Beneath is from the Ripple Runner Deluxe OST and is the oldest of these songs (released 10 years ago, wow!). Because this one has a low tempo, I experimented with using some more complicated 16th note patterns. Like I've mentioned before, I want to be sparing with my use of these since they're not as easy to read, but with slower tempos I think it's okay.  Enemy Spacing Adjustment Enemy Spacing AdjustmentThis was a minor quality-of-life tweak/setting that was on my backlog -- you can now adjust the horizontal offset placement of enemies, in case the default (around 30 pixels) feels off to you. This comes with its own fancy little live simulated preview:  Color/Beat Mapping Color/Beat MappingThis one was a pretty big undertaking that I only recently wrapped up. You can now modify the colors of obstacles and beat grid markers to help decipher rhythms, a la DDR noteskins. Here's an example of that in action during gameplay:  I don't know how popular this kind of thing will be, but as I started to experiment (carefully!) with more complicated rhythms, I didn't like the fact that some of them can be a little ambiguous to sightread on the fly, so I wanted to at least provide some sort of nod toward players who want things to be a little more readable. Floor beat grid markers (and flight path markers) can be colored according to their beat offset (red = downbeat, blue = offbeat, yellow = 16th rhythms), or according to the action on that beat (red = attack, blue = jump, green = both). This coloration will override the default color specified by the level palette.  Enemies can likewise be colored according to beat (probably most useful) or according to action type:  There are some separate settings for wings and spiked enemies, as well as an option to use a different shade of green in case you find that better (I can put more color variations here in the future if needed):  Overall one nice thing about Rhythm Quest is that color isn't actually necessary to differentiate anything, so all of this coloration stuff is hopefully just for people who want to tweak their experience or are having trouble with songs that use weird rhythms. Either way, I'm glad to have this feature finally complete, as it took a good deal of work. The preview UI for this was also perhaps more of a pain to put together than the actual feature itself! It's not even perfect (ideally it would display an actual level section being played in realtime), but this was what I came up with when I was balancing my effort/benefit ratio. Other Odds and EndsPreviously checkpoints could only ever be placed on solid ground, and I made it a point to always chart all of my levels to accomodate that. I still think that's best practice, but for situations where that isn't a good option, I've added a little floating cloud platform for the checkpoint flag to sit on:  Finally, per a community request from a while ago, I've added the option for timing windows to scale in size based on the music speed multiplier:  While I'm personally not a huge fan of this, I also understand the rationale behind it, and it wasn't too difficult to implement. It doesn't apply neatly to all obstacles (rolling spikes...) and it might possibly cause some weird behavior since the collision boxes are so unexpectedly large, but in most cases it should (?) work okay. Note that this doesn't fix the duration of timing windows across different song sections, so faster-scrolling sections will still have (slightly) tighter timing like normal. I think that covers all the stuff I've been working on lately, minus one other thing which won't be ready to show for quiiiiteee some time. It certainly *feels* like I'm putting together a lot because of all the bonus levels, but that's mostly because charting existing songs (and not having to draw additional backdrops) is very easy. At some point I'll have to get back to actually finishing out world 6, but maybe after having made so many other charts I'll have a little more confidence in doing so...
|
|
|
|
|
Logged
|
|
|
|
|
 Community
