Welcome, Guest. Please login or register.

Login with username, password and session length

 
Advanced search

1411430 Posts in 69363 Topics- by 58416 Members - Latest Member: JamesAGreen

April 20, 2024, 02:15:25 AM

Need hosting? Check out Digital Ocean
(more details in this thread)
TIGSource ForumsCommunityTownhallForum IssuesArchived subforums (read only)TutorialsBlender Unwrapping
Pages: [1] 2
Print
Author Topic: Blender Unwrapping  (Read 19804 times)
xrabohrok
Level 0
***


ahahahaAHAHAHAAHA


View Profile WWW
« on: November 23, 2011, 12:25:38 PM »


      Unwrapping in Blender is just like unwrapping in any other 3D suite.  In fact, in some ways it is even better (3ds max, I’m squinting at you)!  Unfortunately, like everything else Blender related, it suffers from a lethal combo of incomplete documentation and well hidden buttons.  As it so happens, unwrapping is one of the more involved processes, so learning how to do it can be very painful.  I remember learning how to do it, and it still gives me chills to this day.  So let me take a moment to de-mystify some of the process, by unwrapping a cube. 
   This tutorial assumes that you already can model, and want to take said models to the next step.  By extension, it also means that you know viewport navigation, window manipulation, etc etc.  If you don’t, there is a wonderful website called BlenderCookie that will gladly show you (google it!).   This tutorial does not need photoshop/gimp experience, since we will just use the test texture.  Just as reminder, a good UV wrap would have a nice, even layout.  The best way to tell if you have such a thing is to use a checker texture, which in Blender is referred to as a “Test Image”.  When you have done things right, the checkers will be nice and even, roughly the same size everywhere, and over the entire mapped surface.  For example:


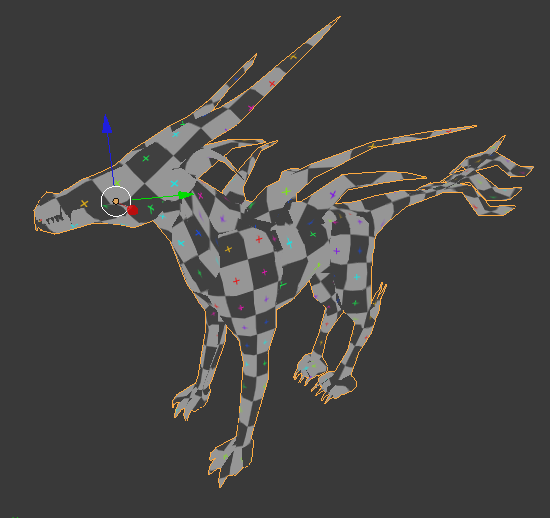
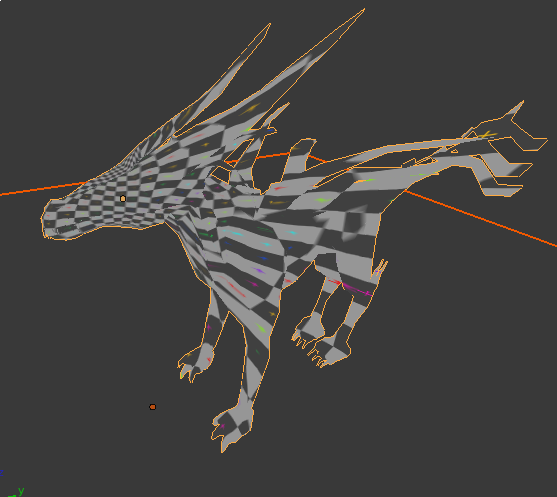
The good one is on the top.  It would be predictable if you were to color him in, and the colors you chose would be nice.  You can see the individual blips of color in each checker.  The abortion of an unwrap is to the bottom.  It is uneven, warping the texture and looks crazy.  It is an abomination in the face of god.  It makes me sad. 
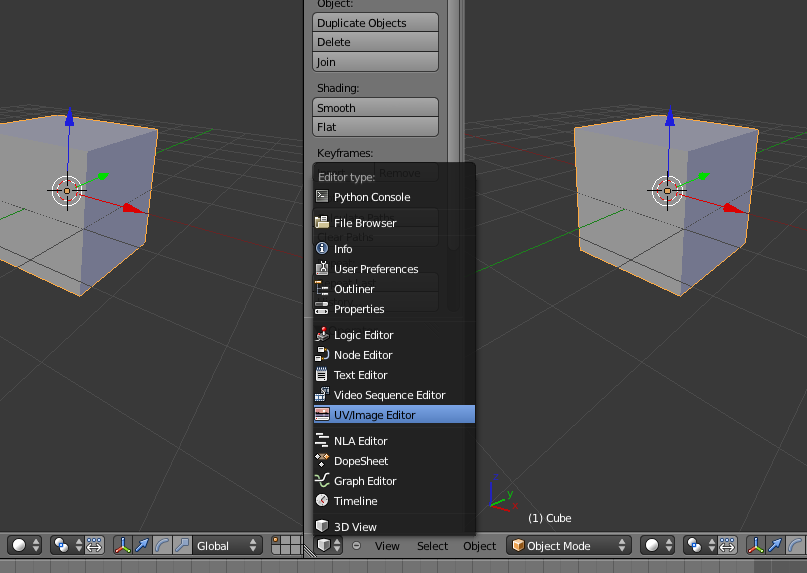
Now that we know what the stakes are, let us begin.  Start by splitting the main viewport into two, with one of them showing a good view of your model.  On one of them, click the Editor selection button and choose “UV/Image Editor”, like so.


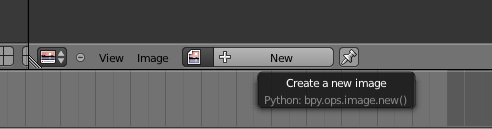
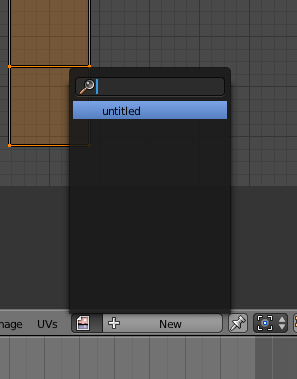
Now, you will have a view of your model and an image viewer (probably blank at the moment) in another view.  Since we have it open, we might as well take a moment to create our test checkerboard image.  You will need to click the big gray “new” button.  If for some reason it isn’t there, because maybe you already loaded an image or something, you will need to click Image->New Image. 

This next window will pop up either way.  Make sure “UV Test Grid” is checked. 
The default settings are good enough for most projects. 


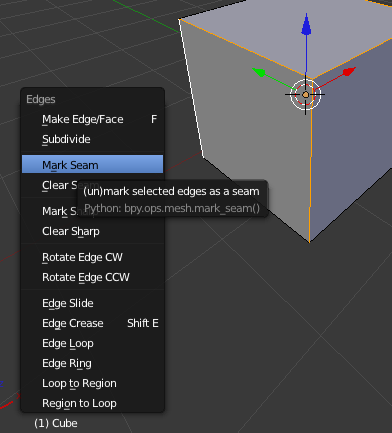
We now have a test image!  Now we need to prep the model’s UV’s to receive the image correctly.  Keep in mind that even though I am unwrapping a box, the process is the same no matter if it is a box or a demon dog thing.  Go into edit mode and select the edges where you can have the edges of the texture “break.”  In this method of mapping, we are “unwrapping” the model as if it were made of paper.  The edges you select here is where the model will be torn.  You want to choose edges that make sense in this regard, so everything will be as flat as possible. 
   Once you have your edges selected, press Ctrl + e to bring up the edges menu.  Select “Mark Seam”, and the selected edges will turn red.  Repeat this process until you are reasonably certain you have all the edges you need.   


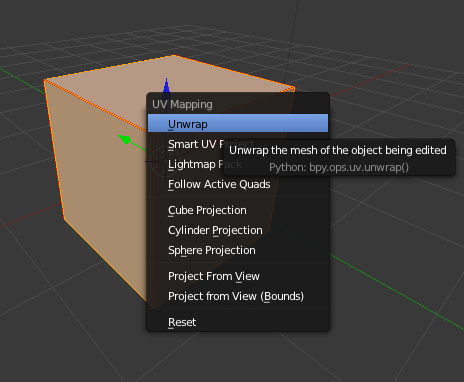
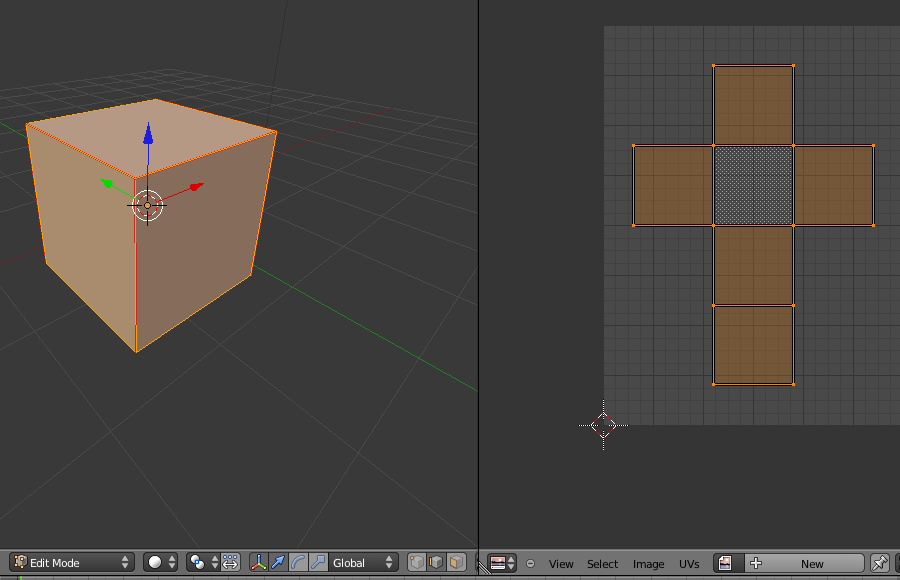
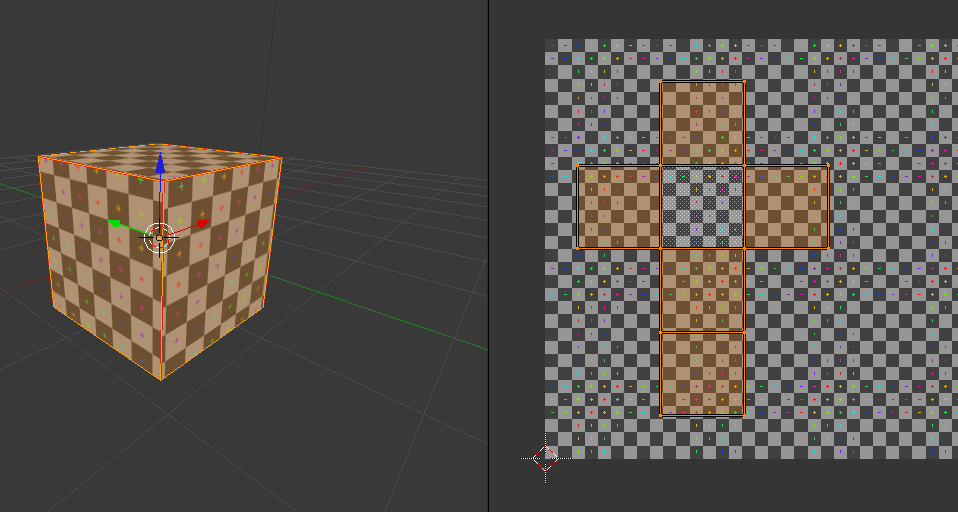
Now, select all the faces that need to be UV mapped.  Once done, press U, choose “unwrap”, and Blender will automatically unwrap the model as best it can.  Once it is done, the flattened model will be shown in the UV/Image editor. 


Now, how well did we choose our edges?  To determine that, we need to show the model with the checker image applied.  There are a few steps to do this.  First, without leaving edit mode, and with all the mapped faces selected, click the little image icon next to the new button and select the check image we made earlier.


The image is now being shown its position in relation to the UV plane, but the model still looks barren.  This is an easy fix: turn on Texture view by clicking on the little ball in the viewport. 


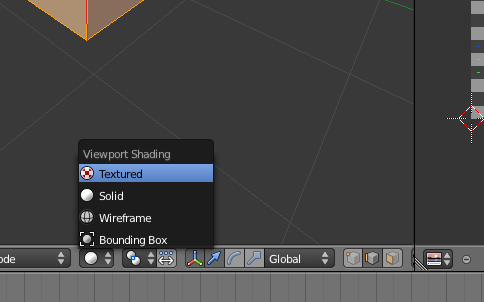
The model will now reflect the texture it has been given. 


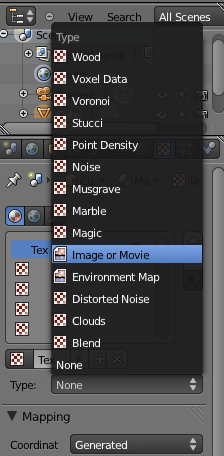
We aren’t quite done yet.  If we were to render this now, the cube would still be grey.  This is because the render information has not changed, only how we look at the model through the viewport.  What we need to do now is add the checker image to the material.  To get that ball on the road, click the little red and white checker box next to the materials tab (the red-ish shiny circle on the right-hand part of the screen).  Add a new texture if need be (there should be a blank one there already), then make it an “image or movie”.


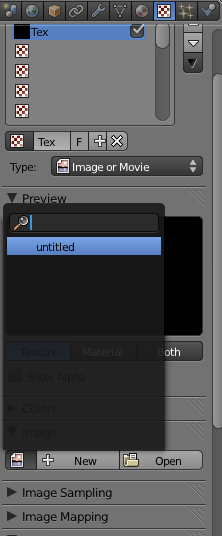
An image section will appear below.  Click the little portrait to the left of “new” and choose the texture. 


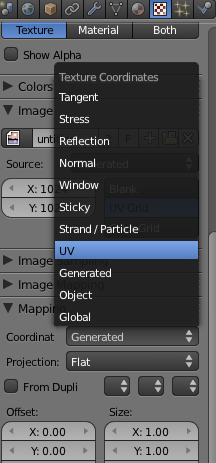
Almost there!  If you render it now, it will look crazy.  That is because Blender is using the wrong mapping coordinate system.  You need it to be the UV system that we set up with seams earlier.  Scroll down to the “Mapping” section and from the coordinates drop down choose UV. 


Now, when you render it, you will be left with a smart looking cube.
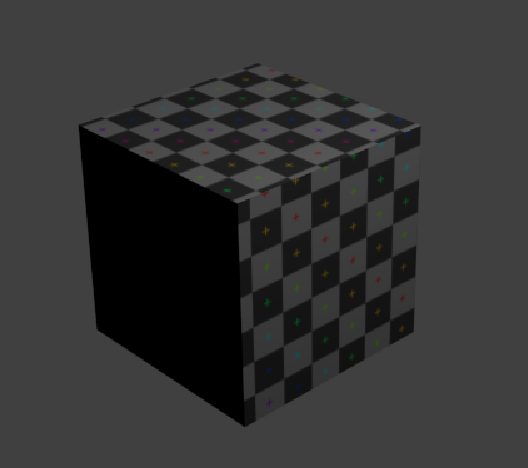

Sexy.

Thoughts would be appreciated, I don't write many tutorials so anything to improve it would be nice. 
Logged

A picture is worth a 1000 words, so naturally they save a lot of time.
Hangedman
Level 10
*****


Two milkmen go comedy


View Profile WWW
« Reply #1 on: November 23, 2011, 03:20:32 PM »

I was having serious trouble with this previously, so thanks for this.
Logged

AUST
ITIAMOSIWE (Play it on NG!) - Vision
There but for the grace of unfathomably complex math go I
kamac
Level 10
*****


Notoriously edits his posts


View Profile
« Reply #2 on: November 24, 2011, 10:17:03 AM »

Wohoo, will be much of use for my brother  Hand Thumbs Up Right
Logged

CowBoyDan
Level 3
***


View Profile WWW
« Reply #3 on: November 24, 2011, 04:31:49 PM »

Looks good, something I've found myself using a lot is using blender to bake the textures and normal maps for use in my game (particularly when using procedural materials in blender).  You can make a pretty awesome looking what nots without any real 'art' skills.
Logged
bart_the_13th
Level 2
**


View Profile
« Reply #4 on: November 24, 2011, 06:53:08 PM »

Just when I'm learning blender and trying to figure how to do unwrapping Coffee
Logged
xrabohrok
Level 0
***


ahahahaAHAHAHAAHA


View Profile WWW
« Reply #5 on: November 26, 2011, 12:59:16 PM »

Glad to see that this has helped!  Gentleman
Logged

A picture is worth a 1000 words, so naturally they save a lot of time.
Kramlack
Guest
« Reply #6 on: December 01, 2011, 07:40:44 PM »

I was having this problem awhile ago where there would be some kind of anti-aliasing of my texture;


They're being resampled. Notice that it's only happening in the x direction of the texture.

Somewhere along the pipeline the texture bitmap is being resized.

(A) It may be because your texture is 3x3 squares, and powers of binary don't divide by 3.
(B) It may happen if the texture bitmap is not perfectly square (I can't tell if it is or not).
(C) It may be because texture coordinates do not point to specific texels (a symptom of A, perhaps?), so it has to resample.

There should be an option somewhere to choose nearest-neighbour resampling rather than linear blend.

This was the best answer I got. After talking it over with willy-wilson, we basically came to the agreement that there wasn't a fix for the version of Blender I was using (the same one you seem to be using). Judging from your tutorial, you seem to be having the same issue, but I'll ask anyway. Do you know of a way to fix this and have the model represent the texture pixel to pixel? It's hard to explain so if you're still confused, I want it to be as sharp as Kenneth Fejer's cars, basically.
Logged
Theophilus
Guest
« Reply #7 on: December 01, 2011, 08:03:13 PM »

I tried this with a slightly more complex model, but still cube based, and it was skewed. Here's the model:

Logged
SolarLune
Level 10
*****


It's been eons


View Profile WWW
« Reply #8 on: December 01, 2011, 10:08:29 PM »

Nice unwrapping tutorial. It's thorough.

Turning off mip-maps in the User Preferences menu will allow you to turn off blurring of the texture, which is nice for pixelly textures. There's also an entry in the individual texture, but doing it with the User Preferences menu will change how it looks in the 3D viewport (and BGE), which is nice.

@Kramlack - Are you sure that all faces are the same size on the UV-map window? Click UVs > Snap to Pixels and press G to grab them - this will snap the UV-texture points to the pixels. You may have to reposition the points to get an even distribution.

@Theophilus - Did you put the edge cuts in the right places? The UV-map should look like the mesh - that's the way to ensure that the pixels are correctly sized and represented. The skewing might come up if the UV-maps don't look the same. For example, if a vertex is slightly moved from where it should be, I think that will look like that 'triangle' of the texture skews on the mesh.

Of course, I'm not super experienced with Blender, so I'm not sure...
Logged

xrabohrok
Level 0
***


ahahahaAHAHAHAAHA


View Profile WWW
« Reply #9 on: December 07, 2011, 09:08:07 AM »

Oh goodness, this thread went places when I wasn't looking... Tired

Blender will automatically de-rez the texture by half in terms of the viewport.  Remember, it is only a preview of the final model.  The object will render crazy, however, if you don't take corrective measures.  Turning off mip-maps won't really help (they only kick in when you can't tell the difference), the thing you are looking to turn off is texture interpolation.

This was my experiment with a 6x6 texture I whipped up in gimp:


As for unwrapping the cube with chamfered edges, that would take some practice. My hint is that you should cut the seams such that each face is roughly the same size it is on the 3d model in relation to the other faces.  To do that right is kind of an art though.  If you want you can post the file, or at least an image, and I can take a crack at it.     
Logged

A picture is worth a 1000 words, so naturally they save a lot of time.
Theophilus
Guest
« Reply #10 on: December 07, 2011, 10:11:35 AM »

Here's the model. http://dl.dropbox.com/u/9942053/rounded_cube.blend
Logged
xrabohrok
Level 0
***


ahahahaAHAHAHAAHA


View Profile WWW
« Reply #11 on: December 07, 2011, 01:44:47 PM »

Alright, I gave it a shot, here it is: http://dl.dropbox.com/u/20581642/rounded_cube.blend

What I essentially did was cut up the corners a little more, that flattens each side better:
Logged

A picture is worth a 1000 words, so naturally they save a lot of time.
Theophilus
Guest
« Reply #12 on: December 07, 2011, 02:06:24 PM »

That's genius! Thanks.
Logged
anonymous
Guest
« Reply #13 on: December 07, 2011, 10:34:03 PM »

I was having this problem awhile ago where there would be some kind of anti-aliasing of my texture;


They're being resampled. Notice that it's only happening in the x direction of the texture.

Somewhere along the pipeline the texture bitmap is being resized.

(A) It may be because your texture is 3x3 squares, and powers of binary don't divide by 3.
(B) It may happen if the texture bitmap is not perfectly square (I can't tell if it is or not).
(C) It may be because texture coordinates do not point to specific texels (a symptom of A, perhaps?), so it has to resample.

There should be an option somewhere to choose nearest-neighbour resampling rather than linear blend.

This was the best answer I got. After talking it over with willy-wilson, we basically came to the agreement that there wasn't a fix for the version of Blender I was using (the same one you seem to be using). Judging from your tutorial, you seem to be having the same issue, but I'll ask anyway. Do you know of a way to fix this and have the model represent the texture pixel to pixel? It's hard to explain so if you're still confused, I want it to be as sharp as Kenneth Fejer's cars, basically.

set your texture length and width to powers of 2, so either 2x2, 4x4, 8x8, 16x16, 32x32, 64x64, 128x128 etc.  I had the same issues, this fixed it.  info here
Logged
Kramlack
Guest
« Reply #14 on: December 10, 2011, 09:42:37 PM »

As for unwrapping the cube with chamfered edges, that would take some practice. My hint is that you should cut the seams such that each face is roughly the same size it is on the 3d model in relation to the other faces.  To do that right is kind of an art though.  If you want you can post the file, or at least an image, and I can take a crack at it.    

@xrabohrok: Here's the most updated texture. Transparency has already been added so right clicking and saving should give you the best result;


It's composed of 16x16px faces. The way Blender unwraps my box is really wonky though, even following your tutorial. You'll notice how out of place the texture looks in my previous image. I haven't figured out how to unwrap it properly so...

EDIT: I was able to move the texture faces around thanks to what Solar Lune said but it still leaves me not knowing where the faces are placed until I check the model with textures on.

EDIT2: If you could clarify where this is located;

I can't seem to find that option on my right hand tabs.

@Tor@noko: I don't really know what you mean, my textures have always been done in this format, using the same one as the above image.
« Last Edit: December 10, 2011, 10:09:44 PM by Kramlack » Logged
SolarLune
Level 10
*****


It's been eons


View Profile WWW
« Reply #15 on: December 10, 2011, 10:59:53 PM »


EDIT2: If you could clarify where this is located;

I can't seem to find that option on my right hand tabs.

That's in the texture tab, to the right of the material (red sphere) tab, with the UV settings and such other options. They're in the Properties window.
Logged

anonymous
Guest
« Reply #16 on: December 10, 2011, 11:34:58 PM »

NAh dawg, according to your texture, its size is 48 x 64.  Make it 64 x 64 - and it will look b-e-a-utiful.  What's happening, is that your pixels are overlapping, creating that anti-alias effect.
Logged
Kramlack
Guest
« Reply #17 on: December 11, 2011, 08:51:38 AM »

@Solar Lune: Thanks, I just found the Image Sampling dropdown. It wasn't in the already-set properties (had to 'link' a texture).

@Tor@Noko: Oh, so you mean the whole texture has to be in 2x2 format, I had assumed you meant each face, my bad. I still have no idea how to get rid of this anti-alias effect though.

Some info with what I just found, when I increase the textures size (in this case, I've scaled the texture to be x8), the AA'ing effect diminishes. Could it be that my texture is too small? I was hoping something like this wouldn't be an issue, and I could work with normal sized images.

With the texture at x1.
With the texture at x8.
Logged
SolarLune
Level 10
*****


It's been eons


View Profile WWW
« Reply #18 on: December 11, 2011, 12:11:33 PM »

Your texture's resolution is divisible by 2, right? I mean, it's 64x64 or 128x128, not something like 130x130 or 100x100, right?
Logged

anonymous
Guest
« Reply #19 on: December 11, 2011, 02:23:05 PM »

What I mean by power:
2 x 2 x 2 x 2 x 2 = 32, in other words, 2 to the fifth power.

It doesn't just have to be divisible by 2 but it has to be a product of a power.
130 is divisible by 2 but isn't a product of any power of 2.  128 is the closest number to that.

compatible sizes:
64x64
128x128
256x256
512x512

You don't need to scale your texture there can be a lot of empty space in your texture.  Just line up the vertices in the uv screen.  Here so this is what I mean by a correct texture:


You can use this texture and don't have to worry about the Numbers appearing on your cube. 

Here's something you have to understand about uv's:
Anything contained within your faces in the uv editor will be stretched and be reflected on the surface of your object.  Try moving a any vertice in the uv editor, you'll see what I mean - so your faces do not have to be perfectly square in the UV editor, but they will remain square on model, it's not entirely necessary to make "Seams" on your model so that it unfolds in a perfect layout.  I've been skipping this step entirely, and manipulating whatever shapes come out of unwrapping, and fitting to the Texture I want mapped.  So you can have all this extra crap and space in your texture, like the number '64' but as long as it isn't in one of the faces, it won't show up on your model.

That's wordy and perhaps not very coherent, but modeling is not an entirely rigid process like you have to follow step by step and get perfect shapes to come out of unwrapping or all is lost.
Logged
Pages: [1] 2
Print
Jump to:  

Theme orange-lt created by panic