Welcome, Guest. Please login or register.

Login with username, password and session length

 
Advanced search

1411423 Posts in 69363 Topics- by 58416 Members - Latest Member: JamesAGreen

April 18, 2024, 09:15:59 PM

Need hosting? Check out Digital Ocean
(more details in this thread)
TIGSource ForumsCommunityDevLogsLovers in a Dangerous Spacetime - Devlog #11: Timing is Everything
Pages: 1 ... 4 5 [6]
Print
Author Topic: Lovers in a Dangerous Spacetime - Devlog #11: Timing is Everything  (Read 41736 times)
Thecoolestnerdguy
Level 2
**

while(!succeed) try();


View Profile
« Reply #100 on: February 21, 2014, 05:59:14 AM »

Pretty cool technical post!
I love raycasting stuff!
Logged

Sad minecraft didnt copyright squares
winkels
Level 0
*


View Profile WWW
« Reply #101 on: February 21, 2014, 09:23:55 AM »

Such a nice simple system, and the end result is very smooth. That's three Raycasts per walker per frame, which I guess isn't bad.

What are you using for enemy AI? Finite state machines? Or behaviour trees? Did you write your own system, or are you using something from the Asset Store?

I just want to say that the bottom gif of the original post was very well made, and perfectly illustrates the important concepts of the code. Well done. Keep it up!

Thanks!  Walkable terrain is on its own layer, so since we're masking the raycasts against that layer that should increase the efficiency.

In terms of AI, we rolled our own system that basically uses behaviour trees.  It's pretty simplistic, but it's served us well so far.
Logged
bitbutter
Level 0
*


View Profile
« Reply #102 on: February 21, 2014, 09:31:48 AM »

I'm enjoying all the dev blogs on this game. Fascinating stuff. Looking forward to the next one.
Logged
christopf
Level 1
*


View Profile WWW
« Reply #103 on: February 21, 2014, 11:02:41 AM »

so much love in this thread
Logged

Bandreus
Level 3
***


View Profile WWW
« Reply #104 on: February 22, 2014, 01:20:25 AM »

In terms of AI, we rolled our own system that basically uses behaviour trees.  It's pretty simplistic, but it's served us well so far.

I love behavior trees as it's simple enought an approach, yet very organic and capable of producing amazing results.

I'd love to read a technical post on your own implementation. That would be extra cool.
Logged

Ninja Dodo
Level 4
****


View Profile WWW
« Reply #105 on: February 22, 2014, 02:54:49 AM »

Saw your walking collision post on Gamasutra. Really interesting stuff... I wonder how well it would apply across other tools. I imagine the theory is fairly universal. Bookmarking for future reference. Game looks great too. Keeping an eye on this. Blink
Logged

winkels
Level 0
*


View Profile WWW
« Reply #106 on: February 22, 2014, 09:05:38 AM »

Saw your walking collision post on Gamasutra. Really interesting stuff... I wonder how well it would apply across other tools. I imagine the theory is fairly universal. Bookmarking for future reference. Game looks great too. Keeping an eye on this. Blink

I don't see any reason why it wouldn't be transferrable to any engine that has a reasonable collision detection system.

Glad you liked it!
Logged
matthammill
Level 0
**


Designer/Artist


View Profile WWW
« Reply #107 on: March 04, 2014, 12:14:14 PM »

DevLog #8: Ugly Sketchbooks


Whenever I buy a new “Art Of” book, no matter how great the concept paintings are, I often wish I could also see the earlier, rougher, uglier stuff that must exist from when the designers were still batting around ideas and trying to figure out what they were making.

On that note, here are some sketchbook pages from the past year-and-a-half of Lovers development. Working on paper, without an undo, helps to focus on the broad decision-making stuff and avoid getting bogged down in details. My sketchbook drawings have gotten rougher over the years as I’ve moved more mid-stage work to the computer, so with that warning, let’s dive in…

Enemies

For this game, enemy design is always a balance between keeping the geometric style of the game and still trying for interesting creatures. We’re also trying to hint at the gameplay of a specific enemy through their appearance, and keep enemies appropriately themed throughout the levels (which admittedly you can’t tell from this sampling).


Player characters

The players started out looking more human and more gendered, but that wasn’t really where we wanted to go so we tried to simplify them and make them more universal as we went on.


Weapon design

Designing weapons brings out the 10-year-old in me. It takes a bunch of iteration after this, though, to figure out what’s doable, let alone what’s fun to play.


Level design

Our current level tool looks like this, so for me it’s basically impossible to use creatively unless I go in already having an idea on paper of how the level should feel.


Planning work

Even for non-visual work, I can’t function without a sketchbook beside me to help organize my messy brain.


The other guys

Jamie keeps a sketchbook as well, although since he also does more coding, he ends up with lots of mathy diagrams.


Our main programmer Adam keeps a notebook too, though his artwork can be quite, uh, minimalist.


--
This article was originally posted at http://www.asteroidbase.com/devlog/8-ugly-sketchbooks
« Last Edit: March 04, 2014, 12:38:38 PM by matthammill » Logged

winkels
Level 0
*


View Profile WWW
« Reply #108 on: March 26, 2014, 10:33:30 AM »


The simplest approach to pausing your game in Unity is to set Time.timeScale = 0. While the time scale is 0, Update methods in your scripts will still called, but Time.deltaTime will always return 0. This works well if you want to pause all on-screen action, but it is severely limiting if you need animated menus or overlays, since Time.timeScale = 0 also pauses animations and particle systems.

We first encountered this limitation when we were trying to implement an world map in Lovers in a Dangerous Spacetime</em>. When the player enters the ship's map station, we display a overlay of the current level. Since the map obstructs the ship and, as such, inhibits gameplay, we needed to pause the game while the display is visible. However, a completely static map screen would make it difficult to convey information (and also look pretty dull). In order to achieve our goal we needed a separate way to track how much time has elapsed since the last update loop.

It turns out that Time.realtimeSinceStartup is the ideal mechanism for this. As its name implies, Time.realtimeSinceStartup uses the system clock to track how much time has elapsed since the game was started, independent of any time scale manipulation you may be doing. By tracking the previous update's Time.realtimeSinceStartup, we can calculate a good approximation of the delta time since the last frame:

Click to view Gist


This script on its own is not enough, however, especially since we want to use Unity's Animation component to drive our dynamic map elements. To allow this, we created a subclass of TimeScaleIndependentUpdate that manually "pumps" the animation:

Click to view Gist


By using AnimationState's normalizedTime property and our calculated delta time, we scrub through the animation in each Update. Now all we need to do is attach this script to the GameObject we want to animate while Time.timeScale = 0:


As you can see above, the game action is paused when the map appears, but the icons on the map are still animating. Particle systems can also animate while the game is paused. ParticleSystem contains a handy Simulate method which, similar to Animation, allows us to manually pump the particle animation. All that's needed is a simple subclass of TimeScaleIndependentUpdate:

Click to view Gist


We can combine these three scripts to create fairly complex sequences. In Lovers, once the player has collected enough friends to unlock a warp tunnel, we play a little cutscene while Time.timeScale = 0:


This sequence relies heavily on the TimeScaleIndependentWaitForSeconds method of TimeScaleIndependentUpdate, which approximates Unity's built-in WaitForSeconds method and is extremely useful for creating coroutines.

Original post
Logged
metlslime
Level 0
***


View Profile
« Reply #109 on: March 26, 2014, 11:40:52 AM »

I like that warp tunnel cutscene, very slick.

I've recently been working on something similar in my game, to make menus, cutscenes, and room transitions work.  I actually have 3 clocks, "usertime", "gametime", and "simtime" -- enemies and players and effects use simtime, transitions use gametime, and UI uses usertime.  In a menu the gametime and simtime are paused, and in a transition or cutscene only the simtime is paused.  This way you can go to the menu in the middle of a room transition.

I also advance each entity's clock independently, because I have an effect in my game where you can freeze entities, this stops their clock while the rest of the simulation continues.  So entities don't look at the global simtime number, they look at this.time and this.frametime when calculating their movement and animation.

Also i have a max frametime of 66ms so that if your performace gets really bad, the game slows down rather than having a really long frame (which could break physics and hurt player reaction time.)  So even if 1 second goes by between frames, the clock only advances 66ms.
Logged

winkels
Level 0
*


View Profile WWW
« Reply #110 on: March 26, 2014, 12:26:50 PM »

I like that warp tunnel cutscene, very slick.

I've recently been working on something similar in my game, to make menus, cutscenes, and room transitions work.  I actually have 3 clocks, "usertime", "gametime", and "simtime" -- enemies and players and effects use simtime, transitions use gametime, and UI uses usertime.  In a menu the gametime and simtime are paused, and in a transition or cutscene only the simtime is paused.  This way you can go to the menu in the middle of a room transition.

I also advance each entity's clock independently, because I have an effect in my game where you can freeze entities, this stops their clock while the rest of the simulation continues.  So entities don't look at the global simtime number, they look at this.time and this.frametime when calculating their movement and animation.

Also i have a max frametime of 66ms so that if your performace gets really bad, the game slows down rather than having a really long frame (which could break physics and hurt player reaction time.)  So even if 1 second goes by between frames, the clock only advances 66ms.

That sounds like a good system.  If we were to start from scratch I would consider implementing something like that, but hopefully we can get away with our more simplified approach for this game.
Logged
Veven
Level 0
*


View Profile
« Reply #111 on: March 27, 2014, 01:01:47 PM »

Hey winkels, thanks for stopping by the /r/Unity3D sub-reddit. The skill level for people there ranges from "artist using PlayMaker" to "someone learning programming with UnityScript"
 to "developer with multiple live games". There's a huge variety in the eyeballs that scan that place.

Pausing in Unity is a real pain point, and lots of devs (myself included) are still trying to figure out a good method that works for them. Which is why I think it's been popular. It's definitely an article I'll come back to when I'm dealing with the issue in my project, both for the technique you originally posted, as well as the other ideas posted in the comments on reddit.

Oh, hey, do you guys have a pre-order form? I just pre-ordered Rex Rocket on their page, after being linked there from your latest post about GDC.

Keep up the good work!
Logged
matthammill
Level 0
**


Designer/Artist


View Profile WWW
« Reply #112 on: May 15, 2014, 09:34:51 AM »

Devlog #10: Bringing Warmth to Deep Space


When we showed Lovers in a Dangerous Spacetime at PAX East last month, we got asked a few times about how we were handling our space backgrounds, so I thought I'd go into a bit of detail. We're aiming for a rich, 2.5D neon fantasy look, and we wanted our backgrounds to fit this world and feel alive. We ended up combining a few different elements for the effect we wanted.


Element 1 - Far BG plane

The farthest background layer is a big plane with a 1024 x 1024 texture on it. I used some of the sky photos at www.cgtextures.com to get started, and the painted texture contains some colourful nebula cloudiness, but doesn't have much fine detail. The image tiles perfectly, thanks to Photoshop's good old Filter → Other → Offset.

One early problem with implementing the background was that the procedurally generated levels in Lovers can get fairly big, yet we wanted to avoid dealing with ridiculously large background planes. We decided that instead of having the player's ship travel past a stationary background, the background plane would be just large enough to fill the camera, and actually travel around the level with the ship. It only appears that the ship is moving past the background because the texture itself scrolls across the background plane in the opposite speed that the ship is moving in (using SetTextureOffset in Unity). The result is that the background plane works sort of like a window moving around the level, revealing a space background only where the player happens to be.


The far BG tile texture, and the far BG plane in Unity

Element 2 - Stars and space plankton

The next element we needed was a star field. We're using Unity particles for our stars, and we have one main particle system emitting sub-emitters which in turn emit the actual stars. This gives us some subtle clumping, rather than a perfectly even distribution. We also set them to twinkle and fade over time.

The particle stars are created within a box emitter shape, and this emitter travels around the level with the ship emitting stars around the ship as it goes. Stars appear and disappear slowly, so the player doesn't notice them being generated. Because we also wanted some parallax to the environment, we're shooting the BG plane and these particles from a perspective camera, while all the foreground gameplay elements are shot with an orthographic camera. We occasionally have planets or other doodads show up in the background too; these are generated with additional particle systems. We also threw in some super-subtle foreground particles (think the blurry plankton bits in flOw) which might seem strange for outer space, but they add some weird glowy nebula ambience and give the sense that you're moving through the space clouds, rather than just in front of them.

(As an aside, before we started using particles for stars, we used to use have several huge layered planes with transparent star textures on them. This wasn't very efficient because the there was lots of unnecessary overdraw, as most of the pixels in the star textures were completely transparent. On our middling laptops we saved 5 - 10 fps after switching to particle stars.)

Element 3 - Foreground Glow

For the sake of framerate we're trying to avoid post-processing effects, and for all the other blooms and glows in the game we're using baked-in textures, which we can get away with because everything is shot from one camera angle. So to help stitch the gameplay and background elements together with some overall glowiness, we added one additional plane with some really faint colour glow blobs painted on it. This plane appears in front of the ship and enemies, and its material is a Flare type so it overlays on top of everything else. The texture on this plane scrolls similarly to the far BG plane, but faster, so that as you fly the ship around the colours on the FG glow blobs and the BG clouds mix and shift against each other. This just makes the environment feel deeper and more alive.


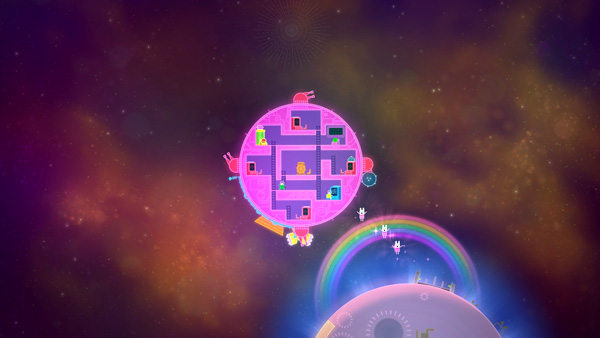
The different background elements layered together

Element 4 - Location-based elements

Now that we have a solid base background, we can add some variations to different areas of the level by layering on some location-based elements, like this green electron storm. An additional particle system behind the electro orbs is emitting some large green blobby particles.


Final notes

While we were assembling this system, there were a couple of things we noticed. Because there's a lot of foreground action in our game, we found we had to keep the background fairly subdued so as not to compete with the gameplay elements. We also learned not to overdo the parallax effect--while it's great for adding depth, if you're flying around in space, your eye needs a consistent reference point to judge your speed. If you can't tell what "depth" you're flying at, then you can't tell how fast you're going.

In any case, using this system, it's pretty easy to modify the different elements to suit different environments, while keeping a consistent overall feel to the environments.

This devlog was originally posted at http://www.asteroidbase.com/devlog/bringing-warmth-to-deep-space
Logged

Rostiger
Pixelhead
Level 5
******


View Profile WWW
« Reply #113 on: May 25, 2014, 08:42:57 PM »

Hey what?! I didn't know you had a devlog going on here on TIGSource, awesome!
I love rough first draft/brain storming sketches as well, so cool that you posted the pages - I have tons of theses as well, they only look messier!  Grin
We're actually currently working on the Secrets of Rætikon artbook and one of the ideas is to have some very early sketches in there to see where they went in their final form.
Anyway, more stuff like this please! Looking forward to your upcoming posts.
Logged

Clemens Scott
Co-Founder & Artist of Broken Rules
winkels
Level 0
*


View Profile WWW
« Reply #114 on: September 18, 2014, 09:32:38 AM »


The Ceraf enemy uses timers to control its pre-shoot, shoot and post-shoot animations and actions.

One of the tasks we find ourselves doing quite frequently while working on Lovers is controlling the timing of things (loop an animation for x seconds, randomize AI behaviour every y seconds, etc.). There are many ways to accomplish these types of actions, for instance you could do something like this:

Code:
float timerLength = 1;
void Update()
{
  if(timerLength > 0)
  {
    timerLength -= Time.deltaTime;
    if(timerLength <= 0)
    {
      doSomeAction();
    }
  }
}

This works in the simplest cases, but it requires you to reuse the same code in any script that uses a timer and quickly becomes cumbersome if you require multiple timers in a script.

You could use a coroutine with Unity's handy built-in wait function:

Code:
void Start()
{
  StartCoroutine(timerCoroutine());
}
IEnumerator timerCoroutine()
{
  yield return new WaitForSeconds(1);
  doSomeAction();
}

Coroutines are great for when you want a long sequence of actions or when you need to do something over a number of frames, but if you just want to wait for a certain amount time before performing an action, having to write a new method is tedious (plus, until recently they were very difficult to cancel).

To get around these issues and help satisfy our laziness we created a class that to encapsulate the functionality of a countdown timer: CoroutineTimer.

Click to view Gist


As its name implies, CoroutineTimer utilizes Unity's coroutine library to provide a straightforward timer mechanism.  In its simplest form, CoroutineTimer acts a straightforward timer:

Code:
CoroutineTimer timer = new CoroutineTimer(timerLength);
timer.Start(gameObject, doSomeAction);

After timerLength seconds, the doSomeAction method will be called. (Note that you must supply a GameObject to the timer's Start method as coroutines can only be run by MonoBehaviours and CoroutineTimer attaches a new MonoBehaviour to the supplied GameObject when it runs.)

We've also included additional functionality to CoroutineTimer that comes in handy relatively frequently. For instance, say you wanted an enemy to shoot every 2 seconds, but to only start shooting initially after 4.5 seconds have passed. Also, you realize that it looks pretty mechanical if the enemy shoots *exactly* every 2 seconds, so you want to randomize the behaviour a bit so it actually only shoots every 1.8-2.2 seconds (i.e. a 10% randomization).  Sure thing, no problem:

Code:
float length = 2f;
float randomizationFactor = 0.1f;
float startDelay = 4.5f;
bool repeat = true;
CoroutineTimer timer = new CoroutineTimer(length, randomizationFactor, startDelay, repeat);
timer.Start(gameObject, shoot);

CoroutineTimers can also be cancelled at any point (using the Stop() method) or reused once they are stopped finished.  Additionally, it uses the [System.Serializable] attribute, so its properties can be serialized and exposed in the Unity Editor.


Limitations & peculiarities

Unfortunately there is no way to check how much time is left in a CoroutineTimer, you merely start it and it lets you know when it's done.

CoroutineTimer uses the string-based method of starting and stopping its coroutines.  We're generally not big fans of this approach, but until Unity 4.5 it was the only way to easily cancel a running coroutine.  Now that the StopCoroutine method can take an IEnumerator, we will likely update the class in the future to use that instead. This change would also negate the need to pass a GameObject to the timer (we are attaching a new MonoBehaviour for the timer only for safety since StopCoroutine(someString) stops all coroutine methods named someString on a given MonoBehaviour) and we could instead simply pass a MonoBehaviour
Logged
Pages: 1 ... 4 5 [6]
Print
Jump to:  

Theme orange-lt created by panic