Thanks again everyone for the encouragement. Right, then.. character tools.
Character ToolsFrom the start of this project I knew creating all the sailors was gonna be a huge task. I looked around at various "create a character" libraries and wasn't impressed so I decided I'd just try to make them all myself. For the dev build I settled on a pretty basic system of blend targets applied to a common base character, with animated weighting to switch between them. That worked ok for a few characters in a few scenes but I could see pretty quickly that it wouldn't scale up to 80 characters in >20 scenes.
It took me a while, with lots of trial and error, and now I've finally got the character pipeline sorted. My goal was to be able to quickly create characters as both original builds and as components of existing pieces. I also wanted to keep things fairly flexible so I could build characters piecemeal - going back to edit or adjust them whenever I felt like. The current result is a set of tools: ObraHumans, ObraPainter, ObraSculptor (all Maya MEL-scripts), and ComposeHuman (Haxe command-line app).
ObraHumansThis the main tool for creating and editing characters in Maya. There's no special meaning for "human" here, I just went through most of the obvious names with previous tools (character, crew, sailor, etc) and wanted something new.
Flipping between characters in the ObraHumans tool
For this game I've modeled and rigged only a single base "neutral" character - unique characters are created as variations of this. Each unique character is made up of:
- The neutral base body mesh (rigged)
- Blend targets on the body for changing features (always 100%, non-animated: face shape, injuries, expressions, etc)
- Separate hair/clothing/hat/etc meshes (optional)
- An overall scale (applied to the rig, so elongating limbs instead of a raw scale factor)
Switching between characters is a process of applying blend targets, showing/hiding different piece meshes, and setting a rig scale. The script handles this for me and I can easily add variations, new clothes, hats, etc, then choose them from the drop-downs for any character. It works a lot like a typical character builder, just integrated into Maya and organized for easy additions.
Adjusting pieces/targets/clothes on one character
ComposeHumanComposeHuman is a command-line tool for compositing the texture layers. The compositing logic is based on the stuff I wrote about earlier, encoding a sort of alpha value into RGB-painted textures. I originally had a fairly complicated process here but moving that complexity to the ObraHumans script let me simplify ComposeHuman a lot.
ObraHumans calls out to ComposeHuman whenever adding or removing a piece to a character. That updates the texture and it's reloaded into Maya. In the end, each character has two unique textures (body and clothes) that are composited based on the selected pieces. Most pieces just use the body texture but some clothes actually have to overlay the body and need the separate texture for that.
ComposeHuman has just two modes: "build" or "paint".
Build does a simple composite:
> ComposeHuman build seaman2 base-male face-seaman2 pants-long
Compositing layers into a single texture
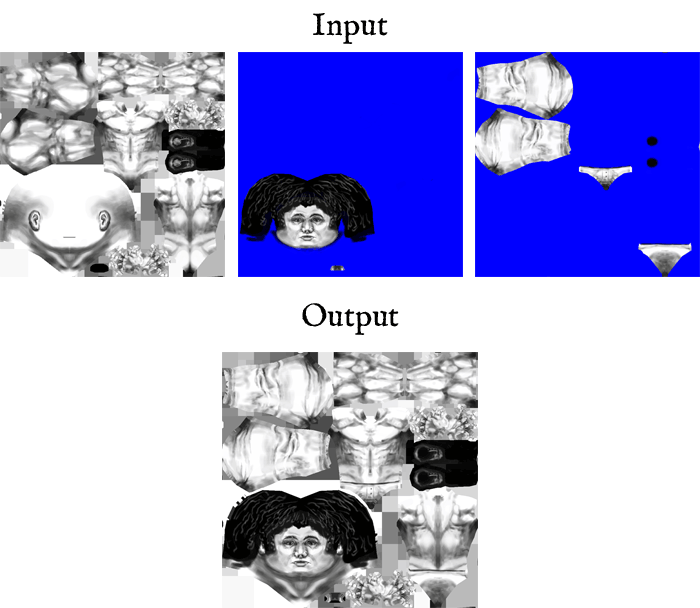
mode also composites but tints the base layers so they can later be separated. This is the texture that I paint on directly using ObraPainter (explained below).
> ComposeHuman paint face-seaman2 <workingDir> base-male
Paint-ready texture with ignored pixels in blue/cyan
ObraPainterObraPainter is the MEL-based painting script. Maya's built-in 3dpaint tool is so limited and buggy that I needed to add a bunch of workarounds and features to get a smooth pipeline. ComposeHuman was a big part of that (all the alpha-in-RGB and compositing stuff) but I also had to add a custom file-based undo/redo system since Maya's was so flaky. And the ObraPainter window includes the most useful shortcuts for brush colors, alpha values, showing wireframes, toggling reflection, etc.
All the actual painting is done in Maya by hand on a Bamboo tablet. For non-stroke stuff I can also quickly edit the texture in Photoshop - to shift some pixels around or whatever.
Painting a character
ObraSculptorThe last character tool is a simple mode-switching helper. Since all of the character variations are defined as blend targets for the base body mesh, I needed an easy way to edit these. You don't want to edit the base mesh directly, and you don't want all your blend targets hanging around visible in your scene most of the time. That's what I had while making the dev build and it was getting way out of control. So ObraSculptor just unhides the desired mesh and sets it up for vertex editing.
Sculpting a character's blend target
In UseWith all this character tool work mostly solved I've been able to start proper arting on the sailors. It's a huge relief that the pipeline actually works ok. Everything is fast enough that I can make around 2 characters per day, which puts me on track to finish all of them in a month or two.
Right now they all look sorta samey, especially in-game with 1-bit rendering. I'm not
too worried about that as most people do like kinda similar anyways. Still, identifying sailors by appearance is important in this game so hopefully after adding clothing variations, tattoos, and other custom stuff they'll differentiate more.
Here's a few faces I've done so far:
 Community
