Welcome, Guest. Please login or register.

Login with username, password and session length

 
Advanced search

1411501 Posts in 69373 Topics- by 58429 Members - Latest Member: Alternalo

April 25, 2024, 03:00:01 PM

Need hosting? Check out Digital Ocean
(more details in this thread)
TIGSource ForumsCommunityDevLogsLeilani's Island
Pages: 1 ... 32 33 [34] 35 36 ... 67
Print
Author Topic: Leilani's Island  (Read 411766 times)
TheGrandHero
Level 1
*


View Profile WWW
« Reply #660 on: October 01, 2017, 12:23:39 PM »

The clifftop backdrop is another good example of improvements, this one on the left being from way back in 2014:


As much as I really like the new clifftop background, I kinda prefer the old color motif. Could different levels with the same environment have different palettes, maybe?
Logged

qMopey
Level 6
*


View Profile WWW
« Reply #661 on: October 01, 2017, 03:24:19 PM »

I would have to agree; the old background was muted enough to somehow let the eyes rest on the player and foreground without requiring too much focus. The new background is vibrant enough to "distract" the eye.
Logged
ydobemos
Level 0
**


View Profile
« Reply #662 on: October 01, 2017, 09:12:40 PM »

I'll add my opinion that both the new backgrounds look great. And the new mountain has a much better scale and the completely different hues take care of content separation. One thing that does feel like it could be changed would be the "gradient" - I think it needs to be exponential, like "o oo ooo oooo".
Logged
Ishi
Pixelhead
Level 10
******


coffee&coding


View Profile WWW
« Reply #663 on: October 02, 2017, 10:52:31 AM »

Thanks for the comments everyone!

I saw the new Mario Odyssey game has Mario performing a roll very similar to Leilani's. Thought of your immediately.

Now everyone will claim you're a rip ;-)

Yeah I saw the rolling briefly in an early trailer (haven't watched any new footage since the E3 trailer though). I was excited! More games need rolling! :D It seems such an unrealistic and videogamey way to move around, which I love.

As much as I really like the new clifftop background, I kinda prefer the old color motif. Could different levels with the same environment have different palettes, maybe?
I would have to agree; the old background was muted enough to somehow let the eyes rest on the player and foreground without requiring too much focus. The new background is vibrant enough to "distract" the eye.
I'll add my opinion that both the new backgrounds look great. And the new mountain has a much better scale and the completely different hues take care of content separation. One thing that does feel like it could be changed would be the "gradient" - I think it needs to be exponential, like "o oo ooo oooo".

Thanks for the thoughts! No one has complained about the background on that level being distracting while playing, but it's certainly worth keeping an eye on. Backgrounds can usually benefit from being desaturated a little more to help clarity. Changing background colours between levels is also a good idea, I do intend on reusing backdrops so would be an easy way to make a level look visually different. And yeah, the gradient would look less lazy if it was less linear!
Logged

Photon
Level 4
****


View Profile
« Reply #664 on: October 02, 2017, 01:53:04 PM »

I think the issue isn't so much that the new backgrounds are bad--they aren't, and they look great in fact!--but rather that when you compare all the backgrounds as a whole, they're a bit too similar to each other. I like the variety and differentiation in colors that the previous backgrounds had. That's my opinion, at least.
Logged
qMopey
Level 6
*


View Profile WWW
« Reply #665 on: October 02, 2017, 02:04:17 PM »

Agreed with Photon. Another thing is composition rule-of-thirds. new background sits right in middle of screen, which makes it a little harsher on the eye. Old background was closer to sitting on a "thirds" line, due to base of the mountain residing near the bottom third line, and the sun on the left hand third line.
Logged
JobLeonard
Level 10
*****


View Profile
« Reply #666 on: October 02, 2017, 03:21:27 PM »

Quote
I was excited! More games need rolling! :D It seems such an unrealistic and videogamey way to move around, which I love.

Obligatory:


« Last Edit: October 09, 2017, 11:22:53 PM by JobLeonard » Logged
Ishi
Pixelhead
Level 10
******


coffee&coding


View Profile WWW
« Reply #667 on: October 06, 2017, 11:48:21 AM »


Haha that's great, maybe he can cosplay Leilani some day Wink
Logged

JobLeonard
Level 10
*****


View Profile
« Reply #668 on: October 09, 2017, 11:23:23 PM »

He seems the type to do so if you suggest it to him! :D
Logged
Ishi
Pixelhead
Level 10
******


coffee&coding


View Profile WWW
« Reply #669 on: October 18, 2017, 09:19:41 AM »

Time to get back into the devlog!

Boss!

October is boss month! It's a shame the month is already half way through My Word! I was away for a week, so it's gone quickly.

I'm starting work on the code for the game's bosses, specifically focusing on the first one. I don't know yet how many bosses I'll have, but I do plan on them all following a similar format - they will all be some kind of giant vehicle or tank. This fits the theme, and has good potential for variety, but allows me to share most of the code across all the bosses.

The first boss is modelled after the cannons already found in the game that fire bombs at Leilani. So naturally, this tank will also fire bombs! Hitting the bombs back by rolling into them will be the way to damage it.

It doesn't fire any bombs yet, but I've started coding its movement capabilities. Driving, turning, and jumping:


The jumping will provide a simple pattern to avoid in-between the bomb-firing phases, and will serve as an introduction for whatever more advanced movement capabilities I might give to later bosses.

Anticipation

I've focused on building lots of anticipation into the boss's movements. Anticipation is an animation term for the preparation before an action. So in my case, that's the short backwards movement before the tank drives forwards, and also the way the tank squashes downwards before jumping in the air. This helps to give the tank a sense of weight, but more importantly warns the player of what it's about to do. There should be no unfair sudden attacks/movement.

On a larger scale, the small jump on the spot before the tank does some moving jumps across the screen serves as anticipation too, warning the player that the tank can jump, which may come as a surprise since it's not a normal action associated with tanks.

Secondary action / Follow through

Another animation term, referring to secondary movement caused by doing other actions. I made the body of the tank tilt according to the acceleration that the tank is undergoing. And I added some suspension bounce to the body when the tank lands on the floor. These additional anims also just help to add a sense of weight to the tank, although they don't affect gameplay in the same way as the anticipation movements which help to warn the player.

I use sprite rotation very sparingly in the game, and I was worried it might look a little cheap to use it here, but I think I can get away with it. I limited the tilting so it happens in steps rather than being super smooth, which looks more in-keeping with the hand-drawn animations (such as the tank turning around) which also happen in steps.

Next

So that's an overview on the thought processes that have gone into the boss so far! My next priority will be making the turret functional, making the boss damageable (and making it hurt Leilani too), and putting together a more final sequence of actions for the boss. Once that's done I'll probably discuss how I'm structuring the code for the boss.

P.S. See my twitter for a fun bug involving the tank.
Logged

io3 creations
Level 10
*****


View Profile WWW
« Reply #670 on: October 19, 2017, 02:50:12 PM »

P.S. See my twitter for a fun bug involving the tank.
Hey! Who needs tracks ... when you can hover!  WizardHand Knife Right  <-- magical knife

So, would that be #funbug or perhaps #funGameBug to be more obvious that it is related to games? Wink


Oh, going back to the topic of platforms and parenting, I came across Game Boy Escape, a "short" game (if you can finish it quickly).  It show what it's like to move on moving and rotating platforms without parenting. Grin
« Last Edit: October 19, 2017, 02:56:29 PM by io3 creations » Logged

Ishi
Pixelhead
Level 10
******


coffee&coding


View Profile WWW
« Reply #671 on: October 21, 2017, 05:43:09 AM »

Oh, going back to the topic of platforms and parenting, I came across Game Boy Escape, a "short" game (if you can finish it quickly).  It show what it's like to move on moving and rotating platforms without parenting. Grin

Unparented platforms can provide their own kind of challenge, it does have the problem of being unintuitive though! I remember Zool 2 on the Amiga had some platforms like this too.

Since you mentioned platforms...

Bonus Boss Post 1

There are a couple more things about the boss that I wanted to talk about, before I move onto the things I mentioned last time.

I have the boss some solid collision, essentially turning it into a moving platform. The idea is that Leilani shouldn't be able to use post-damage-invincibility to pass through the boss. So, when Leilani touches the boss it'll cause damage but continue to push her. I think it helps with giving the boss the feeling of a big heavy machine.

(Currently, the boss doesn't actually damage Leilani... so she can ride around on it if she wants. Smiley )


Unfortunately, if the boss jumps on Leilani, she gets crushed by the solid part of the collision and it causes insta-death. (She gets crushed by it, which turns her small, and then gets instantly crushed again and dies).


This is too harsh of a punishment; it feels unfair if a full size Leilani can essentially be killed in one hit by the boss.

To solve this I turn off the solid part of the collision at the end of the boss's jump! In my debug view the solid part is represented by the blue boxes, and you can see the bottom one disappear part way through the jump, and not come back until it's clear of Leilani.


Once I've made the boss damage Leilani, she'll just take a single hit in this situation and then the player will have chance to run/roll to safety.
Logged

Ishi
Pixelhead
Level 10
******


coffee&coding


View Profile WWW
« Reply #672 on: October 21, 2017, 06:35:42 AM »

Boss Bonus Post 2

I will cover some of the maths used in the boss's animation / physics.

Jumping

The height of the boss during the jump doesn't use any real physics; it's basically following a predefined curve. This gives me more control over exactly how it moves. It might not work very well in a very dynamic environment - for example Leilani's jump is properly controlled using velocity and forces and stuff. But the boss is in a predictable environment where I can use something more tailor made.

My starting point is a simple half sin wave, shown in the graph here. The X axis is the time, and the Y axis is the height of the jump. (Click the graphs on this page to see the actual equations.)


x = sin(x*pi)

It gives a pretty natural looking jump curve. However I'd like the boss to stay in the air for longer, to give Leilani more time to roll underneath. I could just slow the jump down but it would start to look a bit too floaty and just take too long.

For the solution, let's look at some simple equations below that I use often. This graph is showing the range 0-1 on the X and Y axes.

(Note that 0-1 is a really useful range to work in for equations. For example all my calculations for the height of the jump are based on an input value from 0-1 spread over the time of the jump, and outputs a value from 0-1 representing the height of the jump. I just multiply the output value by the actual height I want the jump to be, for example 3.0 units high in the game world.)


Blue line: y=x
A straight line.

Green line: y=x^2
Square curve, basically multiplying a value by itself. When working in the 0-1 range, this pushes values closer to 0, but still maintains the same value for 0 and 1.
If applied to an animation it slows things down at the start, and speeds them up towards the end.

Red line: y=1-((1-x)^2)
Flipped square curve. Does the opposite of the square curve; it pushes values closer to 1, or when applied to an animation would make it go faster at the start and slower at the end.

So... if I want the tank to spend longer at the height of its jump, I can combine the original sin wave with the flipped square curve. This will push the jump height closer to 1, particularly during the middle of the jump. Let's see the sin wave combined with both types of curve.


Blue line: y=sin(x*pi)  (the same as before)

Green line: y=sin(x*pi)^2
Pushes the height values towards 0, which causes a weird curve where the tank would accelerate upwards at the start of the jump, spend less time at the top, and fall back down gently.

Red line: y=1-((1-sin(x*pi))^2)
The tank speeds up into the air quickly, hovers for longer at the top of the jump to let Leilani run underneath, and then slams back down. But the jump itself hasn't actually taken longer to complete, it all fits within the 0-1 range of the jump time. Good.

Hopefully you can see that combining simple equations together can give you the result you want. If you work within a consistent range (0-1) then you can learn how simple equations work, for example how the square curve pulls values towards 0, and you can use it as a tool to intuitively adjust numbers. Messing around on a graph plotting website is a really good way to see instant results without having to try and visualise it in your head, and without having to program it first.

The code ends up looking like this.

Code:
// Half sin wave curve. m_JumpAnim is a value from 0-1. sinWave will also be in the 0-1 range.
float sinWave = sinf(m_JumpAnim * MATHS_PI);
// Push the value towards 1 so the tank hovers for longer
// FlippedSquare is a helper function which returns 1-((1-x)^2)
float height = Toolbox::FlippedSquare(sinWave);
// Convert to the actual desired jump height.
height *= m_JumpHeight;

Suspension Bounce

The suspension bounce when the boss lands on the floor after a jump also uses a fixed animation, no physics involved. No matter how high the jump is, the result is the same. But this is fine, the bounce is over such a short distance (only a few pixels up or down) that any variation wouldn't mean much.

The approach is much the same as before.


Blue line: -sin(pi*x*2)
A full single sin wave. It's negative (note the '-' symbol at the start) so it goes downwards, and then up, and then back to the middle. That's basically what we want the suspension to do. But it would be strange if the upwards portion of the animation had the same magnitude as the initial downwards portion; we want the suspension to look like it's gradually stabilising the tank's bounce.

Red line: 1-x
A simple line that goes from 1 down to 0. This represents the magnitude of bounce that we want over the course of the animation.

Green line: -sin(pi*x*2) * 1-x
Multiply the values of the two lines, and the magnitude of the bounce is now reduced for the suspension's secondary upwards movement.
« Last Edit: October 21, 2017, 11:17:08 AM by Ishi » Logged

Ishi
Pixelhead
Level 10
******


coffee&coding


View Profile WWW
« Reply #673 on: October 21, 2017, 11:16:48 AM »

Boss Bonus Post 3

Driving to the right place

One of the tank's abilities is to drive to a given position in the world and stop. What's involved in making that happen?

I'm going to ignore the brief drive backwards that the tank does before moving; it's as simple as accelerating in the wrong direction for a fixed period of time, so doesn't add any complexity really.

I'm also going to discuss it as if the tank is always travelling in a positive direction on the X axis (towards the right of the screen). It makes it easier to use terms like "increasing" without worrying about whether the X Velocity is a negative value.

Physics values-
Position: Current x co-ordinate of the tank's position.
Velocity: How much the Position changes per second.

Input values-
Target: The desired x co-ordinate the tank wants to travel to.
Acceleration: The rate at which the tank accelerates - how much the Velocity increases per second.
MaxVelocity: The Velocity that the tank wants to drive at for the duration of its movement.
Deceleration: The rate at which the tank decelerates to a stop - how much the Velocity decreases per second. If this is low it'll skid slowly to a stop, if it's high it'll stop pretty much on the spot.

Most of this is super simple. On a typical frame of the game, the calculations are as follows. frameTime is the length of each frame in seconds.

Code:
// Accelerate forward
Velocity += Acceleration * frameTime

// Cap at the maximum velocity
if Velocity  > MaxVelocity then
    Velocity = MaxVelocity
end

// Apply the movement
Position += Velocity * frameTime

The Velocity increases each frame according to the Acceleration, and the Position increases according to the Velocity, so it goes faster and faster until it reaches the MaximumVelocity, then it travels at a constant speed across the screen.

When the tank starts to decelerate, the calculations look very similar...

Code:
// Decelerate
Velocity -= Deceleration * frameTime

// Have we stopped?
if Velocity <= 0 then
    Velocity = 0
    // Tank has stopped moving, it can now do the next action
end

// Apply the movement
Position += Velocity * frameTime

The big missing piece of the puzzle here is, in order for the tank to stop in the desired place, when should it start to decelerate? For this we need to look at the Equations of Motion. These are a lovely set of equations which are used to make calculations involving motion and constant acceleration (i.e. accelerating or decelerating at a fixed rate) in a single axis.

For the period of time where our tank will decelerate, it'll be doing so at a fixed rate, so we can make calculations about what'll happen during that period. If we could find out the total distance that the tank will cover during its deceleration period, then we know exactly when to begin decelerating in order to stop at the Target.

Our acceleration calculations will now look like this.

Code:
// Accelerate forward
Velocity += Acceleration * frameTime

// Cap at the maximum velocity
if Velocity  > MaxVelocity then
    Velocity = MaxVelocity
end

// Apply the movement
Position += Velocity * frameTime

// What distance would we cover to decelerate to a stop at our current velocity?
Distance = CalculateDecelerationDistance()

// Do we need to begin decelerating?
if (Target - Position) <= Distance then
    // Switch to the deceleration state
end

How do we implement CalculateDecelerationDistance? The equations of motion feature 5 variables, so let's look at what those are.

s: The distance travelled. This is what we're trying to calculate.
u: The starting velocity. We know this.
v: The ending velocity. This is 0.0, because we want to decelerate to a complete stop.
a: Acceleration rate. This is our Deceleration value (Deceleration is just negative Acceleration).
t: The time taken. We don't care about this, we don't care how long it takes for the tank to stop, we only care that it stops in the right place.

Looking at the Equations of Motion themselves, the only one that works for us is v2=u2+2as, because it doesn't involve time. We know every variable, apart from s, which we want to calculate. Rearranging the equation gives us:

s = (v2 - u2) / 2a

v (the ending velocity) is zero so it can be simplified further, because v2 is 0.

s = -u2 / 2a

Code:
CalculateDecelerationDistance()
    return -(Velocity * Velocity) / 2 * Deceleration
end

And so the tank will stop in the correct place.

Side note

One thing to note, is that the equations of motion give perfect answers for what will happen in simple situations of fixed acceleration. However our simulation itself is not actually perfect! Because the velocity and acceleration are both changed in incremental steps (every 60th of a second, or whatever the game's frame rate is), rather than changing smoothly, the end result can be slightly different from what the equations predict. So the tank may actually travel slightly further or shorter and end up overshooting the target position slightly.

In this case I don't care about small errors, which are probably on the sub pixel level. It's worth knowing though, because if you start using the equations of motion to do something like predicting the arc of a thrown grenade, then depending how the grenade's physics are programmed, it may end up landing in a different place than you originally calculated.
« Last Edit: October 21, 2017, 10:50:20 PM by Ishi » Logged

Ishi
Pixelhead
Level 10
******


coffee&coding


View Profile WWW
« Reply #674 on: October 21, 2017, 10:49:52 PM »

Boss Bonus Post 4

Tilting Under Acceleration

When the tank moves around, it tilts backwards and forwards. Rather than being based on the speed, it's based on the acceleration force the tank is undergoing. If you're sitting in a car, you feel the backwards force that pushed you into your seat while the car is accelerating, but once it's at a fixed speed, that force is gone. I'm replicating the same thing here.

Calculating the Acceleration

I calculate the acceleration based on the difference in velocity between the previous frame and the current frame. As with the driving example in the previous post, I'm just working in the X axis here.

Code:
Acceleration = (Velocity - PreviousVelocity) / frameTime

Dividing by the frame time converts the number into a per-second value.

If you're wondering, yes I should already know the acceleration that's being applied to the tank, because I'm applying it in the driving code. But I want the tilt system to be totally independent, so it calculates the acceleration itself. This also means that if I add other methods of moving the tank around, then the tilt system will just work automatically, as it can calculate the acceleration in any system.

Calculating the tilt angle

I think I used an Underdamped Harmonic Oscillator to simulate the tilt. The description sounds very similar to what I did.

The variables in the system are:

TiltAngle: Current tilt angle of the tank, starts at 0 which is in the centre.
TiltVelocity: How much the angle is changing per second.
Acceleration: This is a force that's applied to the angle.
AccelerationStrength: How much does the acceleration actually affect the tilt angle?
SpringStength: The further the tank tilts, the more this force pushes the tank back to the centre.
DampeningStrength: Reduces the TiltVelocity back down to 0 over time, to keep the system stable and stop the tank wobbling all over the place.

So we have already calculated the Acceleration value to feed into the system. First I apply the dampening force. The higher TiltVelocity is, the stronger the dampening should be.

Code:
// abs gives the absolute value, i.e. flips a value to positive if it's negative
float dampeningAmount = abs(TiltVelocity) * DampeningStrength * frameTime

// Apply the dampening amount to the tilt velocity.
if abs(TiltVelocity) < dampeningAmount then
    // dampeningAmount is high enough to fully return us to 0 velocity
    TiltVelocity = 0
elseif TiltVelocity > 0 then
    // Decrease velocity down towards 0
    TiltVelocity -= dampeningAmount
else
    // Increase negative velocity back up towards 0
    TiltVelocity += dampeningAmount
end

Then we calculate the spring force too. The higher the current tilt angle is, the more the spring force counteracts it.

Code:
float springAmount = -TiltAngle * SpringStrength * frameTime
TiltVelocity += springAmount

Then apply the acceleration force too...

Code:
float accelerationAmount = Acceleration * AccelerationStrength * frameTime
TiltVelocity += accelerationAmount

Finally, actually change the tilt angle according to the new velocity.

Code:
TiltAngle += TiltVelocity * frameTime

Now all this needs is some balancing! AccelerationStrength, SpringStrength and DampeningStrength are the magic values that really change how it feels. On my tank, I used the following values:

AccelerationStrength: 1
SpringStrength: 70
DampeningStrength: 13

Also, when I'm rotating the actual sprites, I apply a final multiplier to the TiltAngle, to get exactly the kind of range of angles that I wanted. Once you have the system working nicely, but want to increase/reduce the final angle that's visible on screen, it's way easier to apply a multiplier at the end rather than rebalancing the whole system.
Logged

Ishi
Pixelhead
Level 10
******


coffee&coding


View Profile WWW
« Reply #675 on: October 27, 2017, 10:22:05 PM »

Boss work is continuing nicely; the boss can now fire projectiles, can hurt Leilani on touch, and can be damaged by explosions! It can't actually die yet, though.


Plus I've put together a scripting system for controlling the boss's actions.

Today I'll talk about how the boss as a whole is pieced together.

Boss Code Structure

In my game an entity is an object in the game world. Typically something in the world just consists of a single entity - for example a normal enemy, or a coconut, or a collectable shell.


I've occasionally broken more complex things up into multiple entities. The main reason to do this is that each entity only supports a single hitbox, so using multiple entities allows multiple hitboxes. It can also just help to neaten the code up.

One example of this is that when I added Leilani's bubble powerup, I added the bubble as a separate entity. The bubble entity automatically tracks the Leilani entity's position, and Leilani tells the bubble when to turn on or off. The bubble entity then animates and plays sounds as appropriate. The bubble also has a bigger hitbox, and when it detects a collision that should pop the bubble, it reports that back to the Leilani entity.


The boss uses a similar thing on a bit of a larger scale. There are 3 main types of entity.

The BossScript entity gives high-level orders to the BossController entity, which executes those orders using a collection of BossSection entities, each of which is a visible and collidable component of the boss.

BossScript


This entity is invisible, and doesn't have any collision or anything. When it's created it's given a BossController entity to manage, and also a script to execute.

At its most basic the script can be thought of as just a series of actions to execute. For example...

  • Drive to far side
  • (Wait until finished driving)
  • Turn around
  • (Wait until finished turning)
  • Fire a bomb
  • (Wait 1.0 seconds)
  • Fire a bomb
  • (Wait 4.0 seconds)
  • (Loop back to the start)

In reality the script is more complicated than this, but that's not something to cover in this post.

Some actions can be executed by the BossScript entity itself - for example, "Wait 1.0 seconds". In the case of "Wait until finished turning" the BossScript will query the BossController to check when an action has finished. And actions such as "Drive to far side" are passed to the BossController for it to execute.

This script is stored in a file, the most useful thing about this is that I can edit the file, quickly restart the current level and see the behaviour changes in the boss instantly! No compilation of code or restarting of the game necessary.

BossController


This is a physical entity in the world, which has collision. The hitbox is big enough to represent the whole boss, and this hitbox is used when the boss moves around the world (for example to check if the boss is on the floor or hitting a wall). The hitbox doesn't collide with other objects, such as Leilani - that kind of interactive collision is left to the BossSection entities.

The BossController is invisible. Sprites and animations are responsibilities of the BossSection entities to do.

The most important thing the BossController does is implementing the actions that the BossScript tells it. So if it's told to drive to a point, it accelerates, moves towards the target position, and stops there, as described in recent posts. It can be told to jump, turn around, or to fire a projectile.

It also does the suspension and tilting-under-acceleration animation calculations. Then it passes the resulting positions / rotations through to its BossSection entities.

The layout of the sections is read from a file, similarly to the script, so it can be reloaded instantly by restarting the level. There's a simple tree structure which is used to give the idea of "parenting" the sections to each other purely for the purpose of calculating their positions. For example:

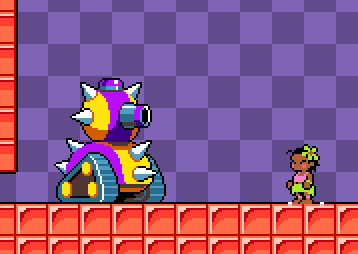
Body: sprite "Body", position 0,-0.2, tiltable, collidable
   \_ Turret: sprite "Turret", type Turret, position 0,-1.8, collidable
        \_ Lid: sprite "Lid", position 0,-1.5
LeftTrack: sprite "Track", type Track, position -1.8,0
RightTrack: sprite "Track", type Track, position 1.8,0

The turret is a child of the body. When the tank accelerates, it's the body that tilts/rotates due to the acceleration, and the turret only rotates because it's attached to the body.

BossSection


Typically each section has a single sprite, and a single hitbox (the orange box). It can also provide solid collision (the blue box) to prevent Leilani from running through it while invincible.

The sections are responsible for handling collision, so if one touches Leilani, it hurts her. If an explosion hits the section, it reports back up to the BossController that the boss should take damage.

There are also some special types of sections such as:
Turret: capable of firing projectiles, it plays unique animations related to this.
Track: as the tank moves, this animates to show the tank tracks rotating.

Summary

Well that was a brief overview of the general idea of how the boss is constructed!

Creating a boss seems to be a good test of a game's technical gameplay systems, as it's way more complicated than most other things in the game. I originally intended on supporting multiple hitboxes in a single entity, for the purpose of doing things like this. It would be quite impractical to tack that functionality on at this point however, and would overcomplicate the general process of checking for collisions. Cobbling multiple simpler entities together to behave as a cohesive whole is simpler on the whole, more flexible, and helps to divide code up into more sensibly sized chunks.

I'm leaning on the data driven aspect of the boss quite heavily (the script file and the section layout file) and it already feels like it's paying off. The convenience of seeing changes instantly can never be overexaggerated. The faster your turnaround time is for iterating and testing ideas, the better!

The rest of October will be spent putting together a proper script for the boss so it can be fought, and maybe giving it some sort of basic 'death' state / sequence. I'm probably going to roll the boss work over into November rather than stopping at the end of October, as I'm not feeling burnt out on it yet, and there are many more aspects of the boss that need to be worked on.
Logged

LyricalReverie
Level 1
*


View Profile
« Reply #676 on: November 08, 2017, 05:24:13 PM »

Clever. Thanks for explaining!
Logged
Ishi
Pixelhead
Level 10
******


coffee&coding


View Profile WWW
« Reply #677 on: November 14, 2017, 12:34:05 PM »

I haven't posted an update in a while, apologies! I've been working away on the boss still - feeling a bit burnt out on it now, I think I should probably stick to my one-month-per-topic plan more closely in the future. I've spent way too long staring at this boss in its red and purple test room.

The boss's attack sequence is now fully implemented, and it can take damage and die. I've done some work on the ending sequence for the boss. Here's a little sneak peek - quite happy with this bouncy text animation.


The boss destruction sequence will be hopefully quite satisfying, and obviously a little more extravagant than the normal end of level sequence!

I've also been working on another important aspect of the boss - a tank needs a driver! The game has been lacking an antagonist for a looong time, I've had ideas for her character here and there but never locked down anything final. I'll try and put together something to show her off in the coming week or two. Smiley
Logged

orzlab
Level 0
**


View Profile WWW
« Reply #678 on: November 14, 2017, 06:08:20 PM »

Your devlog is always amazing to read, and it doesn't hurt that the game looks amazing!
I can't wait to play it!
Logged
Louard
Level 2
**


View Profile WWW
« Reply #679 on: November 17, 2017, 07:40:34 AM »

OMG! I LOVE the spinny-bouncy lettering! And great timing on the confetti as well. In general, you seem to have a great sense of timing in your animations.
Logged

-Louard
louardongames.blogspot.com
Pages: 1 ... 32 33 [34] 35 36 ... 67
Print
Jump to:  

Theme orange-lt created by panic