|
DDRKirby(ISQ)
|
 |
« on: May 24, 2021, 01:29:28 PM » |
|
Welcome to Rhythm Quest! About the gameRhythm Quest is an upcoming 2-button rhythm platformer game being developed by DDRKirby(ISQ).Jump, attack, and fly to the beat to get past challenging obstacles in this rhythm-based twist on a traditional "runner" game. Each type of enemy requires different button sequences to defeat: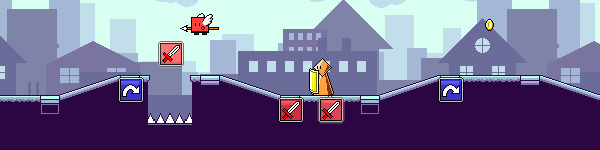 Wings offer extra mid-air jumps, while flight paths require you to hold down the jump button: Wings offer extra mid-air jumps, while flight paths require you to hold down the jump button: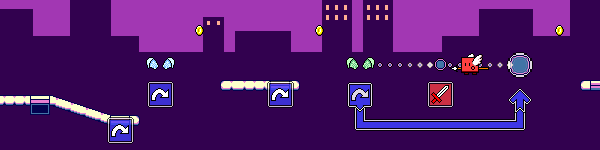 Speed zones change up the rhythm of the song: Speed zones change up the rhythm of the song: - Over 30 levels across 6 different worlds, each with their own musical themes and gameplay mechanics
- "9-bit" chiptune soundtrack hand-crafted to match gameplay rhythms
- Adjustable latency calibration and audio scheduling for tight and responsive gameplay
- Use coins to unlock bonus stages, alternate character skins, and more extras
More detailsRhythm Quest is a labor of love from me, DDRKirby(ISQ). I'm handling 100% of the game, including the art, audio, coding, game design, and management. In particular, I'll be creating all of the backing music tracks for each level, using my trademark "9-bit" modern chiptune style. Being both the game designer and composer for a rhythm game allows me to create music tracks that are mapped out specifically to provide call-outs to obstacles in the game. This worked especially well for previous games of mine. The game is being built using Unity3D, and will be available on Windows/OSX/Linux, as well as Switch, iOS, Android (the 2-button control scheme lends itself quite well to mobile devices). The story so farI first started Rhythm Quest in late 2016 as a side project during a break between jobs, where I built out the core functionality that you see in the demo above. The game had promise and I was pretty happy with what I had built, but it ended up taking a backseat to employment and other projects...until now! I'm happy to report that I've quit my fulltime job and have dedicated myself to attempting to finish and publish Rhythm Quest. About the developerDDRKirby(ISQ) -- that's me -- is a 9-bit chiptune music artist and independent game developer. If you know of me, it's most likely through some of my more popular video game song rearrangements, such as my Katamari Damacy - Lonely Rolling Star remix or my Super Mario 64 - Koopa's Road remix. You can browse my full extensive music catalog on my Bandcamp site at https://ddrkirbyisq.bandcamp.com/. I'm also a veteran participant in the weekend-long "Ludum Dare" game jam, having made 25 jam games over the past 10 years. Some of my more notable entries include the music games Ripple Runner, Melody Muncher, and Samurai Shaver, which took 1st place overall in Ludum Dare 40. LinksRhythm Quest on Steam: https://store.steampowered.com/app/1635640/Rhythm_Quest/Rhythm Quest main website: https://rhythmquestgame.comMy main website: https://ddrkirby.comRhythm Quest discord server: https://discord.com/invite/w3paJPchmbTwitter: https://twitter.com/RhythmQuestGameAlso feel free to follow my generals: Twitter: https://twitter.com/ddrkirbyisqYouTube: https://www.youtube.com/ddrkirbyisqitch.io: https://ddrkirbyisq.itch.io/Patreon: https://www.patreon.com/ddrkirbyisqFacebook: https://www.facebook.com/DDRKirbyISQMusic |
|
|
|
« Last Edit: February 09, 2023, 04:30:27 PM by DDRKirby(ISQ) »
|
 Logged
|
|
|
|
|
Silkworm
|
 |
« Reply #1 on: May 25, 2021, 07:28:46 AM » |
|
Oh hey! I love your music, I'd play this just for that honestly even though I'm not much of a rhythm game player. With only two buttons it seems casual enough and perfect for mobile. Looks (and sounds of course) pretty nice, satisfying and juicy already. Good luck with this!
|
|
|
|
|
Logged
|
|
|
|
|
DDRKirby(ISQ)
|
|
« Reply #2 on: May 25, 2021, 02:36:56 PM » |
|
Jump ArcsI spent some time yesterday refactoring and refining the jump mechanics for Rhythm Quest and thought I'd write a bit about it, since it's more interesting than it might seem at first blush. In Rhythm Quest, each (normal) jump is roughly one beat in length. The exact horizontal distance varies, though, since the scroll rate is different for each song (and even within a song). 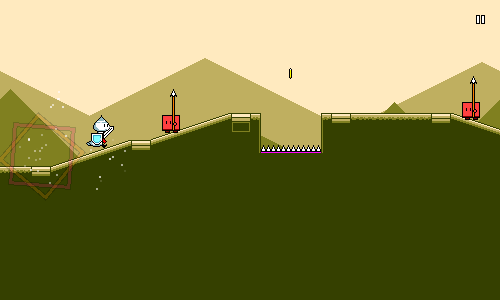 The naive approach The naive approachYour first instinct when implementing something like this might be to use simple platformer-style tracking of vertical velocity and acceleration: void Jump() {
yVelocity = kJumpVelocity;
}
void FrameUpdate(float deltaTime) {
yVelocity += kGravityConstant * deltaTime;
yPosition += yVelocity * deltaTime;
}
Here we're essentially using a "semi-implicit euler integration", where we modify the differential velocity and position at each timestep. Surprisingly, it's actually fairly important that we modify the velocity before the position and not the other way around! See https://gafferongames.com/post/integration_basics/ for more on this. There are a number of issues with this approach. Probably the biggest one is that the behavior is different depending on the framerate (deltaTime), which means that the jump will behave differently depending on the FPS of the game! You can fix that by using a fixed timestep to do this physics calculation instead of a variable timestep (Unity and Godot both provide a FixedUpdate physics processing step for this purpose). The other problem is one that's specific to Rhythm Quest... The problemSo after some algebra (or trial and error), we have our jump velocity and gravity figured out. The jump paths look something like this: 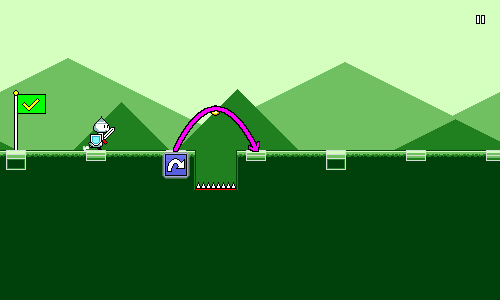 That's all fine and good, but when we add height changes into the mix, it's a different story: 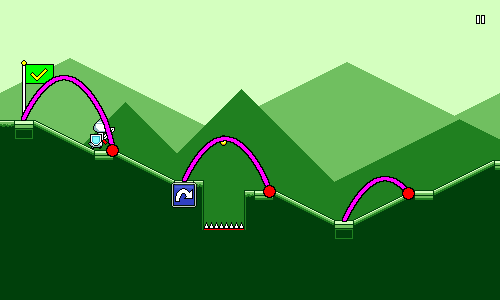 The sloping ramps in Rhythm Quest aren't actually supposed to have any bearing on gameplay -- they're mostly there for visual interest and to accentuate the phrasing of the music (it looks a lot more interesting than just running across an entirely flat plain). But they're actually causing gameplay issues now, since they throw off the duration of each jump. It might not seem like much, but it can add up and cause mistakes, especially in sections like this: 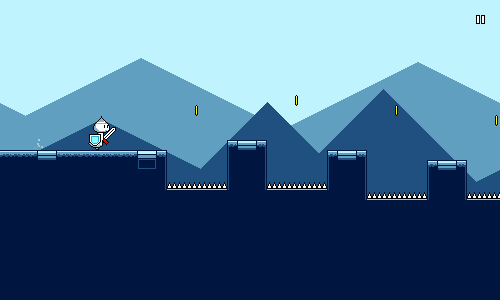 The above gif looks perfectly-aligned though, because it's using a better and robust solution. How did I manage to dynamically alter the jumping behavior to match the changing platform heights?A more robust solutionThe first thing we need to do is throw out our ideas of having a predetermined/fixed jump arc, since that obviously didn't work. Instead, we're going to calculate each jump arc dynamically. No trial-and-error here, we're going to use quadratics! The fundamental equation for a parabolic / ballistic arc trajectory is given by y = ax^2 + bx + c. If we assume a start position of x = 0 and y = 0 (this would be the start of the jump), then we can simplify that to y = ax^2 + bx. In other words, if we know the two constants a and b, then we can just plug them into this equation and have a mapping between y and x which will trace out an arc. a here represents our "gravity" term and b represents our initial velocity. Since we have two unknowns (a and b), we can solve for them if we're given two nonzero points. In other words, we just need to pick two points along the path of the jump arc, and then we can solve the algebra and have a formula that we can use to calculate our y-coordinates. The whole idea of this exercise is to have the player land exactly on the target position at the end of the jump, so let's pencil that in as one of our points (shown here in green). To make our lives easier, we'll say that the x-coordinate at this point is 1: 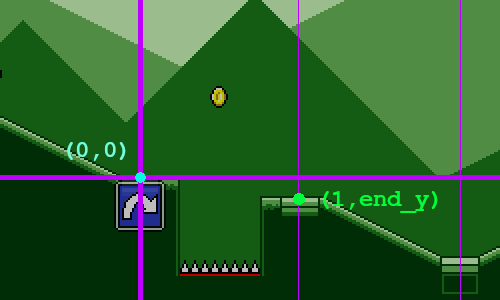 Of course, in order for this to work, we need to know exactly what end_y is. We could try to calculate this using a raycast, but that wouldn't work if your jump "landing" position isn't actually on the ground (e.g. you mis-timed a jump and are going to fall into a pit!). Instead the way that this works is that I have a series of "ground points" that are generated on level initialization. These form a simple graph of the "ground height" of the level, minus any obstacles. This lets me easily query for the "ground height" at any x-coordinate by using linear interpolation. Conceptually it looks like this: 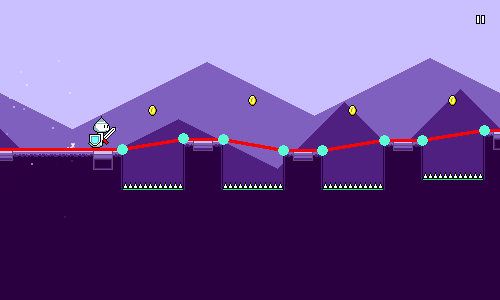 For our third point, let's just have that be in the middle of the jump horizontally. 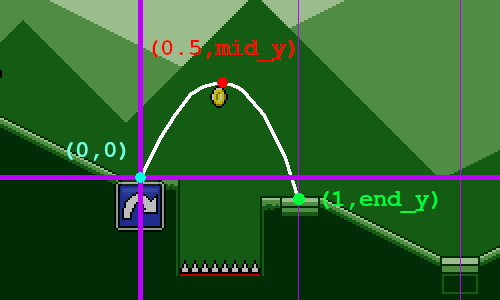 There are a couple of different options we could use for determining mid_y, the height of this point. Here's what I ended up with after some twiddling around: // Some constant base jump height.
float midHeight = GameController.JumpHeight;
if (yDiff > 0.0f) {
// The end of the jump is higher than the beginning.
// Bias towards jumping higher since that looks more natural.
midHeight += yDiff * 0.5f;
} else {
// The end of the jump is lower than the beginning.
// Here I bias towards jumping lower, but not as much as above.
// It ends up looking a bit more natural this way.
midHeight += yDiff * 0.25f;
}
We have all of our variables and knowns, so let's actually do the math now! We have two equations that we get from plugging in our two points into the basic formula y = ax^2 + bx: mid_y = 0.25a + 0.5b // x = 0.5, y = mid_y
end_y = a + b // x = 1, y = end_y
This is extremely easy to solve -- just multiply the top equation by two and take the difference. In the end we get: a = 2 * end_y - 4 * mid_y
b = end_y - a
Now that we know a and b, we can store them and then use them to trace out the path of the arc! So to wrap it up, each time the player presses jump, we:- Store the beginning x-coordinate and y-coordinate
- Calculate a and b as shown above
- On subsequent frames, set y = ax^2 + bx + starting_y
The end result, once more: This is way better than our naive solution from the beginning of the article. Not only does it work with varying heights, but we derived an exact equation to trace out our jump arc (no approximations!), which means we can just update the visual x and y coordinates in the rendering update instead of having to deal with physics-based timesteps. A few extra things I also ended up doing to make the jumps feel better:First, I made jumps actually last slightly shorter than one beat. This is because it looks more natural to have a short period where the character has definitively landed on the ground before the next jump. This also allows for some more leeway for timing consecutive jumps, and ensures that timing errors don't compound unfairly. I also allow for early jumps -- in other words, you can re-jump slightly before you actually touch the ground. This again helps with ensuring that timing errors don't compound, and is a nice quality-of-life improvement for players. In this case I make sure to "snap" your y-coordinate downwards at the beginning of the jump, so it still looks as if you ended up touching the ground (even though you didn't really).
|
|
|
|
|
Logged
|
|
|
|
|
DDRKirby(ISQ)
|
|
« Reply #3 on: June 07, 2021, 01:51:55 PM » |
|
Flying Mechanic and Level GenerationAfter a bunch of work, I finally have a new core mechanic working in Rhythm Quest! This video showcases the flight mechanic, where you need to press and hold the jump button in order to traverse a flight path using a wing pickup. I should take this chance to explain briefly how level design works in Rhythm Quest. Wayyy back in the infancy of Rhythm Quest development, levels were built using the Tiled map editor ( https://www.mapeditor.org/). It looked something like this:  While this provided a nice visual representation of what the level looks like, it was severely limiting. The scrolling speed of the gameplay couldn't be adjusted at all, as it was locked to the tile width. In addition, it took ages to lay out all the tiles for the level, and iterating on the design was painful -- changing the ramp/height structure for one section affected the entire rest of the map, which was mess to deal with in the editor. Every single beat marker also needed to be placed by hand. It became clear pretty quickly that this wasn't going to be workable in the long run. Here's what a level looks like now: "level1-1",
new LevelData() {
PrettyName = "Level 1-1\nSunrise Sonata",
BeatsPerChar = 1.0f,
Obstacles =
"#... .... ..1. ..1. ..1. ..11" +
"#.^. ..^. ..^. ..^^" +
"#.<< ..11 ..-- ..11" +
"#.^1 ..^1 ..++ 1111" +
"#+.1 .+.1 .+.+ .111" +
"#<.1 .<.1 .111 1..." +
"#.+. ..-. ..-. ..--" +
"#.1. ..1. ..11 1...",
Height = "" +
".... .... .... .... .... ...." +
".... .... .... ...." +
".... .... .... ...." +
".c.. .c.. .C.. CCBB" +
"...c ...C .... .cC." +
"...c ...c .ccc ...." +
".C.. .c.. .c.. CC.." +
".C.. .c.. ..Cc ....",
Checkpoints = new []{
new CheckpointData { Hue = 0.0f, PixelsPerBeat = 80.0f, RespawnOffset = 8.0f },
new CheckpointData { Hue = 0.0f },
new CheckpointData { Hue = 30.0f },
new CheckpointData { Hue = 30.0f },
new CheckpointData { Hue = 240.0f, PixelsPerBeat = 140.0f },
new CheckpointData { Hue = 270.0f },
new CheckpointData { Hue = 150.0f, PixelsPerBeat = 110.0f },
new CheckpointData { Hue = 120.0f },
},
ExtraEvents = new []{
new LevelGenerator.EventData(10.0f, LevelGenerator.EventType.AttackTutorial),
new LevelGenerator.EventData(26.0f, LevelGenerator.EventType.JumpTutorial),
},
}
That's right, the level is just a bunch of simple string constants! There are two main strings that are relevant here: Obstacles and Height. Obstacles denotes the actual gameplay elements such as enemies and jumps. Each character denotes something specific, so for example the # symbol represents a checkpoint and the ^ symbol denotes a jump over a pit of spikes. 1 and 2 represent single and double hit enemies, respectively. A period (.) represents a beat with no obstacle (whitespace is ignored and is used for organization only). Each character represents 1 beat by default, but this can be changed on a per-level basis. Height denotes the slopes/ramps going up and down over the course of the level (this is for the most part purely for visual interest and variation). This has its own separate string since it's often the case that ramps and obstacles happen at the same time. The LevelGenerator script is responsible for taking these instructions and actually creating the entire level programmatically via instantiating and initializing various objects (prefabs). In the end, the level looks something like this in Unity's scene view: 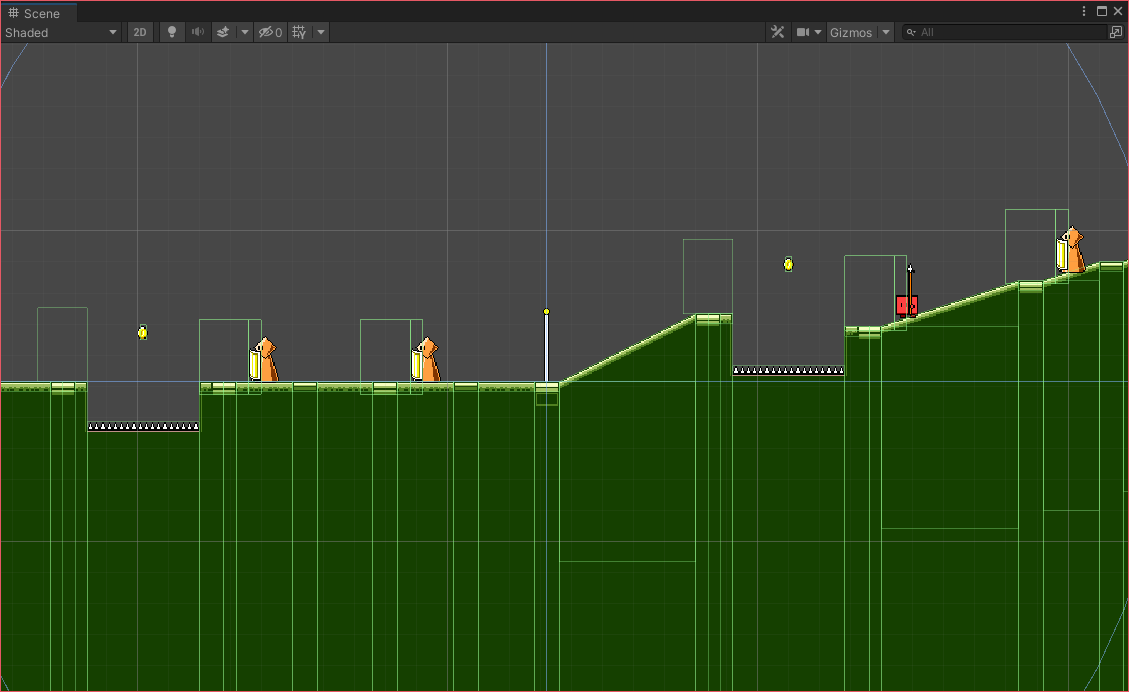 As you can see, the ground is actually made of a ton of different segments/pieces. I'm making heavy use of Unity's sprite tiling functionality here to create blocks of arbitrary width and height, so I just need to provide a set of about 9 different graphics/prefabs and then the level generator can build everything out of those. This level generation process is one of the main things that I'll be working on over the next month or two as I strive to add additional core (and side) mechanics to the game. The flying mechanic shown earlier, for example, involved adding a bunch of code for generating the waypoints in the flight path as well as the spike segments below. Some of my future mechanic ideas will also probably involve major refactors to this code, to support things like triplet meters, more complicated obstacle combinations, etc. While there's some additional up-front cost involved in designing out the level generation system programmatically like this, the ability to iterate and build out levels quickly more than makes up for it in the end.
|
|
|
|
|
Logged
|
|
|
|
|
DDRKirby(ISQ)
|
|
« Reply #4 on: June 11, 2021, 02:51:57 PM » |
|
Music/Game synchronizationToday I'm going to be taking an initial look at Rhythm Runner's music synchronization code, both as an informative technical log and also as a way to refresh my memory of the system that I've ended up building. There's a LOT of under-the-hood logic that goes on in trying to keep everything working properly, so there will probably be some more followup posts about music sync. For now, let's try to cover the basics (synchronizing gameplay to a backing music track). BackgroundThe art of synchronizing music to gameplay is a bit of an arcane one, with numerous compounding factors and difficulties interfering with what seems like a simple concept. As much as you'd like to just "play the music and start the game at the same time", audio buffers, DSP timing, input latency, display lag, timing drift, and other things need to be considered in order to have a robust approach. The exact nature of these problems and their corresponding solutions are also engine-specific most of the time. Regardless, here is a brief but nonextensive list of the things that can go wrong when using a naive latency-unaware approach to music/gameplay synchronization: Audio scheduling - Telling an audio clip to play doesn't send audio data to the hardware instantaneously. The audio needs to be loaded, scheduled, mixed, etc. Audio buffering - Audio is mixed using circular buffers and the exact size of these buffers adds some amount of latency to audio output. Frame-based timing - Input/audio/timing is often handled on a per-frame basis, even if the actual events happened between frames. Input latency - There may be some amount of input latency, either hardware or (more likely) from the game engine, particularly for touch-based inputs. Visual/display latency - There's some amount of delay before a visual update can actually be seen on the screen (vsync, monitor lag, etc.) Player - Players can "expect" certain amounts of latencies due to previous experience with other games Etc... I'd highly recommend studying the notes of Exceed7 Experiments (https://exceed7.com/native-audio/rhythm-game-crash-course/index.html) on this subject if you're unfamiliar with thinking about these sorts of concepts.A Naive ApproachAn initial stab at creating music/gameplay synchronization might be to do something like this: void Update() {
player.transform.position.x = audioSource.time * SOME_SPEED_CONSTANT;
}
This works great for a quick-and-dirty prototype (it's essentially what I did for the initial version of Ripple Runner way back in the day...), but unfortunately, there are a couple of problems here: First, this isn't latency aware, so all of the problems that are listed above apply. audioSource.time tells you "the playback position of the clip from the point of view of the engine", but this doesn't take into account all of the additional processing steps that happen later down the audio processing chain. Second, audioSource.time doesn't actually update smoothly between frames. So you may get odd results like audioSource.time reading the same value in two consecutive frames, or changing by twice as much during one frame as the next, which results in stuttery movement. Fundamentally this is due to the audio system running on an entirely different timeline than normal "game time", but also because this value is based on the start of the current audio buffer, not the current playback position. Using PlayScheduledUnity exposes an AudioSettings.dspTime value which will return the current time from the audio system's point of view. From here on out I'll refer to this as "DSP Time", as opposed to "Game Time" which is the frame-based timing that you'd get from Unity's Time.unscaledTime value. If you ever get confused, remember that for the most part, doubles are DSP time and floats are game time. We can use Unity's AudioSource.PlayScheduled function in order to schedule our backing track in advance at a particular Audio DSP time. Given enough of a scheduling window (I use a full second, which should be plenty), this guarantees that the audio track will consistently start playing exactly at that Audio DSP time (though of course, there will still be latency...). We call this schedule point _audioDspStartTime. This represents the DSP Time at which the music track first starts playing. void Start() {
_audioDspStartTime = AudioSettings.dspTime + kStartScheduleBuffer;
_musicSource.PlayScheduled(_audioDspStartTime);
}
Unfortunately, there's no "exact" way to map from a DSP timestamp to a game time value, since the two systems update at different intervals. However, we can get pretty close by using a linear regression. The Twitter thread at https://twitter.com/FreyaHolmer/status/845954862403780609 contains a graph illustration of what this looks like, if that helps. I have an AudioDspTimeKeeper script that is responsible for managing this linear regression mapping throughout the application's lifetime: void Update() {
float currentGameTime = Time.realtimeSinceStartup;
double currentDspTime = AudioSettings.dspTime;
// Update our linear regression model by adding another data point.
UpdateLinearRegression(currentGameTime, currentDspTime);
}
Here, UpdateLinearRegression() is just a bunch of statistics math that uses the average, variance, and covariance to establish a linear regression model. I'm sure you can find an implementation in your favorite programming language if you search for it. Currently I keep a rolling average of 15 data points for this regression. The output of the linear regression model is a set of two coefficients which determines a line mapping, so we can then expose the following function: public double SmoothedDSPTime() {
return Time.unscaledTimeAsDouble * _coeff1 + _coeff2;
}
There's one more detail that needs to be addressed, which is that since our linear regression model is constantly being updated, we might get a little bit of jitter. That's fine, but we should make sure that our SmoothedDSPTime() function is monotonically increasing, otherwise there's a chance that the player might move backwards for a frame, which would probably break a lot of things: public double SmoothedDSPTime() {
double result = Time.unscaledTimeAsDouble * _coeff1 + _coeff2;
if (result > _currentSmoothedDSPTime) {
_currentSmoothedDSPTime = result;
}
return _currentSmoothedDSPTime;
}
We now have an AudioDspTimeKeeper.SmoothedDSPTime() function that will give us the (smoothed) current audio DSP time for the current frame. We can now use this as our timekeeping function, in conjunction with our _audioDspStartTime that we set when we first scheduled the backing music track: double GetCurrentTimeInSong() {
return AudioDspTimeKeeper.SmoothedDSPTime() - _audioDspStartTime;
}
And we can simply swap this into our naive approach: void Update() {
player.transform.position.x = GetCurrentTimeInSong() * SOME_SPEED_CONSTANT;
}
Adding latency compensation into the mix is actually really easy! We can add it here: double GetCurrentTimeInSong() {
return AudioDspTimeKeeper.SmoothedDSPTime() - _audioDspStartTime - _latencyAdjustment;
}
So for example, with a latency adjustment of 0.05 (50 milliseconds), GetCurrentTimeInSong() will return a value 50 milliseconds lower than it would normally, which means that the player's position will be slightly to the left of where it otherwise would be. Of course, the hard part is determining what _latencyAdjusment should be, as this is extremely device-specific and will need to be determined via player calibration. But that's a subject for another time... Resynchronization FallbackIn theory and in practice, everything above works just great. ...as long as nothing goes wrong. However, the system is a little brittle, as it depends on a single reference point for song progress (this is our _audioDspStartTime value). Usually this is fine, but there are a number of things that could cause the audio playback to stutter and become misaligned with what should actually be playing: Audio buffer underruns if the audio buffer size is too low to mix everything in time Some sort of CPU spike which causes the application to lag The application could be forcibly paused -- for example, this happens when dragging/resizing applications around the desktop in Windows. The application could be minimized, or even backgrounded on a mobile device etc... As a sanity check, I check our smoothed DSP time against the value from AudioSource.time. As mentioned earlier, we should never use this value directly in our game calculations due to jitter, but it still provides a nice sanity check in case something went wrong. void CheckForDrift() {
double timeFromDSP = AudioDspTimeKeeper.SmoothedDSPTime() - _audioDspStartTime;
double timeFromAudioSource = _musicSource.time;
double drift = timeFromDSP - timeFromAudioSource;
if (Mathf.Abs(drift) > kTimingDriftMargin) {
Debug.LogWarningFormat("Music drift of {0} detected, resyncing!", musicDrift);
_audioDspStartTime += musicDrift;
}
}
Currently I have kTimingDriftMargin at 50 milliseconds, which doesn't seem to trigger unless something actually did go wrong. Unfortunately, this "resync correction" won't be as good or consistent as the original synchronization, but hopefully this won't be needed very often and is just a failsafe. In the future, I'll probably need to add additional fallbacks here, in case for example the audioSource stops playing entirely for some reason, or never starts even though PlayScheduled was called. This is currently a TODO item for me! Phew! Apologies for the lack of images in this post, but unfortunately animated gifs don't really help when trying to show off audio synchronization and I don't happen to have any fancy diagrams on hand to help explain this stuff. :x Hopefully this all made some amount of sense regardless! If not, again I would highly recommend reading Exceed7's work on this (see https://exceed7.com/native-audio/rhythm-game-crash-course/backing-track.html for the post on backing track synchronization) for a more detailed explanation.
|
|
|
|
|
Logged
|
|
|
|
|
Jasmine
|
|
« Reply #5 on: June 11, 2021, 06:56:31 PM » |
|
This is an awesome concept!
|
|
|
|
|
Logged
|
|
|
|
|
DDRKirby(ISQ)
|
|
« Reply #6 on: June 18, 2021, 02:58:06 PM » |
|
Water/Air Jump PrototypingNo technical deep dive this week -- instead I just wanted to post a video showing off some new mechanics that I've been prototyping. The first new mechanic is "water sections" where the scroll rate of the song slows down:  I haven't completely decided how to use this yet. In the video above I've done some playing around with making these sections feature triplet meter as a way of making the rhythms more interesting, but I'm not too sure I'll stick to that as most of my other mechanics aren't built for it and it doesn't seem to have a ton of depth. Perhaps that might be better as a separate type of enemy? So right now it's mainly just an aesthetic thing that changes the feel of that section of music. It also does slows down your jump speed, as that seemed to fit nicely, so jumps are two beats instead of one. The key is going to be building the music in a way that makes sense with these sections (halftempo drums, pitch shifting, etc). This will probably be more of a one-world gimmick than a mainstay mechanic for the entire game. Visually I've reused the water shader from level 1-3, which uses simple sine wave patterns to offset the drawn texture. For capturing the input to the shader, you could use a GrabPass, but I instead chose to implement this by using a Render Texture. For each underwater section, there's a separate camera which grabs what would be shown on the screen and writes it to a Render Texture. There's then a simple rectangular quad Mesh Renderer that draws the Render Texture on top of everything else using my water shader. (Of course, this quad should to be invisible to the water camera) It's important that the quad is drawn above everything else, but unfortunately, Unity doesn't actually expose the 2D sorting order of the Mesh Renderer component in the inspector. Luckily, you can expose it using an editor script: see https://gist.github.com/pavel-fadrhonc/ecbe4ff18e1a4a38a62214bbab69a0e2There's some other things that I could do to get this looking nicer (bubble particles, color tweaks, better "splash" animations), but this is working fine for now. The next set of things that I've been working on is mid-air jumps and the ability to support various complex combinations of jumping and flying. The mid-air jumps were simpler to implement than the press-and-hold flight paths, and I actually had them working a while ago, but the code was pretty old and needed to be brought back up to speed to function properly again.  This is where you can really see the rhythms start to get more complex. Obviously I wouldn't throw players into this sort of dense pattern right off the bat; these sequences were designed to test my level generation code more than anything else. Getting all of this working involved a bunch of changes to the level generation code, as there were previously a lot of assumptions being made there that are no longer true with these combinations. I'll have to continue to clean this up in the future as well -- it's an ongoing process as I add in more features and learn more about the best way to structure things. Fortunately, it seems to be in pretty decent shape so far.
|
|
|
|
|
Logged
|
|
|
|
|
DDRKirby(ISQ)
|
|
« Reply #7 on: June 25, 2021, 02:19:03 PM » |
|
Spike/Teleport Enemies DemoThis week I continued mostly working on new mechanic prototyping. I've got a couple more new things to show off! First up we've got these new teleporting ghost enemies: 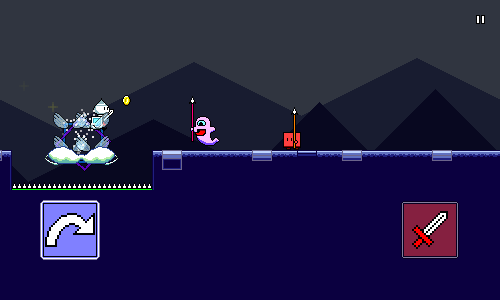 Each one of these takes three hits to destroy and currently uses a dotted-quarter-note rhythm to provide some syncopation. I can potentially switch this rhythm per-level, but I think the three dotted-quarter-note hits probably work better than anything else so I don't really see a need to do that. I wanted another attack-based mechanic and thought this might be a good one as it makes reading rhythms a bit less obvious. The double-hit enemies play around in a similar space, but this one is a bit more complicated as it can be interleaved with other obstacles. Part of the charm of making a platformer/rhythm hybrid is that you can make the rhythms harder to "translate" than with traditional music games, so your brain has to work a little more to parse them out. My other game Melody Muncher plays with this in the same way. There's a neat little after-image "teleport" effect that's used between hits. Here's what that looks like slowed down: 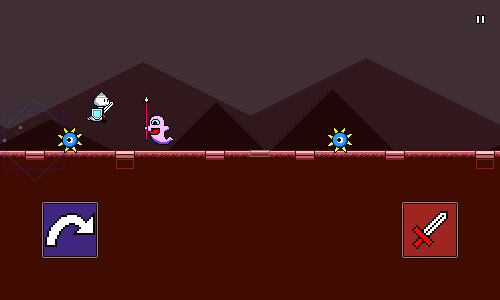 Implementation-wise this is actually pretty simple. The enemy object moves at a fast rate towards the destination (actually, the hitboxes and main entity teleport there instantly; it's just the visuals that lag behind), and as it does so, it emits particles. The yellow star particles are pretty obvious -- they just get created with a random outward velocity and fade out quickly. However, the "after-images" are also actually particles as well -- they just happen to not have any motion, so they just appear and then fade out while remaining in place. (and they of course are sized to be the same as the actual main sprite) Intuitively, you could implement this by simply attaching a particle emitter to the enemy and then toggling it on and off. I actually didn't do that -- I chose instead to just have a global particle emitter that's shared across all of the enemies, and then each enemy just tells that global emitter to emit particles at the appropriate locations. This is most likely (?) better for performance, though it probably doesn't matter a ton here. As a final touch you might notice that the main enemy sprite flashes as it travels. This is done very simply using a shader that inverts the color of the sprite. Something like this: fixed4 frag(v2f IN) : SV_Target
{
fixed4 texcol = SampleSpriteTexture (IN.texcoord) * IN.color;
if (_Invert) {
texcol.rgb = float3(1.0, 1.0, 1.0) - texcol.rgb;
}
// ...
return texcol;
}
The "_Invert" flag here uses Unity's "[PerRendererData]" construct along with "MaterialPropertyBlock"s so that it can be modified per instance whilst still using a single shared material. Feel free to read up on those concepts elsewhere if that all sounds foreign to you. Next up we have these fun little rolling spike enemies: 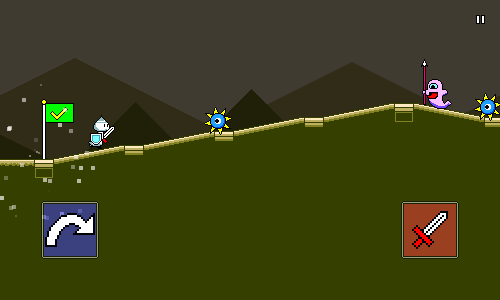 These were actually incredibly easy to code up. The entirety of the SpikeEnemy script looks like this: public class SpikeEnemy : MonoBehaviour
{
[NonSerialized]
public float Beat; // This gets set during level generation.
protected virtual void Update() {
float currentBeat = MusicController.CurrentBeat();
float x = LevelController.Stats.BeatToX(Beat + 0.5f * (Beat - currentBeat));
float y = LevelController.Stats.XToGroundY.Get(x);
transform.position = new Vector3(x, y, 0.0f);
}
}
That's it! The actual interaction is done by simply affixing a "killzone" collider to it -- I already have logic setup so that any collider that is in the "Death" layer ends up triggering a respawn instantly on contact. LevelController.Stats is the bookkeeping singleton that gets populated with all sorts of different lookup/conversion functions and tracking data during the level generation process. For example, converting between x-coordinates and music beats, or looking up the height of the "ground" at a given x-coordinate, or what the player's y-coordinate is supposed to be at a given x-coordinate. The only real tricky part here is the calculation of the x-coordinate, which uses a funny Beat + 0.5f * (Beat - currentBeat) calculation. This is essentially just making it so that when currentBeat = Beat, we just use BeatToX(Beat) which places the enemy at the appropriate x-coordinate. And outside of that, the 0.5f * currentBeat factor means that the enemy will travel to the left at 50% the speed of the song. (100% would be too fast to react to!) One other thing I showed off in the video is the seamless respawn procedure, which gives you a "rewind, cue in" when you restart a section, all to the beat: 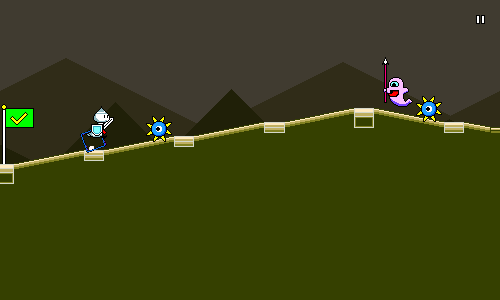 I could easily write an entire article on how this is done (though I've forgotten about a lot of the details since I implemented it ~2 years ago), but essentially, the game is always playing a seamless background loop that's perfectly in sync with the main music track -- except it's muted during normal gameplay. When you respawn, we mute the normal track and unmute the background track. (Since they're both in sync, the beatmatching is preserved) Then it's just a matter of calculating the next downbeat at which we can drop the player into the checkpoint. We then figure out the timing and scheduling for rewinding the music position to the appropriate point, reschedule audio playback, and set up the appropriate tweens. That's all super complicated to actually achieve in practice, but I'm going to just handwave it all away at the moment as I don't want to get into it right now. But it's all very slick when it comes together and really lets you stay in the action across respawns. The last thing I wanted to point out today is more of a minor change. There's now a "cloud poof" animation for air jumps, as well as a quick _Invert flash, which is meant to serve as a more obvious/flashy visual confirmation for doing air jumps and flying:  Phew -- that's all for this week!
|
|
|
|
|
Logged
|
|
|
|
|
DDRKirby(ISQ)
|
|
« Reply #8 on: July 02, 2021, 02:49:47 PM » |
|
Build PipelinesI didn't work on anything exciting this past week (menu handling, accessibility, localization, fonts...), so I thought that I'd instead do a brief run-down of the build pipelines for Rhythm Quest. Build and deploy flows are always changing (for better and worse...) so the steps here might become outdated at some point, but perhaps it'll serve as a useful starting point for someone else thinking about how to make builds and deploys more convenient. PremiseThe first thing you should understand is how painful it is to execute and deploy a game manually, without any sort of build automation or scripting. Here are the rough steps needed in order to build and deploy a new build of a Unity game for iOS: Switch Unity platform to iOS (Wait a long time for assets to reimport...) Start the build from Unity -- an XCode project is created (after some time...) Open the XCode project and create a project archive (Wait a long time for the build to finish...) Upload the archive to the App Store Wait a long time for the archive to be uploaded and processed by Apple Login to App Store Connect, approve the new build and deploy to Testflight ...and that's just for ONE build platform. Rhythm Quest supports iOS, Android, Windows 32-bit, Windows 64-bit, Mac, and Linux, so just imagine going through a similar (but different!) set of steps for 6 different builds. It's clear that we need some sort of automation structure in order to make our lives easier. Unity Batch Mode The first improvement we can make is to allow Unity to make builds through the command-line. This is done by creating static methods that execute the build via BuildPipeline.BuildPlayer(), then using the -batchmode, -nographics, and -executeMethod flags to run Unity in batch mode and execute that build method. You can do a bunch of other logic in your build method while you're at it, for example reading the version number from a text file: string version = PlayerSettings.bundleVersion;
try {
using (TextReader reader = File.OpenText(Application.dataPath + "/Publishing/version.txt")) {
version = reader.ReadLine();
}
Debug.LogFormat("Using {0} as bundle version", version);
PlayerSettings.bundleVersion = version;
} catch {
Debug.LogErrorFormat("Unable to read bundle version from version.txt, using {0} as version", version);
}
Or using compile-time define flags depending on build parameters, useful for something like demo builds: string scriptingDefines = demo ? "DEMO" : "";
PlayerSettings.SetScriptingDefineSymbolsForGroup(BuildTargetGroup.Standalone, scriptingDefines);
PlayerSettings.SetScriptingDefineSymbolsForGroup(BuildTargetGroup.iOS, scriptingDefines);
PlayerSettings.SetScriptingDefineSymbolsForGroup(BuildTargetGroup.Android, scriptingDefines);
We can now run a Unity build via command-line, but there's still a ton of other steps that need to be done, like incrementing the bundle version number, building the XCode project, uploading to Testflight, etc. The best tool I've found to handle all of this stuff is fastlane ( https://docs.fastlane.tools/). Fastlane allows you to define different "lanes", each which will execute a given sequence of actions for your project. Here's what my iOS build lane looks like (excuse the hardcoded Unity path): lane :ios do
unity(
build_target: "iOS",
unity_path: "/Applications/Unity/Hub/Editor/2021.1.7f1/Unity.app/Contents/MacOS/Unity",
execute_method: "BuildScripts.Ios",
)
increment_build_number(
build_number: latest_testflight_build_number + 1,
xcodeproj: "./Builds/ios/Unity-iPhone.xcodeproj",
)
gym(
project: "./Builds/ios/Unity-iPhone.xcodeproj",
xcargs: "-allowProvisioningUpdates",
output_directory: "./Builds/ios",
)
end
The idea of defining a sequence of actions is pretty trivial -- you could just script that yourself if you wanted to. The real value in using fastlane is having access to the large repository of built-in functions for interfacing with the iOS and Android ecosystem. For example, the increment_build_number command is able to automatically bump the build number of an XCode project file, so you don't have to modify it manually. Even better, the latest_testflight_build_number + 1 snippet actually executes a separate command which logs in to Testflight, pulls down build info, and grabs the latest build number, then adds 1 to it. Fastlane also provides commands for deploying the packages once built: lane :deploy_ios_testing do
changelog = File.read("../Assets/Publishing/changelog.txt")
app_store_connect_api_key(
key_id: ********,
issuer_id: *******************************,
key_filepath: ***************,
)
upload_to_testflight(
ipa: "/Users/ddrkirbyisq/Coding/network-share/rhythm-quest/ios/latest/RhythmQuest.ipa",
distribute_external: true,
groups: "ExternalTesters",
changelog: changelog
)
end
No need to paste your changelog into App Store Connect manually -- fastlane can automatically read it from a file and take care of it for you! No need to wait until your build finishes processing -- fastlane can poll the App Store Connect backend and automatically trigger the distribution of the new build! Though I ran into a few minor issues with fastlane (Unity builds stalled when executed through fastlane on windows for some odd reason), for the most part it is well-documented and takes care of a lot of the annoying heavy lifting around Android/iOS deployment for you. JenkinsNow that we have nice fastlane/shell commands for doing builds and deployments, we can move onto managing our build pipelines via a more structured system. Jenkins ( https://www.jenkins.io/) is an open source automation server that's commonly used for this sort of thing. Normally in larger teams you'd host Jenkins on some sort of build machine that anyone can access remotely, but for my purposes I'm simply running it locally on my own machines and hitting it via localhost:8080. You could of course just manually run the build/deploy commands yourself, but using Jenkins provides a number of advantages over that approach: Ability to manage multiple workspaces -- important since Unity can't do multiple simultaneous builds in the same workspace Comes with built-in integration with git -- can auto-fetch the latest commit to build, deal with submodules, etc. Provides simple visual indications (or even email notifications) of build status/success Retains console log output so you can diagnose/debug when something went wrong etc... I actually have two separate instances of Jenkins running on different machines. This is an unfortunate necessity since there's currently no way to make all of the necessary builds using a single OS -- iOS/OSX builds can't be made from Windows and Windows builds can't be made from OSX. (At least there's a cross-compiler available for Linux, so I don't have to boot into a third OS...) If I was really ambitious I'd be able to manage everything through a single Jenkins instance and use one computer as the master and another as a slave, but I haven't bothered doing that since it didn't seem necessary. Past that, I have separate Jenkins subjobs setup for each build platform, and then a single master job that will trigger each of those subjobs. Right now I only have jobs set up for the build process, and not the deploy commands, since I like to run the deploy commands manually (they don't take as long, and this lets me double-check the builds before deploying). One issue I ran into was how to organize the builds for deployment, since some were on the Windows machine and others were build on the OSX machine. I needed to get them all in the same place so that I could for example deploy them all in a bundle to steam or itch.io. I ended up setting up a network share and having Jenkins copy the builds into the network share once each one was complete. Setting up the shared folder is a relatively straightforward process and doesn't require any special software -- it's built-in to the OS functionality (look under System Preferences -> Sharing -> File Sharing on OSX) MiscellaneousWhile fastlane has built-in commands for deploying to iOS and Android, I still had to take care of deployments for desktop builds to itch.io and Steam. itch.io has its own small command-line utility for pushing builds -- butler ( https://itch.io/docs/butler/). butler is very easy to use and simple to integrate into the pipeline as well. My fastlane deployment setup for itch.io is therefore very simple and just runs butler 4 times via shell, grabbing the version number from a text file: lane :deploy_itch do
sh('butler', 'push', '/Users/ddrkirbyisq/Coding/network-share/rhythm-quest/win32/latest', 'ddrkirbyisq/rhythm-quest:win32', '--userversion-file', '../Assets/Publishing/version.txt')
sh('butler', 'push', '/Users/ddrkirbyisq/Coding/network-share/rhythm-quest/win64/latest', 'ddrkirbyisq/rhythm-quest:win64', '--userversion-file', '../Assets/Publishing/version.txt')
sh('butler', 'push', '/Users/ddrkirbyisq/Coding/network-share/rhythm-quest/osx/latest', 'ddrkirbyisq/rhythm-quest:osx', '--userversion-file', '../Assets/Publishing/version.txt')
sh('butler', 'push', '/Users/ddrkirbyisq/Coding/network-share/rhythm-quest/linux/latest', 'ddrkirbyisq/rhythm-quest:linux', '--userversion-file', '../Assets/Publishing/version.txt')
end
Steam is a little less straightforward as you need to use the Steamworks SDK and set up a configuration file which tells Steam which directories to parse for the build for each build platform. This process is documented on the Steamworks site. I had a bit of trepidation as the OSX version of the command-line tools didn't seem to be as well documented (and I prefer to run most of the automation/scripting stuff on OSX), but I haven't really run into many issues there, so it's all working fine. SummaryIn the end, my entire setup and process looks like this: Two computers - one running Windows, one running OSX Each computer has a local Jenkins server Click a Jenkins button on the Windows box to start builds for Win32, Win64, Win64Demo Click a Jenkins button on the OSX box to start builds for Android, iOS, Linux, OSX Most of the platform-specific builds are run through fastlane A static Unity build method is invoked in batch mode to kick off the Unity part of the build fastlane takes care of updating version numbers, building XCode projects, etc. Builds are all copied to a shared network folder on the OSX machine when done Once I've verified the builds, I run deployments via fastlane commands Android and iOS deploys use commands built-in to fastlane itch.io deploys use butler Steam deploys use the steamworks command-line builder tool Setting up all of these build processes and pipelines was actually one of the first things that I did back in May when I picked up Rhythm Quest again. Part of it was because I knew it would be really important later down the road, but part of it was also just because I was interested in seeing how well this problem can be solved nowadays. If you were involved in app development years ago when Android and iOS were still in their infancy, you probably remember all sorts of horrors about having to manually deal with signing certificates, provisioning profiles, and all sorts of other such things. Tools like fastlane didn't exist at the time, so building out this sort of automated pipeline wasn't really even possible. The ability to run builds and deploys across multiple platforms by clicking a single button shouldn't be underestimated. (In fact, one of the reasons I'm moving away from Unity and towards Godot is the simple fact that Godot build times are orders of magnitude faster...)
|
|
|
|
|
Logged
|
|
|
|
|
DDRKirby(ISQ)
|
|
« Reply #9 on: July 25, 2021, 04:19:51 PM » |
|
Menu ReworkSo I didn't have the most productive past ~two weeks, mostly due to extra stuff happening in my life. I decided to stop work on gameplay stuff (partly because I had exhausted my gameplay ideas for now), but I managed to get a lot of UI work done instead. A lot of this work isn't particularly glorious or exciting, but a lot of dull work often goes into making a game polished and robust. I did manage to work in some neat music reactivity, so I'll talk about that as well. Before and AfterHere's a video showing roughly what the menu looked like to start with: I hadn't spent a lot of time working on this, so it's understandably pretty basic. There's no keyboard navigation support, everything is super basic and bland, and there's tons of empty space everywhere. Now, here's a video of the menu in its new state: There's still some more work to be done here, but it's certainly come a long way! New Button GraphicsThe old buttons were designed a looooooong time ago and basically referenced the plain blue window style in some of the Final Fantasy games:   One issue here is the lack of contrast between the button background and the white font, especially for the "selected" variant of the button. That was easy to fix (just use a darker color...), but I also wanted to look at some other ideas for simple button shapes that looked a little less busy. At this time I was also trying to brainstorm ways to make the menu react to the music "somehow", without being too distracting. I knew the button graphics could play into this. I knew that I still wanted a pixel-art-styled button graphic, similar to something you'd see in a classic video game, so I looked around at a few different examples of rectangular windows and menus in older games:  In the end I decided to just draw out a simple flat (darker) blue shape, doing away with the distracting white border. I added some light shading and four circles on the corners as accents. 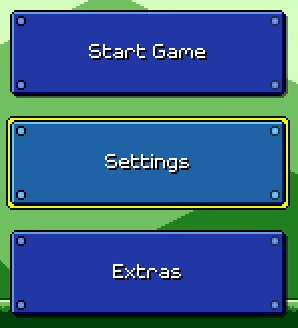 The four corner accents actually call back to these rectangular level structures from Super Mario Bros. 3:  Music Reactivity Music ReactivityOne of the main goals for this entire rework was to add some sort of music reactivity to the menu system. During the ~1 year period where I had stopped working on Rhythm Quest, I had been doing a lot of thinking about how to make an interesting and appealing menu system without involving a ton of work (i.e. beautiful art which I'm incapable of drawing). The answer ended up being to bring the "music-first" ethos of the gameplay into the rest of the game. For some interesting context, back in the day (around November 2017) the level selection screen was actually a full-fledged Super Mario World-like map scene:  This was pretty cool, and if my strengths were a bit different I would have explored this idea a little more, but it became apparent that trying to do this sort of art wasn't really scalable for me, at least not in this form. More importantly, the map just wasn't...interesting enough. It wasn't bad, but it wasn't really super exciting either. I realized here that I really wanted some sort of music-reactive map. I probably could have explored some sort of Super Mario Bros. 3 style graphics with simple animations that synced to the beat: 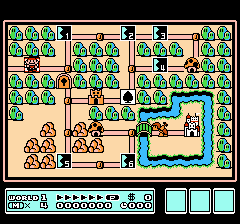 ...but in the end I decided to not pursue this idea and scrapped it in favor of a simpler (but hopefully more effective) menu screen. Beat SyncFortunately, music synchronization was already more or less problem for me at this point. See Devlog #4 for an explanation of how that works. I haven't explained how to tie it to the actual beat of the music, but that's not too hard: float GetIntensity(float offset, float patternLength) {
// (Gets the current time, then converts from time to beat)
float beatOffset = MusicController.CurrentBeat();
// Wrap based on beat pattern length and take the difference from our target.
// (note: the % operator will give negative values in C#, so I use a wrapper)
beatOffset = Utils.ModPositive(beatOffset - offset, patternLength);
// Normalize to 0-1 based on duration of the pulse.
float pulseProgress = Mathf.Clamp01(beatTime / _pulseDuration);
// Apply some easing (ease out quad):
pulseProgress = 1.0f - (1.0f - progress) * (1.0f - progress);
// Invert so that we go from 1 to 0 instead of 0 to 1.
return 1.0f - pulseProgress;
}
So now, making the beat-matched pulsing effects was pretty simple. I made a generic script which can modulate either the opacity or the scale of a graphic based on a given beat pattern, and then applied it to various graphics that were overlaid on top of the base button sprite: 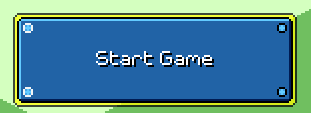 I wanted each separate menu screen (main menu, settings, level select) to potentially have its own music, so I store these beat patterns in the controller script for each menu -- the button graphics find their parent menu on scene initialization. There's also some spinning visual effects that come in during the second half of each musical phrase: https://www.youtube.com/watch?v=HbVu_GrsE28Same idea, but instead of modulating an existing graphic, I just spawn a visual effect at one of the defined points (the effect takes care of deleting itself once finished). These are actually just the same as this visual effect from the main game, which is made by taking two colored squares and rotating them in opposite direction while fading out: 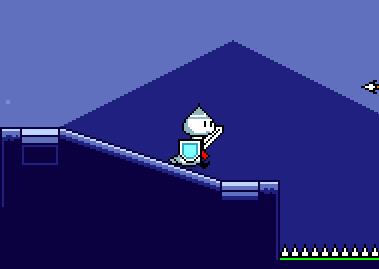 If you look closely, you'll notice that the spinning of the squares slows down as they fade out. This is done by using an aggressive easing function: easeOutQuint. If you're handling the rotation yourself, you can reference the helpful easings.net website to lookup these easing functions, but I happen to be using the LeanTween tweening library, which lets you apply these quite easily: LeanTween.rotateAroundLocal(
gameObject,
Vector3.forward,
_rotationDegrees,
_beatDuration * beatLength
).setEaseOutQuint();
Transitions between menu screens are done via a simple slide animation. As I mentioned earlier, different menus can also have different background music loops: https://www.youtube.com/watch?v=4ZxAP16XrOEThe naive way to implement this would have been to simply crossfade between the two pieces of music during the transition animation. However, I wanted to go a step further, since I had a big intention to try and push the "music first" ideology to as many little elements as possible. There's all sorts of possibilities for how to handle this. For example, you could predefine set "transition points" in the music (at the end of every measure, for example). Then, when the button is clicked, you can schedule a musical transition at the next transition point, and wait until that happens to execute the slide animation. The problem with this is that adding this sort of delay to the UI interaction fels really annoying and slow. I played around with a variant of this idea a little bit, but in the end decided that it was best if I had the transition always start immediately. I could still, however, modify the speed and duration of the transition to make it line up with the downbeat in a pleasing way. To do this, we can simply take the current (estimated) playback time and then calculate the time of the next downbeat: // (Note that this time will never be "exact" since AudioSettings.dspTime runs on a separate timeline)
float currentTime = (float)(AudioSettings.dspTime - _audioDspStartTime);
// (Simple conversion that uses the BPM of the song)
float currentBeat = _song.TimeToBeat(currentTime);
// Find the next downbeat.
float transitionEndBeat = Mathf.CeilToInt(currentBeat);
float transitionEndTime = _song.BeatToTime(transitionEndBeat)
float transitionDuration = transitionEndTime - currentTime;
That's pretty much the basic idea, but there's a problem. If the transition happens to start just before a downbeat (e.g. currentBeat = 0.9), then the transition will be jarringly fast. To fix that we can simply add a minimum buffer time so that the subsequent downbeat will be used instead. (This will also help with audio scheduling latency) // We could add the buffer in terms of beats or in terms of seconds.
// Either way is equivalent here since the entire main menu (currently) has constant BPM.
float transitionEndBeat = Mathf.CeilToInt(currentBeat + 0.5f);
In addition to the slide animation, a couple of different things happen with the audio/music during this transition: - A transition sweep sfx starts playing immediately at the start of the transition - The new music loop needs to be scheduled to kick in at the end of the transition - I also schedule a "landing" impact sfx at the end of the transition - The old music loop needs to be stopped at the end of the transition - The transition sweep sfx fades out quickly during the last sixteenth note of the transition (quarter of a beat) At one point I played around with using different transition sweep sfx samples for different-length transitions, but in the end I realized that it was easier and more effective to just use one long sample and then fade it out dynamically based on the transition timing. // Calculate transition "fade start" time, when we want to start fading the sweep sfx.
float transitionFadeTime = _song.BeatToTime(transitionEndBeat - 0.25f);
float fadeDuration = _song.BeatToTime(0.25f);
// Play the transition sweep sfx immediately. Retain a handle to the AudioSource so we can fade it.
AudioSource sweepAudio = AudioManager.PlaySound(_sweepSfx);
// Schedule landing sfx for end of transition.
AudioManager.PlayScheduled(_transitionEndSfx, _audioDspStartTime + transitionEndTime);
// Schedule new music loop for end of transition.
// We need to queue it up at the appropriate offset first!
_audioSources[newMusicIndex].time = transitionEndTime % _audioSources[newMusicIndex].clip.length;
_audioSources[newMusicIndex].PlayScheduled(_audioDspStartTime + transitionEndTime);
// Loop while transition is happening...
while (AudioSettings.dspTime < _audioDspStartTime + transitionEndTime) {
// How far are we through the fade section?
float timeWithinFade = AudioSettings.dspTime - _audioDspStartTime - transitionFadeTime;
float fadeProgress = Mathf.Clamp01(timeWithinFade / fadeDuration);
// I use an exponent to affect the easing on the fade.
// An exponent of 0.25 makes the fade happen more on the tail end (ease in).
sweepSource.volume = Mathf.Pow(1.0f - fadeProgress, 0.25f);
yield return new WaitForEndOfFrame();
}
sweepSource.Stop();
// Transition should be done now. Stop the old music loop.
_audioSources[oldMusicIndex].Stop();
A couple of notes to mention about the above. First, Unity currently doesn't have any sort of "StopScheduled" functionality that will allow you to stop playback of an AudioSource given a precise Audio DSP timestamp, so the best we can do is guesstimate based on checking the time each frame. Secondly, this method of doing audio volume fades is actually non-ideal as it's not sample accurate at all; the volume of the AudioSource is only modified once per visual update, which only happens about 60 times a second as opposed to ~44,000 times a second as it should be. Again, Unity doesn't seem to provide a good way to handle this, so we're stuck with this solution, though fortunately it ends up being "good enough" for the human ear. Other StuffThat's about all that I'll cover here, but I want to stress that there is a ton of other miscellaneous work involved here that I haven't even talked about. Very briefly, this includes things such as: - Allowing for menu navigation with keyboard, mouse, gamepad, OR touch input - Smartly handling button auto-selection depending on input device (if using keyboard/gamepad, the first option should be highlighted, otherwise not) - Supporting localization for all text in the menus, including dynamic text - Supporting screen readers so that visually impaired persons can navigate the menu - Disallowing menu input while a transition is happening - Remembering previous menu selection (returning to a previous menu should preserve the selection state) - Allowing for the menu scene to be loaded to a certain state (i.e. when returning from a level, it should have that level preselected) - etc... Unity does its best to help you with some of this -- it already provides an automatic menu navigation mapping system, and its new Input System provides (somewhat obtuse at times) means for automatically switching and detecting input devices. There's even a 3rd-party plugin which does most of the legwork for you for integrating with screenreader interfaces. But in the end there's still a lot of work (which will unfortunately go unnoticed by most) that needs to be put in in order to make something that Just Does The Right Thing (tm)...
|
|
|
|
|
Logged
|
|
|
|
|
DDRKirby(ISQ)
|
|
« Reply #10 on: July 30, 2021, 05:12:50 PM » |
|
Settings MenusSo this week I've been taking a stab at reworking the settings/options UI in the menu. For reference, this is what the settings screen looked like at the beginning of the week:  It's...okay. Well, sort of. The styling is consistent with the rest of the menu and it's pretty simple to understand, so there's no problem there. You simply tap the respective button (or press enter with it highlighted) in order to swap through the choices for each setting. The problem is that this doesn't really work out for all types of settings. In particular, volume settings are much better served using some sort of left/right slider that allows you to both increment and decrement the value. Same thing with a windowed resolution selector -- it's a little awkward to have to cycle through all options unidirectionally without being able to see all of them. Some of these options would also benefit from some sort of additional explanation. A bunch of the accessibility options, for example, or maybe a toggle for whether successful audio cues are prescheduled vs dynamic. Traditionally this sort of thing is handled by having each setting row show left/right indicators that allow you to scroll through the options. You can also put in a description box for showing info about the currently-highlighted item:  This is a tried-and-true solution, but the problem here is that this UI really doesn't work well for touch/mouse interaction. For touch/mouse controlled games you generally have individual buttons for each available option, or tappable left/right buttons, as well as sliders, so everything is interactable without needing to first have a "selected row":  Again this works OK, but it's not obvious to me how to best apply keyboard navigation to this. Here was my initial attempt at trying to fuse the two navigation modes together: 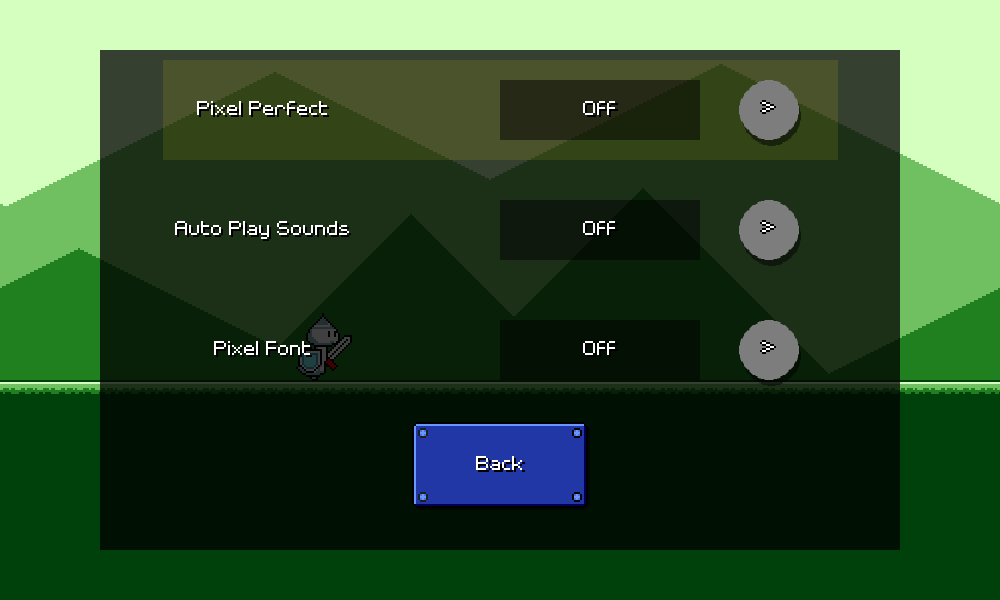 ...no good. You can tell that the two navigation modes are really just fighting each other. It's kind of awkward trying to have left/right arrows that are trying to be indicators of keyboard movement, but also trying to be tappable buttons. I think we have to get rid of the concept of a "highlighted row", or at least clean up the UI so that it's reflected more clearly. Interestingly enough, Fortnite (the one easy example I could think of where a game is designed to handle all these input modes) actually does take this hybrid approach: 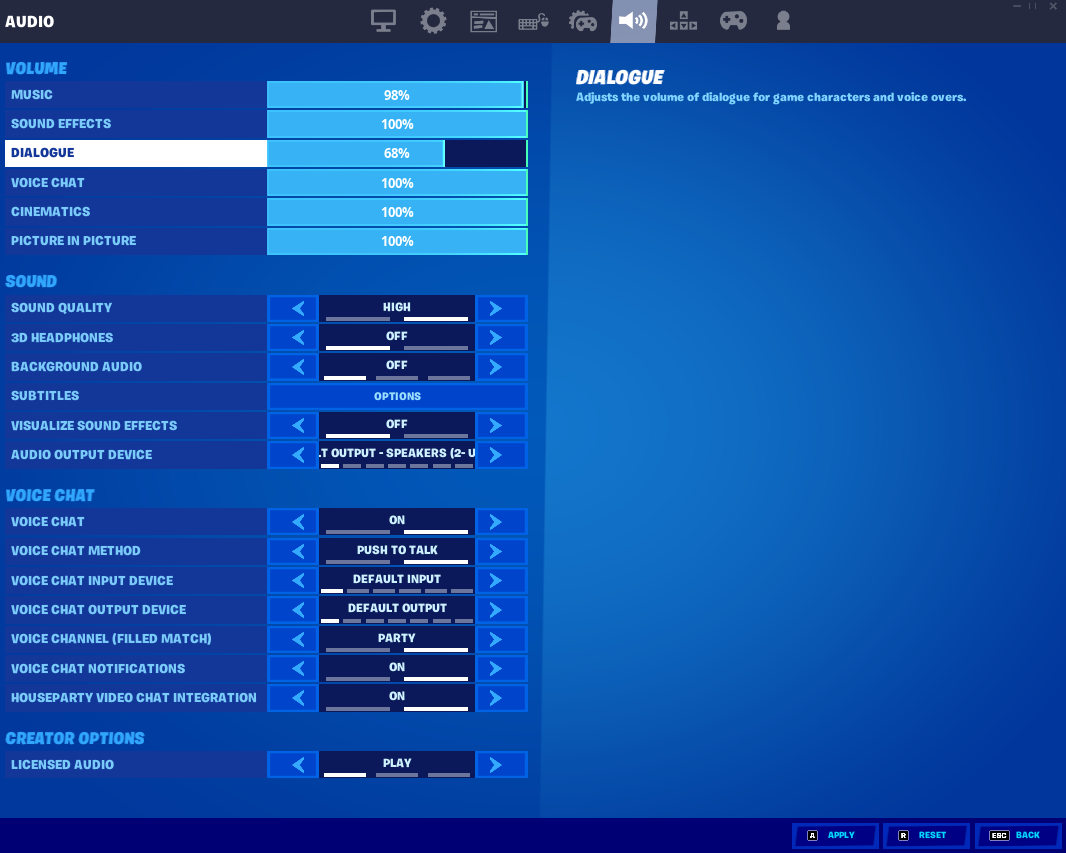 So it IS workable if I decide to go down this route, but I need to style my menu differently in order to get it to look right. Curiously, Fortnite didn't seem to allow me to navigate the menu with a keyboard alone -- I had to plug in a gamepad to get that style of navigation working. I guess they assume that if you're going to play with a keyboard, you're also going to be using a mouse anyways. Here's a different idea: 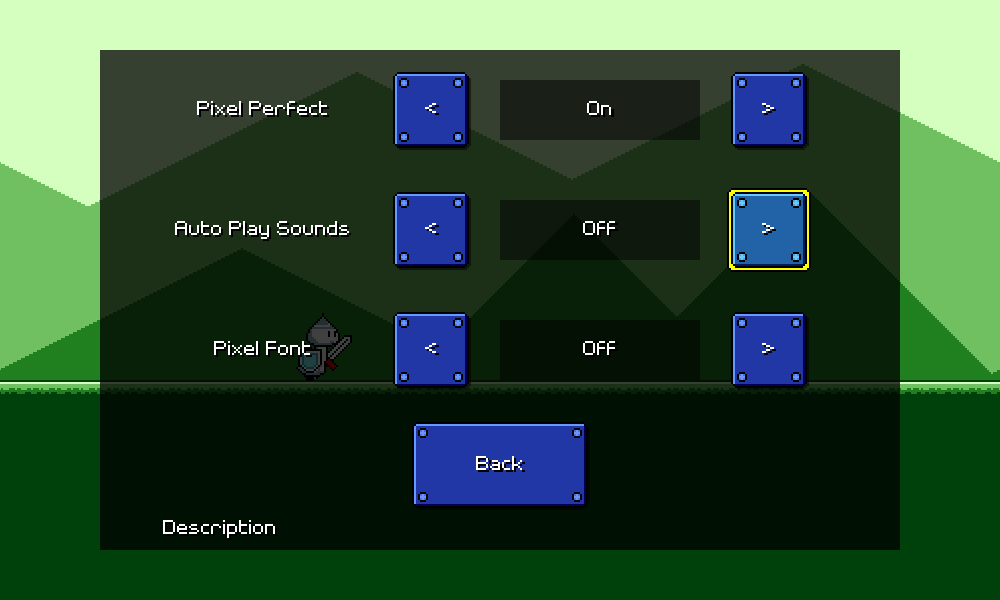 I actually think this is pretty promising. The keyboard/gamepad navigation experience definitely suffers a bit because navigating to these different onscreen buttons isn't the most graceful, but it's easy to understand and more importantly, follows the same UI paradigm as all of the other menus, so you don't have to learn a new system of thinking about the interface. Of course, it doesn't really make sense to have arrow buttons for binary settings that only have on-off toggles. We should just call out the two values instead, like this: 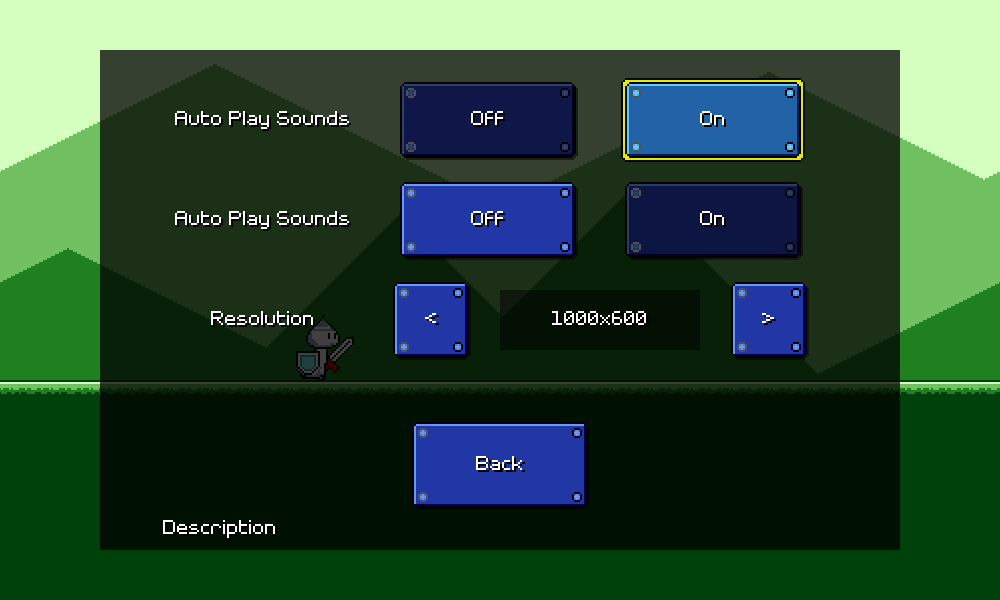 That's starting to make a lot more sense now. The description text will show information for whatever option you have your cursor hovering over, so I also like the fact that you can read about a particular choice before applying it. Of course, I'm now adding a new "darkened" state to all my buttons, so I have to refactor that logic/UI again (sigh, haha). In the end a lot of these UI screens need to be built out by hand, but it's important to reuse refactorable shared components so that this kind of change can be done without too much pain. After a bunch more tweaking and iteration, I've ended up with something that I'm pretty happy with: 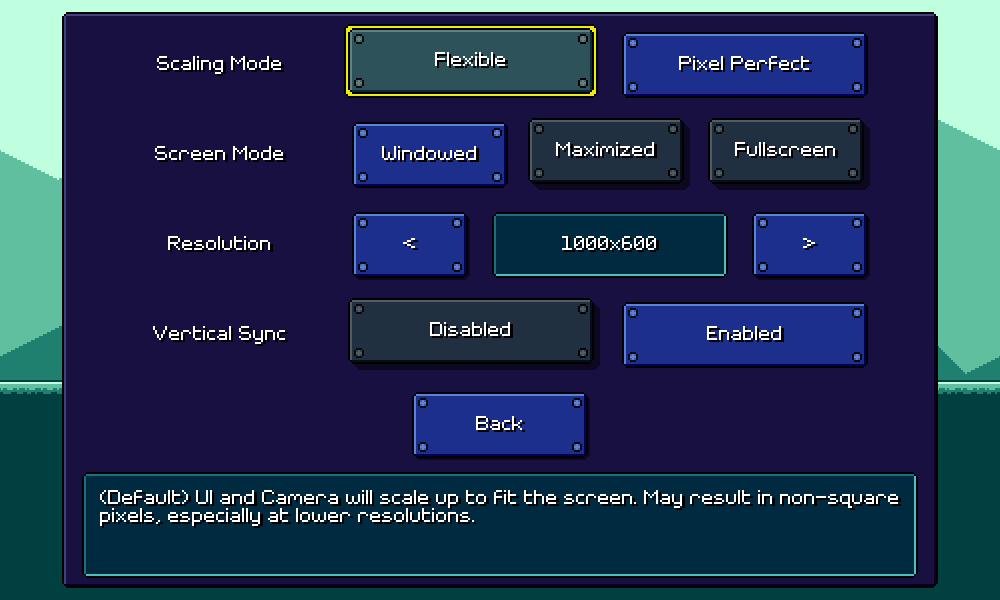 The layout alignment gives the menu a very tidy feel despite the fact that there are differing elements per row. Notice also that I've given the disabled options a bit of a "raised" look with a slight offset and a more distant drop shadow, so that activating an option visually looks like pressing in a button. There's still a ton more work to be done here (all of these text labels need to be put into the localization database...), but that's all for now!
|
|
|
|
|
Logged
|
|
|
|
|
DDRKirby(ISQ)
|
|
« Reply #11 on: August 06, 2021, 05:52:16 PM » |
|
Latency CalibrationAlong with fleshing out a bunch of the settings menus, this week I worked on one of my long-standing high-priority items: a reworked latency calibration screen. 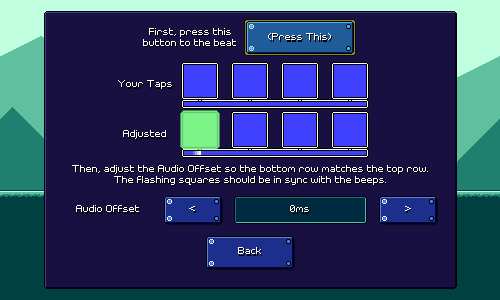 As mentioned briefly in a previous devlog, audio output always has some amount of latency/delay on every device and it's important that we be able to measure this so that we can "queue up" sound/music in advance to account for this delay. Unfortunately, the exact latency amount is different from device to device, so there is no universal measurement that works (plus, different players may perceive latency differently due to psychoacoustics, etc). Thus, we need to build some sort of latency calibration system for the player to be able to easily adjust this for themselves. Types of LatencyActually, there are three separate types of latency that are relevant to us for synchronizing music with gameplay: audio latency, visual latency, and input latency. Audio latency is the delay between playing a sound and when the sound is actually able to be heard. This is caused by various audio buffering systems, mixing delays, hardware/engine limitations, bluetooth headphone transmission time, the time it takes for sound to travel through the air, etc. Visual latency is the delay between rendering an image and when that image is actually able to be seen. This is caused by double-buffering/rendering queue systems, monitor refresh/update characteristics, etc. Input latency is the delay between a player performing an input and when that input is actually able to be handled by the game. This is caused by input debouncing / processing delays, frame-based input handling, wireless controller transmission times, other stuff in the engine, etc. Trying to minimize these latencies usually involves adjusting various engine settings, and past that, going low-level and bypassing engine functionality entirely to interface directly with the low-level platform APIs. For example, bypassing Unity's audio mixing and input processing systems will result in much lower latencies...but of course you lose out on those features (unless you re-implement them yourself). Note that usually, audio latency is the largest of the three latencies. (This is especially true on Android devices which are notorious for having high amounts of audio latency) Input and video latency are already optimized for most other games: if pressing a button does not result in an immediate visual feedback, games feel very unresponsive. And these systems do not require the same sort of mixing and buffering systems that audio does. (One notable exception to this generalization would be when playing on a video projector or something like that.) Measuring LatencyThe standard way to measure and adjust for latency is through some sort of tap test (tap to the beat, or tap to the visual indicator), or by adjusting a video/audio offset. Unfortunately, we can never measure a single type of latency by itself using a tap test. Having a user tap to an audio signal will give you the sum of audio latency + input latency. Similarly, having an user tap to a visual signal will give you the sum of video latency + input latency. Subtracting these from each other should in theory give you an audio / video offset value. Depending on the exact needs of your game, there are a couple of different ways that you can set up calibration measurements. ExamplesThe system of "audio tap test, video tap test" measurements described above definitely isn't the only way to set up a calibration system. Rhythm Doctor (a very nice one-button rhythm game!) splits calibration into two phases. In the first phase the user adjusts the video/audio offset so that both are synchronized: 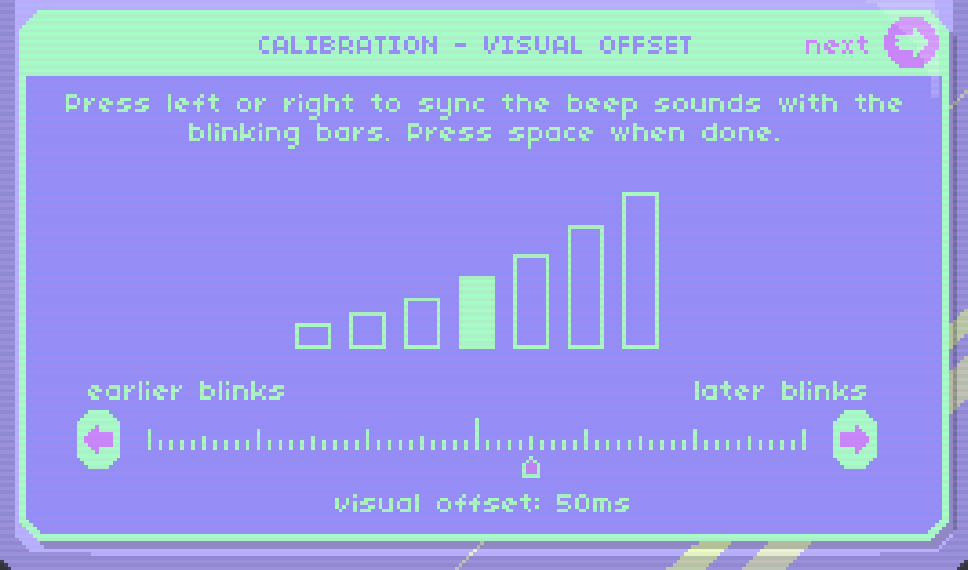 In the second calibration phase, the audio/video sync has already been established, so all that's left is to determine input latency via a tap test: 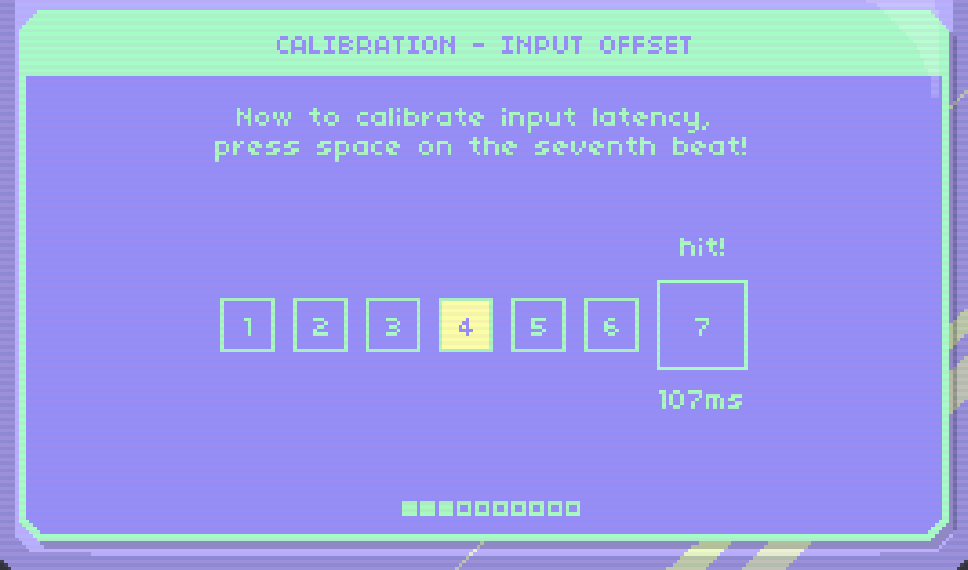 It's worth noting that this "seventh beat tap test" mirrors the actual gameplay of the rest of the game, so it's very representative and should therefore hopefully be accurate. I tried to do the same thing in Samurai Shaver -- I provide a "test scene" where you can simulate actual gameplay and adjust latency to get immediate feedback on whether your calibration is working out: 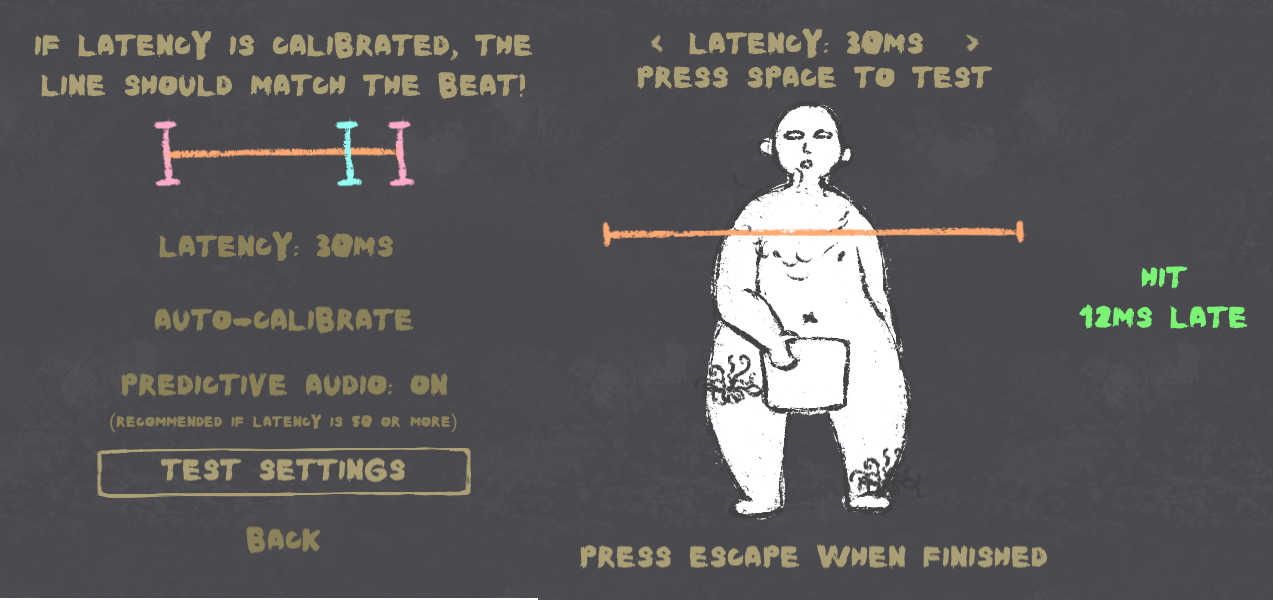 Assumptions and Restrictions for Rhythm Quest Assumptions and Restrictions for Rhythm QuestRhythm Quest isn't a normal "judgment-based" rhythm game like Dance Dance Revolution, or Guitar Hero, or Arcaea, or whatever. In particular, my ability to account for visual + input latency is minimal. In traditional rhythm games, the judgment for a note can be delayed until a bit after the note has passed. When playing Guitar Hero on a calibrated setup with a lot of visual latency, for example, you hit each note as it "appears" to cross the guideline, but the note doesn't actually respond as being hit until it's travelled significantly past that point. That doesn't work as well for Rhythm Quest: 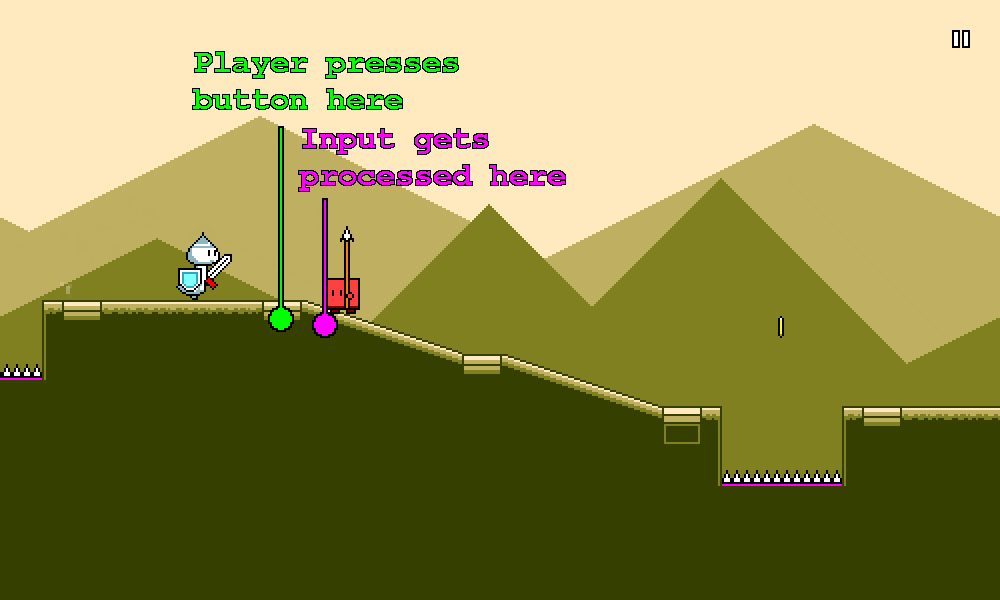 High amounts of input and visual latency can really throw off the game, to the point where normally a respawn would be triggered. Jumping is a good example of this -- in order to properly account for 100ms of input latency, by the time my code receives the jump button press, you ought to already be partway through your jump! For playing sound effects, I can work around this kind of thing just fine. Rhythm Quest (by default) preschedules hit and jump sounds at the correct times, so even with significant audio latency, they will play at the appropriate timing. Note that this also means that even if you don't press anything and miss the hit, the correct sound will still play. While this is not 100% ideal, this is an effective compromise that needed to be made in order for sfx timing to be accurate. (this technique is used in other games as well) But for visuals this doesn't work as well. If I "preschedule visual effects" then I'd have to play an animation of you slashing an enemy, only to find out 100 milliseconds later that you never actually pressed a button. "Rewinding" that visual state would be incredibly jarring. Similarly, if I tried to account for jump input latency by starting all jumps 100ms in, the jumping animation would look very jerky on startup. Given this, the solution I've chosen to go with is to assume that visual + input latency is relatively minimal and trust the player to compensate for it themselves. In fact, input delay is something present in pretty much all games to some extent, and even competitive fighting games usually frequently deal with 50-100ms of lag. Most people should hopefully adapt and adjust naturally to this sort of latency based on visual and auditory feedback. The calibration in Rhythm Quest is thus primarily focused on determining the best value for audio vs video offset. Putting It into PracticeHere's a video of the single-screen latency calibration system that I've built out so far: It's a bit busy (actual UI still not final), but the basic concept works out pretty nicely. This screen is sort of a combination tap test plus user-driven audio/video offset calibration. The top section allows the user to tap in order to establish a rhythm, and the bottom section lets the user adjust the audio offset accordingly. The end result is very immediate in that it should be very easy to tell by eye when calibration looks "locked in". (the UI will also highlight the appropriate button if it's obvious that an adjustment needs to be made) The process is also relatively quick and doesn't require you to spend a full minute tapping to a sound 16 times or whatever, which is something I'm trying to avoid, as it causes friction for people who just want to jump into the game. The design of this screen leverages the fact that the human eye is very keen at determining slight differences in timing between two flashing objects (i.e. "which of these two squares flashed first"). I actually only keep 4 tap samples (one for each square), which is very low for a tap test (usually you'd take 10 or so and throw out the min and max). However, I can get away with this because it is immediately obvious (by sight) if your taps were inconsistent in a notable way. Note that it's very important that the button tap here does NOT play sounds, as those sounds would of course be scheduled with latency, and throw off the user. The exact design of this screen will probably need to be tweaked (I probably need to hide the bottom row at first...), but so far I'm liking it much better than the standard "sit here and tap a button 10 times" design. I'm hoping that this will allow people to spend less time on this and jump into the game more quickly.
|
|
|
|
|
Logged
|
|
|
|
|
q1
|
|
« Reply #12 on: August 08, 2021, 08:29:42 AM » |
|
wow, really love how technical and detailed you've written out this devlog. gotta appreciate posts like this. love the music, and the levels look like they feel really good to play. the way you incorporated combat into the rhythm runner genre made me think of Baby Driver, which made me imagine a hardcore combat rhythm game with a Hotline Miami ish aesthetic where you pull off insane moves to the beat. even though i don't think that's what you're going for haha. i like the addition of moving enemies too. good work and good luck!
|
|
|
|
|
Logged
|
|
|
|
|
DDRKirby(ISQ)
|
|
« Reply #13 on: August 23, 2021, 03:32:05 PM » |
|
Odds and EndsI don't have any single topic in particular to write about this time, so I'll just talk a bunch of about various minor things across the project that I ended up doing instead. Controls tutorialOkay, so maybe this one isn't exactly "minor", but I finally got around to adding a tutorial for the basic controls of the game. Note that for introducing new obstacles, I already provide a short interactive "tutorial" section as part of the beginning of that level: 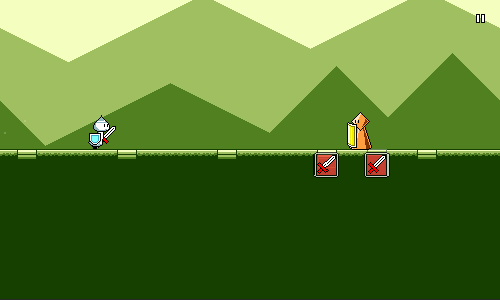 I like how this avoids breaking the flow of the game. I'm able to piggyback a lot of understanding off of the fact that people already understand how platformers work, so it's very intuitive to jump over spike pits or to attack enemies. However, I needed something slightly more hand-holdy in the very beginning of the game, particularly on desktop, to explain which buttons to press. Initially I was thinking of building out a separate scene for this, but I decided instead to keep in the spirit of reducing player friction and just bundled it together with the first level as a pre-level section:  Robustness RobustnessTutorial logic can tend to be a pain in the butt to implement due to many reasons -- one of them is trying to adapt the tutorial to changing keybinds and controller inputs. Consider that all of the following are different cases that need to be handled by the tutorial system depending on what input settings have been chosen by the player: 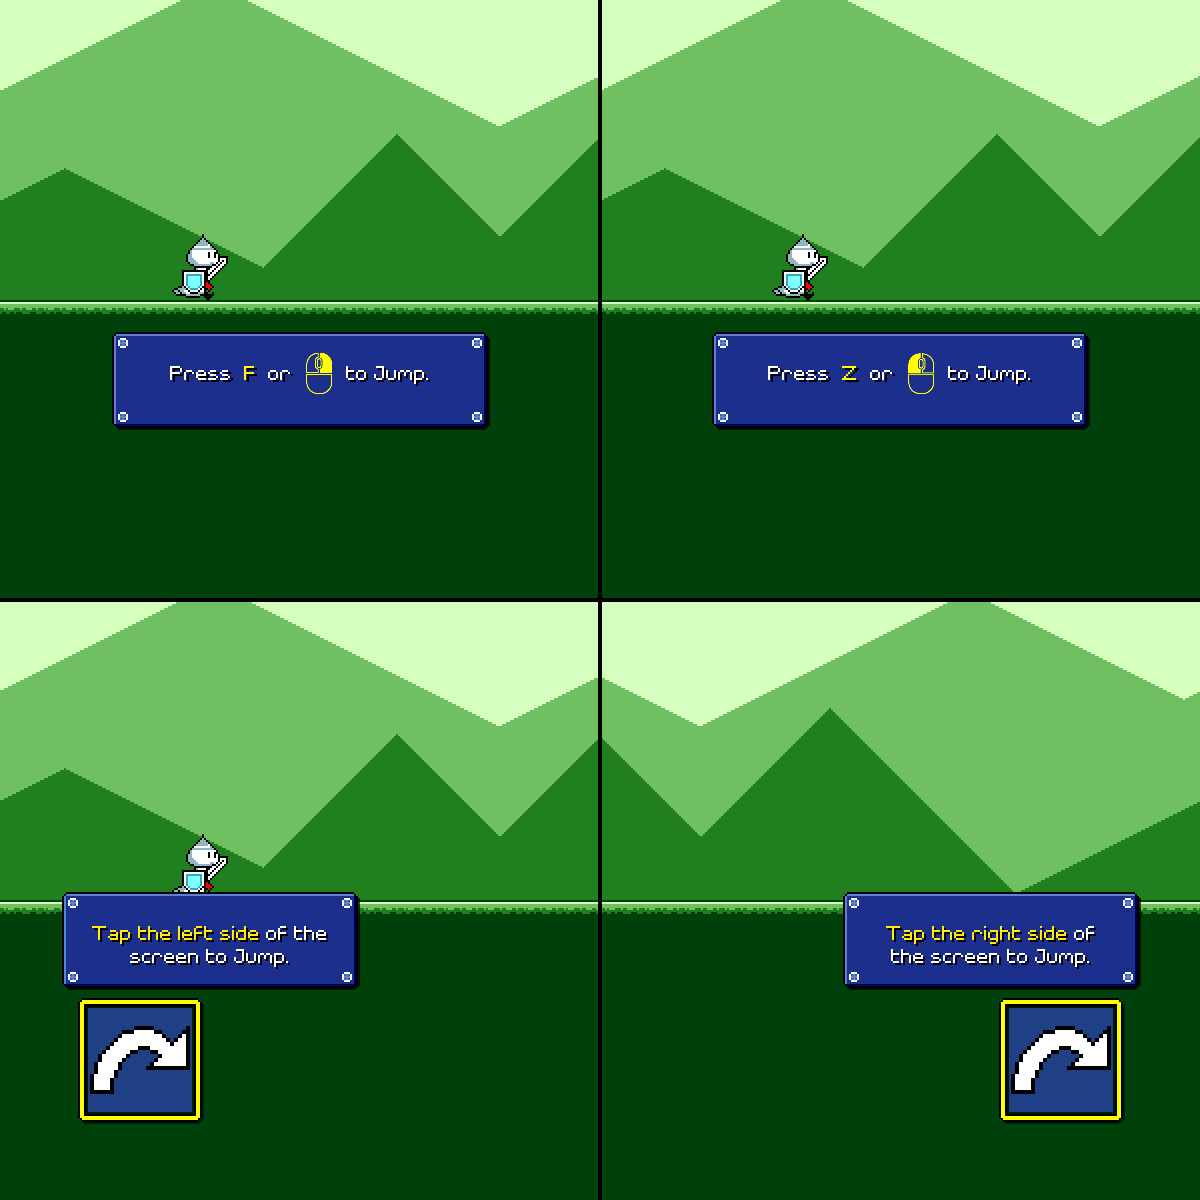 And this isn't even including gamepad support! (which I haven't added yet for the tutorial) This is one of those things that 90% of players won't even notice is implemented, and is only ever thought about when it goes wrong (so much of gamedev is like this...), but it's the right thing to do. The messy way to handle this is by cramming all of the logic into one mega-script with a whole bunch of conditional logic, something like the following: if (controlScheme == "Keyboard") {
// Show keyboard tutorial #1
} else if (controlScheme == "Touch") {
// Show touch tutorial #1
}
// Wait for player input...
if (controlScheme == "Keyboard") {
// Hide keyboard tutorial #1
} else if (controlScheme == "Touch") {
// Hide touch tutorial #1
}
...
That can certainly work for some cases, but I wanted something that was a little easier to extend, so I created a uniform abstracted "Tutorial" step interface, where each tutorial "step" is an abstract object that can be told to show or hide. Then, I have platform-specific child objects that are only enabled for a specific input method, and key off of the parent's "show/hide" progress in order to render themselves. Something roughly like this: // In the main controlling script:
Tutorial1.Show();
// Wait for player input...
Tutorial1.Hide();
// In the Tutorial1 script:
public void Show() {
// Fade our alpha value to 1.
LeanTween.alphaCanvas(Canvas, 1.0f, 1.0f);
}
// In the child:
void Update() {
// Key our position off of the alpha value in some way?
_transform.anchoredPosition = Vector2.Lerp(_offset, Vector2.zero, _tutorial.Canvas.Alpha);
}
Super rough and fabricated example, but hopefully you get the idea. Of course, that's only one way to slice things. This wouldn't work as well, for example, if different platforms featured differing numbers or types of tutorial steps. Schedules and transitionsUnlike my tutorials in Ripple Runner, the controls tutorial is interactive, which means it waits for you to actually hit the appropriate buton before proceeding to the next step. This is because I don't want to assume a certain reading speed, and because players may also (not to mention I'm eventually making this accessible for the visually-impaired) take some time to figure out where that specific key or button is. This means that the tutorial can (in theory) go on forever. To account for this, the background music loops (pretty obvious), but there's also another layer of smoke and mirrors going on as well: underneath the hood, the player actually has a fixed x-coordinate! 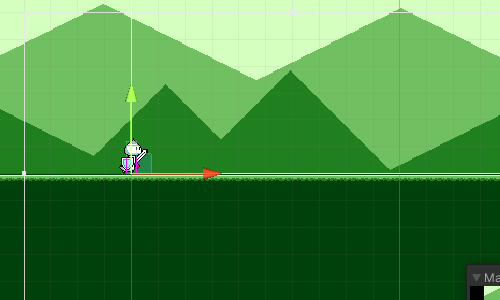 I did this because I didn't want to deal with having a (potentially) infinite horizontal landscape. Instead, the player and camera actually both stay still and the only thing that happens is that the background and ground layers scroll as if you were moving. I did this by hacking the music timing script to always return a time of 0 during the tutorial, which fixes the x position at 0. I had to make one or two other adjustments to deal with the jump and attack logic (your y-position while jumping is based on a time difference, which doesn't work if music time is always 0), but it ended up working out. The last thing I needed to deal with was sort of a headache -- I needed some way to transition seamlessly from these fake-scrolling backgrounds to the actual start of the level (where the camera and player actually track each other). The backgrounds can scroll by an arbitrary amount over the course of the tutorial, so I needed some math to offset the real main level backgrounds to match with the fake-scrolling ones. Then I just fade away all of the fake tutorial-only backdrops, and you drop straight into the level proper: 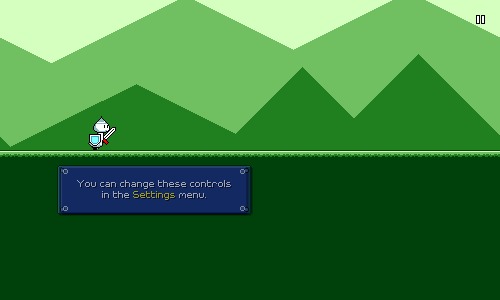 More jump arc adjustmentsI already wrote in a previous devlog More jump arc adjustmentsI already wrote in a previous devlog how I adjusted the vertical arc of jumps to match with varying ground heights. Something new that I recently discovered (while playing on a miscalibrated setup) was that mistimed jumps can still compound in a different way. This is because each jump is always designed to last 1 beat, even if the jump was timed early or late: 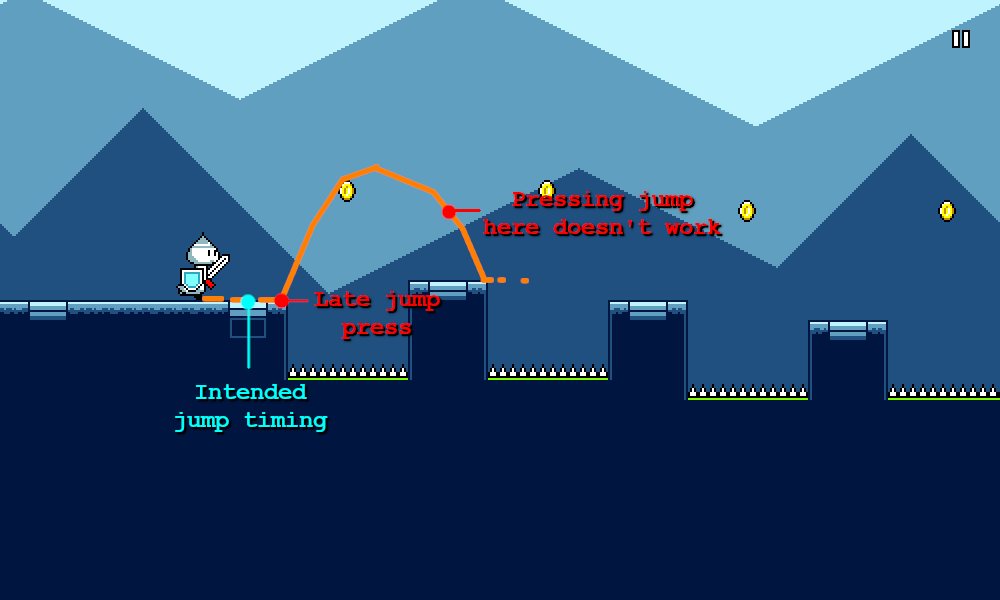 In other words, if you time jump #1 late, then trying to time jump #2 perfectly might not work, because you may not have landed from jump #1 yet. I already provide a facility for "early jumps" where you can re-jump slightly before reaching the ground, but this wasn't quite good enough. I realized that what I really needed here was to correct for the mistimed jump by making the jump duration shorter or longer, so that you'd always land on the "intended" beat:  I of course only wanted to do this auto-correction for jumps that are actually intended (if you randomly bunny-hop around on off-beats, that doesn't need to be snapped to be on beat!). This wasn't too hard as I already had triggers set up for recognizing the "intended jumps" for the purpose of initiating the blue+purple visual effects. Correcting the jump length by the full amount seemed a bit unnatural, so for now I'm only correcting it by 50% (averaging it out). Timing lenienciesSomething that took me a long time to understand about game design is that challenge is not always a necessary component of enjoyment. This is probably an artifact of myself in general preferring to play games for their challenge factor, as well as growing up in an era of gaming for which enjoyment through challenge was the norm. Rhythm Quest is not a competitive game and as such it does not feature any concept of timing judgments (Perfect / Good / Bad) or high scores. Those would be easy enough to implement, but in the end this would detract from what I'm envisioning the core experience of the game to be -- a more tactile and synesthetic sense of enjoyment. Going along with this sentiment, I decided to make the timing windows for obstacles a bit more lenient across the board. This does of course make the game "easier" in some regard, but the particular aspect of challenge that it removes -- that of being precise within a fraction of a second -- isn't something that I feel is important to the identity of the game. Removing this allows for me to help the player enjoy the game for what it is and remove "feel bad" experiences, as well as allow for more leeway in case of an inaccurate or skipped latency calibration. It allows the gameplay to focus on the actual intended challenge, which is reading the obstacles and pressing the buttons to the correct general rhythms. Automatic UI navigation linkingUnity tries to help you out as you build a UI system, by providing an option for automatic navigation wiring between selectable elements. This means (thankfully) you don't have to manually handle what happens when left/down/up/right are pressed in the case of every single button in every menu. Unity will simply figure out which other selectable element is present in that direction and link the navigation to that automatically. Unfortunately, this doesn't always work well: 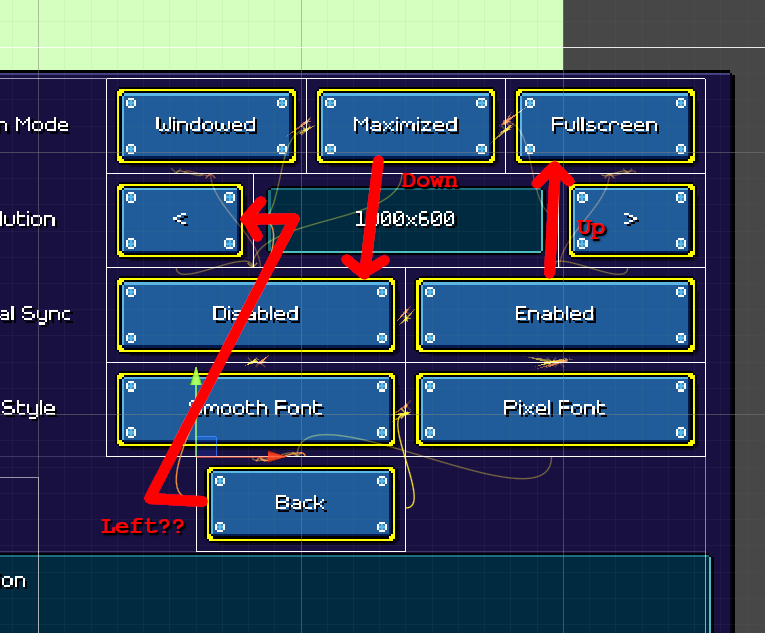 Unity allows you to manually set the left/down/up/right links for each selectable element, but as you can imagine, doing this for every single menu would be both extremely tedious and brittle (the wiring would have to be redone whenever new options are added). To make matters worse, some of these options are completely hidden based on platform-specific conditions (changing keyboard bindings doesn't make sense for a mobile device). I needed a way to set these up automatically. I came up with a script to handle this that dynamically rewires the buttons to hook up to each other in a default way based on their position within each row. What this looks like of course heavily depends on how the UI object hierarachy is laid out, but fortunately I had a regular-enough hierarchy that this was possible to do for all of my settings menus. Saving input rebindsUnity's new input system is......a thing. In general I'm a bit apprehensive of just how large and complex some of Unity's new systems are growing (Addressables, Input, Package Management, ...). I understand that some of these problems (such as input handling and device management) are extremely complex by nature, so it's probably futile to try and define a simple and intuitive abstraction that just works without having to think about it. But at the same time, I think having to learn an entire set of new vocabulary (ControlScheme, DeviceLayout, ActionMap, Addressable) can feel extremely daunting, especially for someone who really wants things to "just work". Anyways, rant aside, I'm (mostly) using the new input system for Rhythm Quest, partially because it gives more fine-tuned (non-frame-based) input timing values. Input rebinding wasn't actually AS bad to set up as I thought it would be, but I did run into a small hiccup with saving and restoring those bindings. You see, the input system API offers some methods to save and restore binding overrides: "SaveBindingOverridesAsJson" and "LoadBindingOverridesFromJson", which work as expected. The only problem is that right now that functionality isn't in the latest stable version of the package (1.0.2) -- it's only exposed the 1.1.0-preview versions. That's all fine and good, but there was no official documentation anywhere on how a preview version of an existing stable package can be used in a project. As far as I can tell you need to find and download the actual package on github ( https://github.com/Unity-Technologies/InputSystem), uninstall the old version of the package, then manually copy the com.unity.inputsystem folder from the github repo into your project's "Packages" folder, which will cause it to be imported as an "embedded package". If you instead try to import the package via Unity's package manager (seems like the intuitive thing to do), it'll work but the package won't be copied into your project and will simply be left in its original disk location (with a hard-coded absolute path), which of course won't play nicely with source control. Steam/Discord integrationThis was really not something worth my time (soooooo far down the priority list), but sometimes you just end up working on random stuff every once in a while and eh, that's not a bad thing. Anyways, I did a barebones integration with a Discord plugin, so now I have a fancy "Now Playing" status that even tells you the name of the current level: 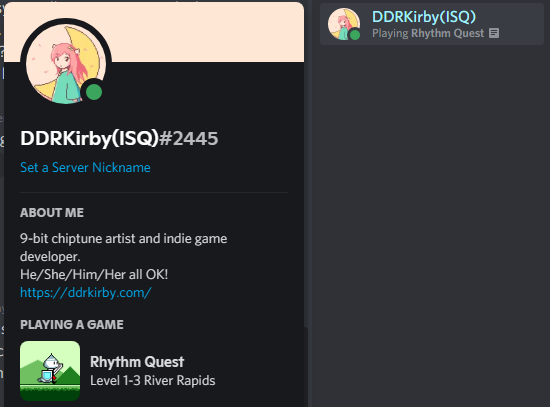 I also have this working (more or less...) for Steam as well:  Aaaand, there's even some very rough achievement handling!  Trimming trailing audio silence Trimming trailing audio silenceThis is such a common thing, I can't believe I didn't already have a script to do this... So when you export audio from music software, typically you need to deal with the issue of trailing silence. This is because when doing an audio export you generally export past the end of where the music data stops:  Wait, why would you do this in the first place? Well, you =could= just cut the audio off right as the music data ends, but the problem is that often there are echo and reverb effects that will trail on past that: 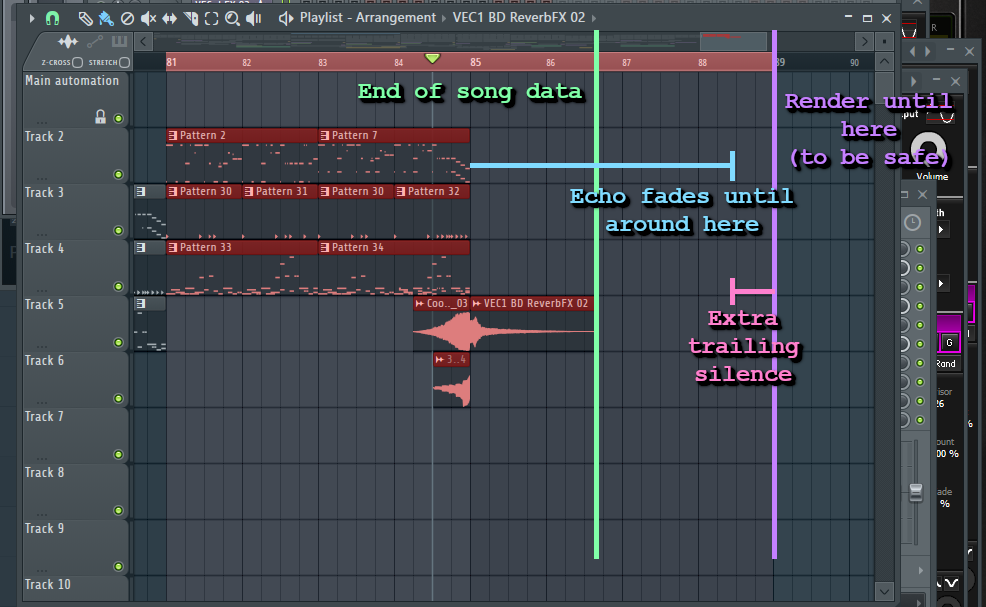 People have of course already thought about this problem and FL Studio actually has a mode where it attempts to automatically wait for complete silence and then cut off the audio file at that point automatically. Problem solved, right? Well...not quite. Turns out that in the audio mastering process, we can actually use something called "dithering" to reduce (or more accurately, "improve") the artifacts that are involved when converting between different audio bit depth resolutions. This gets into jargon that's way too complicated for me to explain here, but basically the idea is that we add a bit of "fuzzy noise" to the audio signal which ends up reducing the amount of harsh artifacts. The image below [ source] sort of tries to illustrate this idea:  The source image is on the left, undithered output in middle, and dithered output on the right. Notice how adding noise during the quantization process prevents "banding" artifacts despite creating an (arguably more pleasing) "fuzzy" texture. Anyways, the point is that when we're using this sort of dithering noise (which I do), the "automatically detect complete silence" algorithm doesn't really work since we're always adding a minute level of noise (at least, this is how FL Studio tends to work from what I've experienced?). So I end up with some amount of trailing silence (not true silence, but it's literally just the dither noise) at the end of my files. This is bad because that "silent" audio still consumes resources during playback -- it still occupies an audio playback channel (too many can cause other sounds to cut out), it still requires an audio source to play it, etc. So I now have an ffmpeg script that will simply go through all wav files in the current directory and just trim off all trailing silence up to a certain volume level (-60dB or something). This isn't the greatest way to do this -- if you wanted to do better, you'd probably do a volume fade at the last bit instead, but I haven't bothered adding that into this script at this point. A missing volume fade that's under -60dB really isn't the biggest of my worries now.
|
|
|
|
« Last Edit: August 27, 2021, 08:44:26 PM by DDRKirby(ISQ) »
|
Logged
|
|
|
|
|
DDRKirby(ISQ)
|
|
« Reply #14 on: August 27, 2021, 08:42:21 PM » |
|
User Experience FlowsThinking about how to design my user interactions in Rhythm Quest has been quite an interesting challenge. Coming up with designs that are intuitive takes a certain kind of skill and insight (and often a lot of iteration...). Designing across multiple platforms and control schemes has been particularly challenging, as the natural modes of navigation and interaction are so different when using a keyboard / touchscreen / etc. Onscreen ButtonsLast week I wrote a bit about how I had added a controls tutorial at the beginning of the game. I was having a few problems with the mobile (touch control) version of this: 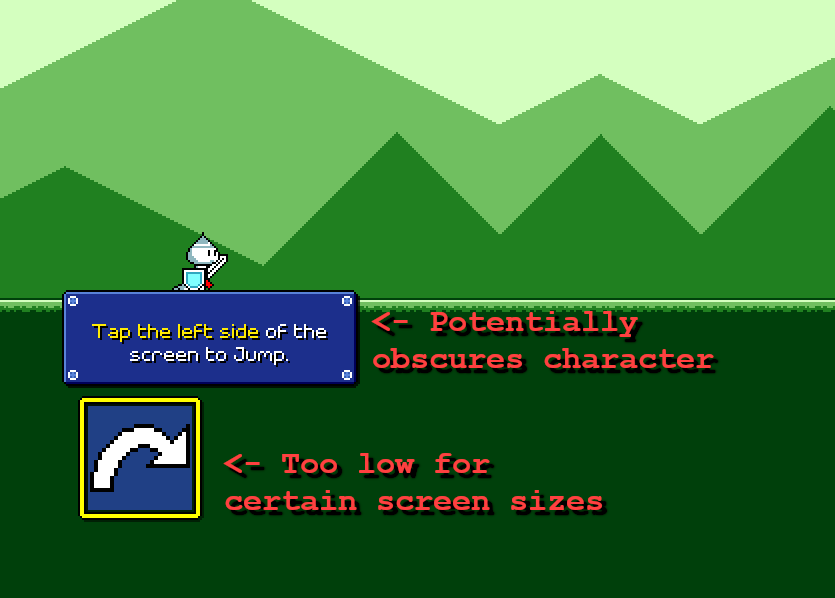 I wasn't really able to find a good placement for the instructional text here, especially across different resolutions. Placing it above the on-screen button potentially blocked the view of the character, and placing it above the character made it too far away from the highlighted button. I could place it to the right of the button, but that was too low on the screen for my likes (perhaps likely to be obscured by thumbs on a phone). I already knew that I was having issues trying to place the on-screen button optimally for different resolutions and device sizes (that's a complicated problem that I've largely ignored), not to mention different hand sizes. It was also the jankiest-looking piece of the UI since the icons are upscaled at 2x compared to everything else (ugh!). I decided to try knocking out two birds with one stone and just getting rid of them altogether: 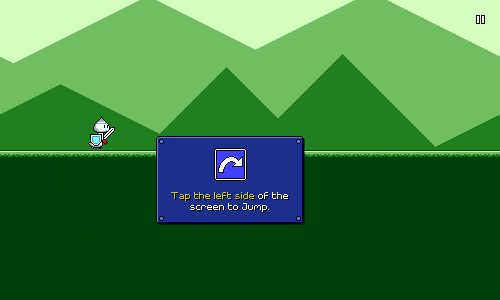 I may still have to play around with the exact positioning of this, but I feel a lot better about it. Without the on-screen button there isn't an actual screen element that lights up when you tap, but I don't think that's a huge deal since the visual focus should be on the character anyways. There are plenty of other mobile games out there that don't need to explicitly draw virtual controls on the screen. Since we don't have the two control icons drawn on screen all the time, I've now included the icon in the tutorial dialog box itself. This allows me to show that graphic in the desktop version of the tutorial as well, which is important because I use that iconography later on in the tutorials for the different game obstacles. Speaking of which... Flying TutorialThe one in-game tutorial that I've been a little worried about is the one for flying, which requires you to press and hold the jump button at the beginning of the flight "track" and release it at the end. Here's what it looked like: 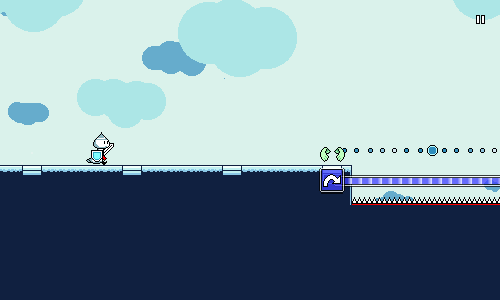 I think the horizontal bar does a good job of indicating that you need to hold the button down, but I wasn't happy with the visual iconography of using the same icon to signify a button release. Having to release the button at a specific time is the least intuitive part of this mechanic, so I wanted to try and do a better job here. As is, it could be interpreted as having to press the button again at the end, which isn't what we want. Here's my new attempt: 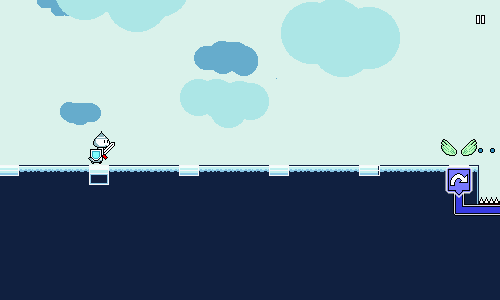 I added a vertical down and up section here to hopefully call out to holding a button (or finger) down, then lifting it upwards. I also removed the jump icon at the end of the path and replaced it with an "up" arrow. This new solution involves a few more different shapes, so I'm a little worried that it's getting too "fancy", but hopefully the up arrow will aid understanding? If I really have to, I'll add the words "hold...release!", but I want to see if I can get the visual icon component of this working by itself well first. One thing that I do appreciate about this new implementation is that if you release the button early, the travelling marker makes it very obvious what went wrong: 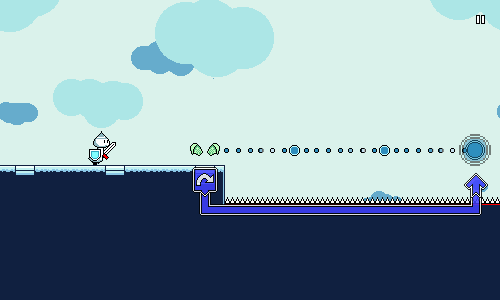 One thing that I'm a little less confident about is the visual feedback for if you just keep holding the button down and don't release it at the end of the track. The visual "sort of" shows this right now, but I might need something a bit more obvious here eventually. 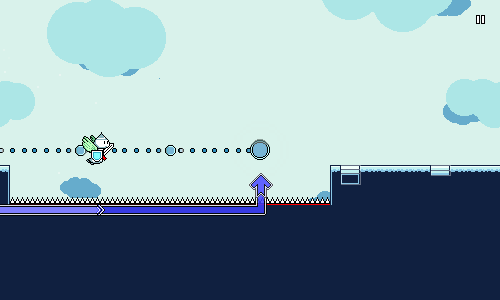 Lag CalibrationI talked earlier about designing a single-screen lag calibration system. Lag CalibrationI talked earlier about designing a single-screen lag calibration system. It looked like this: This...worked, I guess...but it's way too busy and complicated, especially for something that I'm trying to prompt the user to do before even starting the game. It's kind of cool that the screen lets you play around with the timings by yourself and essentially take control of your own calibration, but at the same time, that shouldn't be something I thrust upon all users. What I need is something simple that I can just show to everyone that guides them through the process with very clear directions: 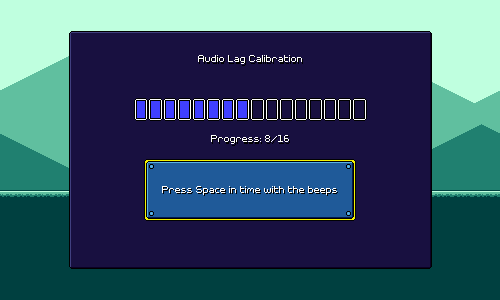 Less is more! The plan is to add an "advanced mode" / "manually adjust" option so that users can fine-tune and play around with the setting if they so choose, but hopefully the simple version should suffice for most people. Settings MenusI also wrote previously about how I was redesigning the settings screens. Those currently look like this:  I'm pretty happy with how those are working, though one knock against it is that the description label on the bottom doesn't work super well for mobile. For keyboard/mouse flows, it's easy to hover over or navigate to an option to read the description, but for touch input, you'd need to depress the option itself in order to read it, which is a little awkward. I also have a different (bigger) problem... this menu:  This is fully functional and very easy to understand, but it's also pretty poor design. There are eight blue buttons that are identical except for the text on them, with no sort of hierarchy or iconography anywhere. One of the problems here is that each page of settings can only hold 4-5 options at most (otherwise the screen becomes too dense to navigate via mobile). On desktop it might be possible to make scrolling menus, but again, that sort of paradigm really doesn't translate well across all of my different input methods. I also don't want to just create a deep hierarchy of submenus here. I've brainstormed possible ways of paginating the individual settings screens so that I can declutter the above menu, but I haven't been able to come up with something that I'm happy with. In the end I think if I want to solve this I'll probably have to do a major redesign, where each individual setting/option has its own little popout or dropdown menu, instead of showing all of the possible options from the start. This would also solve the problem I mentioned before of description labels not working super well on mobile. Unfortunately that's just something that I don't have the time for, as I need to prep the build for an upcoming closed alpha test. So that'll have to wait until later as I tweak other important things and try to flesh out the levels a little more!
|
|
|
|
|
Logged
|
|
|
|
|
DDRKirby(ISQ)
|
|
« Reply #15 on: August 29, 2021, 01:35:32 PM » |
|
No new implementations or anything today, but I wanted to share a new gameplay video that I posted, featuring a new level with a new song:
At some point I do want a make a devlog post that focuses on music and level design, so look out for that in the future!
|
|
|
|
|
Logged
|
|
|
|
|
q1
|
|
« Reply #16 on: August 30, 2021, 06:33:01 AM » |
|
nicee, i'm liking the design of that guy with a shield. are you planning on adding any story elements?
|
|
|
|
|
Logged
|
|
|
|
|
DDRKirby(ISQ)
|
|
« Reply #17 on: September 11, 2021, 12:15:04 AM » |
|
nicee, i'm liking the design of that guy with a shield. are you planning on adding any story elements?
That's pretty unnecessary to the core gameplay, so that'll probably be a strictly "blue skies nice-to-have" item! At the most I may have some brief mini-cutscenes to perhaps introduce each new world (a la Kirby), but that's probably about it. |
|
|
|
|
Logged
|
|
|
|
|
DDRKirby(ISQ)
|
|
« Reply #18 on: September 11, 2021, 12:17:27 AM » |
|
Music and Level DesignToday I wanted to write a bit about the music and level design of Rhythm Quest. Both are very closely related in this game, so really the two are pretty much one and the same. We’re going to use the level in this video as a case study. This is level 2–1, the first level in world 2 (Cloudy Courseway), currently titled “Skyward Summit”. World ThemingThus far I’ve been trying to give each world (set of levels) both a distinct mechanical identity as well as a musical identity (and visual identity). This not only serves to introduce each gameplay concept to players at different times but also provides a sort of progression from world to world, rather than just having a lot of one-off levels that aren’t part of a cohesive group. Mechanically, world 2 introduces two new concepts: air jumps and flight paths (both related to jumping). This particular level introduces the airjump mechanic for the first time: 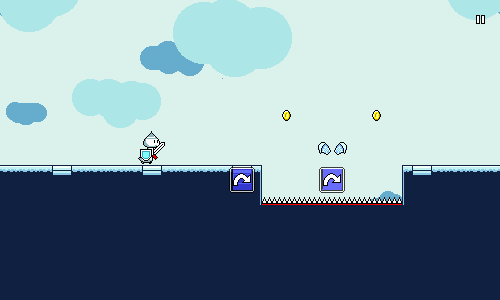 The visual identity should be pretty obvious here — it’s a “sky”-themed level, with clouds in the background. How do we match this musically? I actually had to make a few different exploratory sketches before settling on something for this. Here’s one which really didn’t pan out at all, some sort of relaxed lo-fi vibe or something? https://ddrkirby.com/rhythm-quest/devlog/13-lofi.mp3This next one is more trance-inspired, with a kick drum on every beat and sidechained saw-wave chords. https://ddrkirby.com/rhythm-quest/devlog/13-trancy.mp3The musical call-and-response patterns work really well, and you might be wondering why I didn’t run with this, but in the end the trance feel wasn’t really getting me inspired. This one ended up being the one I liked most (and got turned into level 2–3): https://ddrkirby.com/rhythm-quest/devlog/13-lush.mp3It’s got a very lush soundscape which contrasts nicely with the other worlds. I decided that this would probably be the world that uses the most “modern” production techniques. In this segment you can hear non-chiptune drum loops, and lots of work with low-pass filters. Soundscape BreakdownNow that we have an idea of the general feel that we’re going for, let’s break down the different elements in the initial section of level 2–1. Here’s what that sounds like as a whole: https://ddrkirby.com/rhythm-quest/devlog/13-section.mp3First off we’ve got these chord stabs: https://ddrkirby.com/rhythm-quest/devlog/13-7ths.mp3A few important things to note about these. Firstly, I lead off with a major 7th chord, which tends to subjectively have an “open” or “airy” quality to it. Throughout this world I’m trying to leverage 7th chords a lot (they’re more harmonically complex), and major 7ths specifically to establish this feel. The sound itself is more lush than a regular chiptune sound due to the use of detuning. There’s three oscillators (each playing a 12.5% width pulse wave), each detuned by a bit. I’m also using sidechaining, where I’m “ducking” the volume on downbeats to give it a sort of organic/pulsing feel. Next up, let’s listen to the drums and other accompanying elements: https://ddrkirby.com/rhythm-quest/devlog/13-drums.mp3Nothing too fancy here, but it’s worth noting that I’m using non-chiptune drums. Again, I’m trying to differentiate world 2 a bit more from worlds 1 and 3, which both lean more heavily into chiptune-styled instrumentation. There are actually still a few chiptune elements present, though. Here’s another drum loop that gets layered in, as well as the triangle wave bass patch that’s used throughout the OST: https://ddrkirby.com/rhythm-quest/devlog/13-chiptune.mp3Yes, this particular world happens to lean away from chiptune instrumentation a bit, but overall the game as a whole is still built upon (“modernized”) chiptune sounds as a basis. There’s a sort of balance to be had between cohesion and distinction. Every song on the soundtrack is still very recognizable as being of a certain style of mine, yet they each bring a slightly different flavor of it based on the elements contained within. Melodies and GameplayNow let’s talk about the call-and-response melodies that directly correlate to the gameplay elements: https://ddrkirby.com/rhythm-quest/devlog/13-melody.mp3This sort of direct link between musical callouts and gameplay actions is one of the defining features of Rhythm Quest, and is what separates it from games such as Dance Dance Revolution. This level of coordination between audio and gameplay is made possible because I’m acting as game designer, level designer, and composer all at once, and each of these roles guides the others. This segment has two different instruments that trade off between each other. The first is a chirpy triangle/square wave synth that uses pitch slides and 16th notes. This corresponds to the air-jump rhythms, so the idea here was to capture a “bird-like” nature in the sound to reflect that. The pitch slides help to reinforce the idea of jumping upwards and are also a nod to a bird-like singsong quality, while the 16th notes help establish a bouncy feeling (imagine fluttering wings). I should note that a lot of these decisions happen more on an intuitive level rather than a rational one. I’m explaining it in words here so other people can understand, but my actual composition process isn’t so “scientific” — I just use my instinct and go with the first thing that I think of. I’ve used this kind of chirpy synth many times before, so it was an easy item to reach for in my proverbial toolbox. The second instrument is a bell-like tone that corresponds to the attack presses. Again, this is an instrument that I’ve used many times before, so it’s second-nature for me to bring it in here. A common mode of writing that I use throughout Rhythm Quest is to feature two instruments — one to represent jump actions, and another to represent attack actions. This creates a straightforward and intuitive mapping between melody lines and button presses. These mappings aren’t set in stone, though. Just because I use the chirpy synth to represent jump presses in this particular section of the song doesn’t mean that’ll be the case throughout the song — that would be too limiting and would probably get stale to listen to. Here’s a different melody line that plays later, in the halfway point of the song: https://ddrkirby.com/rhythm-quest/devlog/13-lead.mp3Notice that there’s some amount of leeway being given here for musical expression that doesn’t map one-to-one to gameplay presses. I could have written the soundtrack with the explicit rule that “one melody note = one button press”, but that’s way too limiting and would lead to bland melodies without any embellishments. Obviously different types of rhythm games will land somewhere different along this sort of spectrum: keysounded games like IIDX or Pop’n Music might literally adopt the “one note = one button press” rule by default, whereas games like DDR usually don’t. Level Design ConsiderationsSince music design is tied so closely with level design, I wanted to point out some extra considerations that I try to take into account (some instinctually, others more consciously) as I’m writing these songs. The first is structure. Now, I don’t tend to plan out the exact structure and/or length of my songs, but in general it’s very natural to write out a song that follows this sort of basic formula, with maybe one or two deviations: Simple intro and/or catchy riff — Establishes the feel of the song, but is often missing bassline or pads, so the soundscape isn’t “full” yet. Full section — First high energy point in the song. Chord progression and soundscape is full. Lighter “verse” — Some elements are taken away and other musical ideas are explored. Sometimes the chord progression is more simple here. Buildup — Elements are built back up in layers in preparation for the… Exciting climax — Highest energy point in the song. Full soundscape is occupied, and often features a sustained lead melody. Rampdown — Decrease in intensity from the climax, but often with some elements still sustaining throughout. Sometimes this brings back elements from Full section #1. Outro — Lower-energy, usually stripped down to only a few musical elements. If you watch this video again, it should be pretty easy to pick out each of these distinct sections: As it turns out, this is not only a great and well-practiced structure for a song, but it also works well for ramping up intensity in gameplay (not a coincidence at all). This sort of overall shaping and increase in excitement over time is what helps us get into “flow state” as we’re engaging with music and gameplay. Next up we’ve got repetition. Good music is frequently all about a balance between repetition and contrast, providing the listener with enough common elements for them to latch onto, but also providing enough variety to keep things interesting. If you watch the video again, you should notice that the same gameplay rhythms and musical elements are often repeated twice or even four times in direct succession. This is something that’s very important for the enjoyability of a song. The first time you hear a new musical phrase, you won’t have any idea what to expect, but when it plays again for the second time (or with a slight variation), you already know what’s coming, so you’re able to “lean into it” and appreciate it more. (You can in essence “mentally hum along” to the music on the second repeat.) Gameplay-wise, this also serves to build patterns into the gameplay rhythms that players can latch onto. Once you have a rhythm in your head, it’s much easier to repeat that rhythm again, so this provides a chance for the player to feel a sense of mastery. Alternatively, if the player struggled on the rhythm the first time around, this provides another chance for them to get it right, this time with more familiarity. Repetition is especially important in the first few worlds of the game, where I want to start things off simple and gradually ease into more complex and faster rhythms. Finally, there’s the consideration of note density. There are two main ways in which I try to take this into account. First, I need to think about the frequency and length of empty spaces within musical phrases. These empty spaces without notes provide players with “lookahead” time to prepare for the next elements that are coming up, so having more of them will make a song easier to process. In contrast, a song that constantly throws notes at you with no chance to rest will be perceived as more difficult. Call-and-response melodies are really good for this as they provide natural breaks in musical phrases. Secondly, I also need to simply take into consideration the number of button presses that I’m asking the player to process within a given time, as well as the relative complexity of the rhythms (is there syncopation? are there held notes?), all of which affects the difficulty. The best way to analyze this is simply to play the section in-game, but I also have some code which will analyze the obstacles in each level and spit out some statistics for quantitative comparison. For example, level 1–1 currently features 0.8 button presses per second, while level 2–3 is more than twice as much at 1.7 button presses per second. This gives me a rough way to estimate the general difficulty of a song and evaluate whether I might need to make tweaks in order to adjust the difficulty curve across the worlds.
|
|
|
|
|
Logged
|
|
|
|
|
DDRKirby(ISQ)
|
|
« Reply #19 on: October 12, 2021, 05:03:12 PM » |
|
Closed Alpha Test FeedbackWe're back! I've been away from Rhythm Quest for a few weeks, partly due to having a bunch of other stuff going on, and partly to just take a short break from the project. Among other things, I ended up working on a brand new two-player game for Ludum Dare 49, as well as working on some new unreleased content for our Ludum Dare 48 entry. I also ran a closed alpha test for Rhythm Quest over the past month or so! I've been developing the game mostly in isolation, so this was an important opportunity for me to get some fresh perspectives on the game and see if I needed to re-evaluate certain parts of it. Taking Feedback as a CreatorBefore I get into it, I suppose now is as good a time as any to talk about my interactions with feedback over the course of developing this game. In my long experience as a gamedev and content creator, I've gotten a lot of feedback and critique on my works. Some of these comments are very well thought out, whereas others are more, ah..."impulsive", let's say. There's a natural desire as a creator to want my work to be as good as possible, and in the past that has led to an unfortunate sort of trigger-happy zeal where I felt a need to immediately respond to any sort of criticism by either improving my content ("There, I've fixed it!") or by refuting the opinion ("No, you're wrong because...") Without going into how this may or may not tie into personal insecurities or whatever, any content creator can tell you that this is a pretty unhealthy way to interact with feedback. This is all probably obvious stuff in hindsight, but I sort of had to learn about it the hard way; I needed to unplug myself from the direct feedback cycle and take a step back to realize that people are just expressing whatever they happen to think in the moment and my job as a creator isn't to respond to every single thing, but rather to evaluate it in a separate process and determine what it means for me moving forward. Everyone is probably going to have a different way of dealing with this sort of thing, but for me I found that I needed to be mindful of when and how I interact with outside feedback. What the Test IncludedThe main framework for the game was all in place, including the menu system (though some settings aren't implemented), a basic initial lag calibration prompt, and a tutorial to walk you through the controls. The game had 6 general mechanics which were introduced throughout the stages: Basic enemies Jumping Mid-air flying enemies Double-hit enemies Mid-air jumps Flight paths/flying Rolling spikes Teleporting ghosts Notably, the triplet-based water slowdown mechanic was not included because I wasn't quite happy with it and want to try to rework how it functions. There were 9 levels: 4 in world 1, 3 in world 2, and 2 in world 3. My current thinking is to have about 5 levels in each world, so there were some missing levels, which impacts the difficulty progression (difficulty probably ramps up slightly more quickly than it should). But for the purposes of a test, I'd rather have people play through a greater spread of difficulty than concentrate on only easier levels. Stability and PerformanceI was actually a little bit worried about the performance of the build going into the test because I had been doing some testing with an Android device that was getting pretty poor performance, but I spent some time on optimizations and it seems that for the most part people reported that everything felt smooth! Surprisingly, a significant portion of my optimization work actually ended up being on shaders -- there's a pixel shader that is used to render all of the level graphics that allows me to modulate the colors at each new checkpoint. Internally this is done by converting from RGB values to the HSV color space, applying a hue adjustment, and then converting to RGB, which can involve a lot of operations in the pixel shader. I might actually have to revisit this approach later, as applying simple hue shifts isn't actually ideal from an artistic perspective compared to actually just using a different unique palette for each section, but for now, the optimizations seemed to do well enough. Unfortunately, some of my other optimization work resulted in a bug where level colliders were missing -- causing you to fall through the world. That one was hit by a majority of people, but was pretty easy to fix. I was honestly surprised that more things didn't break! There were a few minor issues with mouse/touch input, but I've since internally reworked how that is handled, so I'm not too worried about that either. Game DifficultyMost people seemed to think that the difficulty was either just right or a little too hard. I think that puts the game in a good place for now considering that the difficulty ramp in the demo is steeper as mentioned earlier. I may have to revisit some of the (current) later levels and adjust them to fit into the appropriate difficulty curve, but that's not really a priority at the moment. Latency CalibrationSomething that I already know needs some additional attention is the latency calibration procedure for the game, as that is incredibly simple right now:  For people who really understand how to do this kind of calibration, I think there's no problem, but to a first-time user it's very opaque. The second screen tells you "the flashing squares should match the beeps", which in theory lets you verify that you performed the calibration correctly, but realistically there's no good way to distinguish a 30ms offset by this simple eye test. Another issue is that there's no sort of visual reference for the calibration process. That's...by design. By definition, since the audio/video latency offset is unknown, any sort of visual reference will be inaccurate, so this test relies on the player tapping purely based on the audio. However, that's sort of bad UX, and it's very easy for people to slip up on the calibration, become impatient, have a bad sense of rhythm, etc. We can look at some possible solutions by taking a look at A Dance of Fire and Ice, by fellow rhythm game dev fizzd: 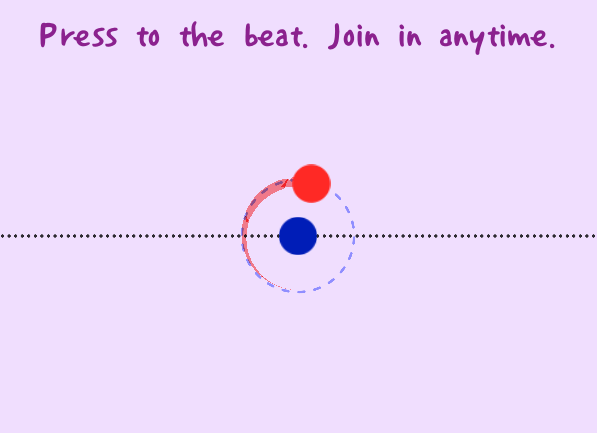 ADOFAI gets around the issue of visual reference by making the visual reference relative. Before the test begins, we don't know what the audio/video offset should be, but as the user taps, we can use their progress so far to make an educated guess. This may be a bit inaccurate at first, but the idea is that we'll eventually zero in on the correct offset as the test progresses. Of course, strictly speaking, this visual offset is actually detrimental to getting a "pure" calibration. If any of your taps are inaccurate, then the visual reference guide will actually mislead you a bit based on that inaccuracy. So, the best "pure calibration" is actually done with your eyes closed, focusing on matching the sound of your tap to the sound of the beat. (rhythm game players already know this) But that's a small price to pay for something which works arguably just as well in practice and provides immediate visual feedback. The other thing you'll notice is that through this calibration process, it's easy for the user to see whether their taps are consistent or not. In fact, we can have the game do this for you as well, and prompt you to recalibrate if it detects that your taps were too imprecise or variable. Now, I could straight-up rip off of ADOFAI's calibration screen (it's just some circles and lines...), but that might be a little incongruous with the rest of my game. But I'm sure I can take the same general concepts and work them in somehow. Flight Paths TutorialI already wrote about this in a previous devlog. It's getting closer, but could use some extra iteration. Extra AttacksThis is an interesting one. I got feedback from multiple people about wanting to slash freely during "downtime" sections where there are no enemies. Currently that's not possible due to a global 0.4-second cooldown after missed attacks. Of course, when actually hitting an enemy, this cooldown doesn't apply (otherwise double-hit enemies would be impossible), but this is by design to prevent people from mindlessly spamming the attack button (off-rhythm, even) and still clearing all of the obstacles perfectly. Here's what that looks like: 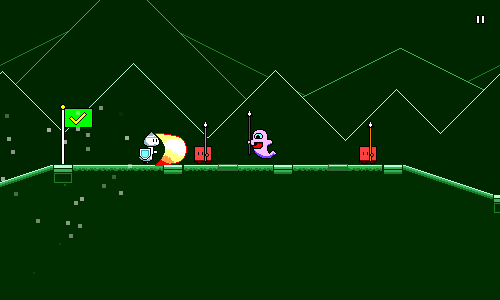 Other rhythm games like DDR use a judgment system to deal with this issue -- if you spam all of the buttons constantly, you end up hitting every note too early, which results in lower scores / a broken combo. However, Rhythm Quest intentionally has no judgment system beyond hitting or missing a note, as I want to maintain a sort of simplicity around scoring. My timing windows are lenient for this reason as well -- you can sometimes be a 16th note / 125 milliseconds off in either direction and still get credit for the note (this would break combo and barely be a "good" in DDR). For the most part, there's nothing that's negatively affected gameplay-wise by the current system -- when people are busy zoning in on the actual rhythms, this is a non-issue. It's just during the other times when people feel the need to play around, "Parappa" style, if that makes sense. But whenever it seems like enough people are feeling limited by the design, it's a sign to me that there's something there. There's a couple of things that I can try out here. The simplest thing to do is just to avoid fighting people's natural instincts and just reduce the global cooldown. As mentioned above, this opens the door to abuse, but there are two reasons why this is potentially okay. First, Rhythm Quest is not a competitive game, so whenever I'm choosing between player comfort/leniency and strict skill-testing evaluation I'm going to err on the side of the former. Second, the mashing strategy works, but is tiring, unsatisfying, and ultimately distracting during later stages when jumping must also be considered. I should note that this problem is mostly avoided for jumping because jumping naturally has a built-in cooldown which doesn't feel unnatural, and because there are held notes which prevent you from mashing mindlessly. I could of course introduce held attack notes as well, but that's not currently on the docket. Coins A couple of people were confused and/or curious as to what the in-game coins would be used for, which is only natural given that coins are a universal stand-in for "collectible currency" in games. For Rhythm Quest this isn't actually the case, as they're purely visual. While I like the fact that the coins are natural indicators of jumps, ultimately if they're going to raise more questions than they are going to answer, then I need to think about changing their representation in some way, or just straight out removing them. The other thing I could do is to again stop fighting people's natural inclination and actually turn them into a currency. I hate this idea because there are so many problems with it -- coins are basically unmissable right now, and different levels will have different numbers of coins associated with them. But I could think of some sort of expanded system, such as enemies rewarding you with a coin after being defeated, etc. It just feels inelegant to introduce the idea of a "farmable" currency to the gameplay which is otherwise quite pure. On the same note, I did have people asking for unlockable characters, outfits, etc. which I'm totally on board with as a reward for e.g. getting medals on levels. That just hasn't been a priority yet. And of course, that'll all need a bunch more UI work in order to get in (oh, goodie...). Visual Clarity of RhythmThis wasn't brought up a =ton= in the feedback, but it's something I've already been thinking about as I think about the visuals in the game (which haven't been touched in so long...). There are some situations that make timings (unintentionally) a little tricky to distinguish or predict. For example, discrete scrolling rate changes at checkpoints can throw people off. Now, I do have the beat markers on the ground to help out with this. You can see for example how the beat markers are closer together here in the water section, which indicates the scroll speed slowing down:  This sort of works, but I've found that it's not very noticeable to most people. Also, the fact that the beat grid markers are all flat boxes is something that's really annoying for the level generation code and breaks up the upward/downward slopes in a very unsatisfying way. Removing them makes the slopes read better: 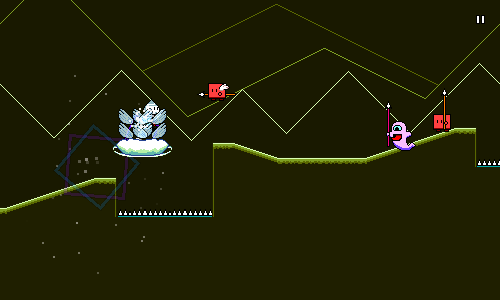 Of course, then there's no point of reference for the beat, but my point is that perhaps the beat indicator shouldn't break up the flow of the ground, and should instead be its own separate thing instead. That's something where I'm going to have to mull over exactly what it'll look like as I think about the overall level visuals a little more. The other (related) issue I was seeing was about how jump/attack sequences were sometimes hard to read, particularly because all of the jumping elements are visually placed on the beat, whereas all of the enemies that you attack are placed directly =after= the beat: 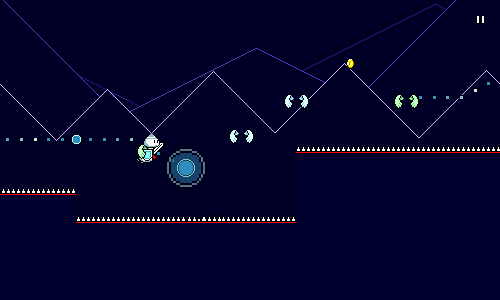 Now of course, intuitively this makes sense -- you need to sword slash an enemy before you get to it, not as you collide with it -- but the offset sort of throws off the visual "grid" of rhythmic elements, so to speak (this is one reason I wanted ot have the beat grid indicators as a reference point). I could change the core conceit of the game such that instead of "slashing" enemies, you "absorb" them (??) or something else that makes more sense with a collision, but as is this is what we've got to work with. Now, to a certain extent this isn't actually a bad thing. Part of the draw of Rhythm Quest is that the platformer/runner elements and rhythm game elements both inform each other, so I want to encourage people to rely on that rather than simply providing a note-by-note outline of what button to press when. But I do also want to provide enough of a visual reference point to make things easier to read as well. It's a balance. This is something where I'm just going to have to tweak and iterate on the visuals over time. (I bet I'll have to rewrite the level generation code yet again...) Moving ForwardOverall, the alpha test was a success! The most important part is that people seemed to really enjoy the game, and had a bunch of positive things to say. Moving forward, I'll be attempting to address some of the things I mentioned above (plus a bunch of little things here and there), as well as prototype a new version of the meter-change mechanic, and think about overall visual reworks. There's still a ton of work ahead of me, so there's not really a chance that I'll be done by the end of the year (taking into account the holidays, etc), but hopefully I'll have made significant progress by then! [crosses fingers]
|
|
|
|
|
Logged
|
|
|
|
|
 Community
