@Satori4 Thanks!
I actually created a tutorial on how to create that smoke effect. It's much simpler than it looks, so if you're interested in the full version (with better formatting

) you can find it
here, but below is a slightly abridged version:
Software used: Unity & Blender, Assets: Toony Colours Pro
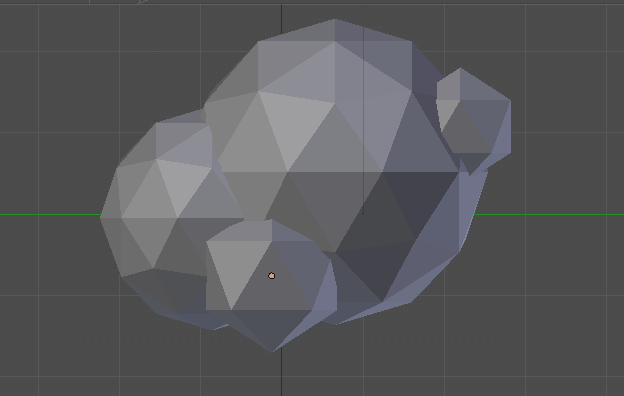
BlenderFirstly I created a a simple cloud model in Blender. I did this by creating some low poly spheres and rearranging and sizing them until I found a shape I liked. If you’re new to Blender, you may find this task a bit awkward as it’s not the most beginner friendly program but here are some steps to help
First open Blender, where you should be presented with the basic cube, lamp and camera. We’ll need to delete these, so select each of them and press X, then delete

Next add an ico sphere. The number of subdivisions can be changed in the left hand side menu depending on the detail you want in the smoke clouds. The sphere can be moved around the screen using the x/y/z axis arrows or freehand (I like to use the arrows as it gives me more control). Pressing Ctrl-Alt-Q will split the screen into orthographic views which I find super helpful for positioning as it’s easier to see multiple objects relative to each other

For this particular smoke effect, I created multiple ico spheres and grouped them into a cluster similar to the one below. Multiple objects can be joined together into one by highlighting the objects and pressing Ctrl-J (this is optional in this example). Also depending on what style you’re going for you can apply smooth shading to the ico spheres so their surface appears rounded rather than flat. To do this highlight all the vertices while in edit mode, press W and select “Shade Smooth”. Then save the smoke as a .blend file and you’re done!
 Unity
UnityThe resulting .blend file can then be dropped into your Unity project. Create a new material and add it to the Blender model before applying Toony Colours Pro shaders. There’s tonnes of different ways you can shade the object but I chose a very simple no shadow set-up with an outline to achieve my affect. I’d advise you to experiment and come up with something unique as it’s easy to do and can make a big difference to the look.

Below are my settings for the shader, keeping it super simple (As I’m not using the full potential of Toony Colours Pro here, you could probably write your own shader to do the same, but I’m no shader expert and using the asset worked perfectly for me)

Now that the model is done, we move onto the scripting needed to create that billowing effect. First create a script which instantiates a new smoke particle at a fixed interval of time called “Emitter” and attached it to a game object. It’s a super simple timer based emitter, but I created this first so it’s easier to test and see the effects of the smoke particle behaviour later. A low time interval is needed to create a thick smoke effect
using UnityEngine;
using System.Collections;

public class Emitter : MonoBehaviour
{
   public GameObject Emitted;

   [Range(0.0f, 10.0f)]
   public float TimeDelay;
   float Count;

   void Update ()
   {
      Count -= Time.deltaTime;

      if (Count <= 0) {
         GameObject _emit = Instantiate (Emitted, transform.position, transform.rotation) as GameObject;
         Count = TimeDelay;
      }
   }
}
Next I created the “SmokeParticleBehaviour” script, which is where all the work is done. This script is attached to a game object containing a Rigidbody2D and the Smoke Particle model, created earlier (In my case the model is a child object of the Smoke_Particle).

One of the most important aspects of the script is the animation curve. Animation curves allow you to manually define a curve in the inspector, and evaluate the y-axis according to the x-axis input. For example, for this application, the x-axis will be the time the smoke particle has been active, and the y-axis will be the scale of the object, so once it’s instantiated, as the x axis value gets higher, the scale (which is based on the y-axis), will grow larger and smaller according to the curve we create. Keyframes can be added to give you more control over the shape of the curve by right clicking and selecting “Add Key”

If you’re not familiar with animation curves there is a more in depth tutorial on them
here.
First a number of variables need to be declared. These include:
ScaleSize: public animation curve which can be manually set
LifeTime: public float to say how long the the smoke particle will stay active for before being destroyed
Counter: float to count how long the smoke particle has been active
RB: The Rigidbody2D component of the object
In the Start method, the rigidbody which is attached is found and some of the variables are set with a random element so the particles aren’t too uniform. The scale is also set 0.
In the Update method, the Counter records how long the smoke particle has been active for. As our animation curves x-axis is set to between 0 and 1, by dividing the Counter value by the LifeTime variable we can get the relative position on the x-axis of the ScaleSize graph. Then by using ScaleSize.Evaluate, we can get the related position on the y-axis and use it as the new scale for the smoke particle.
Finally, once the Counter reaches the LifeTime length that was previously set, the gameobject destroys itself
Below is this simplified version of the script
using UnityEngine;
using System.Collections;

public class SmokeParticleBehaviour : MonoBehaviour
{
   public AnimationCurve ScaleSize;
   public float LifeTime = 2.6f;
   float Counter = 0;
   Rigidbody2D RB;

   void Start()
   {
      RB = GetComponent<Rigidbody2D>();
      RB.gravityScale = Random.Range(-.5f, -.6f);
      RB.AddForce(Vector2.right * Random.Range(-10, 10));
      transform.localScale = new Vector2(0,0);
   }

   void Update()
   {
      Counter += Time.deltaTime;
      float Scale = ScaleSize.Evaluate(Counter / LifeTime);
      transform.localScale = new Vector3(Scale, Scale, Scale);

      if (Counter >= LifeTime)
         Destroy(gameObject);

   }
}
I’ve left out a few details from the script for simplicity but they should be easy to fill in. This includes rotation of the gameobject as it rises (this can be done as a constant rotation or with another animation curve) and also a slight offset to the left and the right as it rises to make it seem more natural (this is done above with a small addForce to either the left or the right on starting but can be changed to another method or applied as it rises). How you want to do this and how much randomness you put in each function is up to you
 Community
