Welcome, Guest. Please login or register.

Login with username, password and session length

 
Advanced search

1411573 Posts in 69386 Topics- by 58444 Members - Latest Member: darkcitien

May 04, 2024, 12:40:41 PM

Need hosting? Check out Digital Ocean
(more details in this thread)
TIGSource ForumsCommunityTownhallForum IssuesArchived subforums (read only)TutorialsGame Maker Tuts
Pages: 1 ... 16 17 [18] 19 20 ... 24
Print
Author Topic: Game Maker Tuts  (Read 355844 times)
Pasty
Level 0
**


View Profile WWW
« Reply #340 on: May 22, 2011, 07:12:56 PM »

as aquanoctis said, you can use depth = -y; to get a good z-order going, but you have to use it on every object that is at ground level. so i recommend putting that code in some kind of object or entity master object. in my RPG, i'm using one master for entities such as players, NPCs, and enemies, and then I use an object master for objects like trees, counters, etc, that aren't part of the tile system.

another issue is that this won't be enough to make sure your character clips properly against ground-level objects; you also have to use the sprite origin properties to make sure that the player is shown when he's in front of the tree, etc. it kind of changes your drawing offset, so you'll have to place everything again, but you're early enough along that it won't matter much. here are the values i used:

player sprite origin (at the feet of the player): (8,28)
tree sprite origin (at the base of the tree): (20,55)

the fixed .gmk is here.

i wish you the best and i look forward to seeing a completed game!
Logged

Sheepolution
Level 2
**


View Profile WWW
« Reply #341 on: May 26, 2011, 02:14:31 PM »

@Pasty, I'm not sure how you did it, but it worked! Thanks!

I have another question.
Is this possible in GameMaker?

Everything is negative, but a circle around you makes colors look normal. Is this possible? And how?
Logged

Aquanoctis
Level 6
*


View Profile WWW
« Reply #342 on: May 26, 2011, 04:18:18 PM »

Hmmm, whilst I'm not of the expertise to tell you how exactly, I'm sure that it's possible, or something close to that is possible. Maybe using a combination of surfaces and blend modes?
Logged
fraxcell
Level 5
*****


View Profile
« Reply #343 on: May 26, 2011, 04:22:55 PM »

It's actually quite simple. Use this code in the draw event of an object: (JUST KIDDING Don't use this one use the one below it)

Code:
draw_set_blend_mode_ext(bm_inv_dest_color ,bm_inv_src_color);
draw_set_color(c_white);
draw_circle(x,y,radius,0);
draw_set_blend_mode(bm_normal);

Just fix the arguments of the draw_circle function to where you want your circle, and what you want the radius to be.

EDIT Actually, I screwed up, the previous code will do the opposite of what you want. To have a circle with normal colors and everything else inverted use this:

Code:
draw_set_blend_mode_ext(bm_inv_dest_color ,bm_inv_src_color);
draw_set_color(c_white);
draw_circle(view_xview+view_wview/2,view_yview+view_hview/2,200,0);
draw_set_blend_mode(bm_normal);

draw_set_blend_mode_ext(bm_inv_dest_color ,bm_inv_src_color);
draw_set_color(c_white);
draw_rectangle(view_xview,view_yview,view_xview+view_wview,view_yview+view_hview,0);
draw_set_blend_mode(bm_normal);
Logged

Sheepolution
Level 2
**


View Profile WWW
« Reply #344 on: May 27, 2011, 07:40:39 AM »

Thanks, it works great!
Logged

AndrewS78
Level 0
*


View Profile
« Reply #345 on: June 17, 2011, 06:57:40 PM »

Great thread Smiley Bookmarked  (will read all later Smiley  Coffee )
Logged

antymattar
Level 5
*****


Has earned the contemporary *Banned* medal


View Profile
« Reply #346 on: June 24, 2011, 02:53:14 AM »

Seamless Screen-Scaling
Game Maker


This is a tutorial how to get around using GM's built-in screen-scaling, which has an often undesired blur-effect when scaling up. An alternate method was to scale the view-port dimensions to scale the view. The problem with the view-port method is that it causes ugly seams to appear in your graphics when displayed on certain machines.

Thus, we're going to use the surface-method. The good thing about this method is you can apply it to your game easily, because none of your drawing events or anything need to be changed. You just have to make one persistent object at the beginning of the game, be consistent with your scaling, and you're set.

With this method, we will be changing the view-ports as well. This is a sure-fire method, because if the graphics card doesn't support surfaces, it'll automatically revert to using the view-port method, which is better than nothing, right?

So here we go.

STEP 1: Choose the scale you want. Use a view for every room and have the port W and port H scaled appropriately. So, for example, if you were using a scale of 2... it would look like this, in GM's room editor.


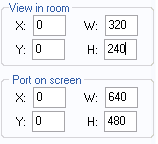
It is important that this is consistent for all rooms. If you have lots of rooms, it might be easier to do this via code*. I prefer to do it that way, because then the values aren't constant and I can support multiple different scales.

STEP 2: Create 3 scripts, screen_init, screen_begin, and screen_end. Here is what goes in each of the scripts...

Quote from: screen_init
// screen base(view_wview and view_hview)
screen_x = 0;
screen_y = 0;
screen_w = 320;
screen_h = 240;
screen_scale = 2;

// create a surface for the whole screen to be drawn on
screen = surface_create(screen_w,screen_h);

// this will destroy the screen object if surfaces are not supported on the graphics card, reverting to the viewport method
if screen = -1{instance_destroy();}

Quote from: screen_begin
// this draws the surface on the screen
surface_reset_target();
draw_clear(0);
draw_set_blend_mode_ext(bm_one, bm_zero);
draw_surface_stretched(screen,screen_x,screen_y,screen_w*screen_scale,screen_h*screen_scale);
draw_set_blend_mode(bm_normal);
screen_refresh();

Quote from: screen_end
// this sets surface 'screen' as the drawing target for everything in the game, so all drawing will be done on this surface and not on the game screen
surface_set_target(screen);

STEP 3: Now we have are scripts, but where do they go? Create an object. Like, obj_screen, objScreen, o_screen, or whatever, and do the following:

A) place the screen_initscript in the Create event.
B) place the screen_begin script in the Begin Step event.
C) place the screen_end script in the End Step event.

And place that object in the first and foremost room of your game, mark it persistent, and make sure there are no duplicates of it.

 You're done, and now have nice, crisp scaling Smiley


TIPS:

*Here's how I defined all my rooms in Skullpogo. Instead of going through every room in the game and setting its view dimensions, I just defined it all here in one neat little piece of code at the beginning of the game (right after the screen_init script, actually, because you need to use variables defined in it).

Quote
var w,h;
w=240*screen_scale;
h=320*screen_scale;
room_set_view(rmSplash,0,true,0,0,240,320,0,0,w,h,0,0,0,0,noone);
room_set_view(rmIntro,0,true,0,320,240,320,0,0,w,h,0,0,0,0,noone);
room_set_view(rmGame,0,true,0,0,240,320,0,0,w,h,0,0,0,0,noone);
room_set_view(rmHelp,0,true,0,0,240,320,0,0,w,h,0,0,0,0,noone);
room_set_view(rmScore,0,true,0,0,240,320,0,0,w,h,0,0,0,0,noone);
room_set_view(rmEnd,0,true,0,0,240,320,0,0,w,h,0,0,0,0,noone);

Things to note about doing it this way:

1) Advantage: because if you decide to change your game's scale, you can do it by just changing the screen_scale value. One little number change and its all done.

2) Foresight: what if you want to have the user choose between multiple game scales? Well, you could have the player choose the scale value at the beginning of the game, and then call this script to set all the rooms. Actually that's exactly what I did in Skullpogo.

3) WARNING: You'll notice that I used room_set_view because it can change the view settings in other rooms. Don't change the view port for the room you're in, the results won't be pleasant. I did this all from an INIT room at the beginning of the game, the room itself which doesn't have any view specifications. So make sure this isn't called from any of the rooms that are being altered.

4) Possibilities! Now your whole screen is drawn on a single surface, which can be moved, rotated, stretched, cut up, or manipulated as you please. The latest I made was an effect where the screen spins away into the background, and I took out the draw_blank(0) for the effect, so the screen leaves behind images as it whirls away in the transition. You can also change the color of the screen, save it to external files, darken/lighten it, or even apply screen filters (which I've also covered with my Retro Remakes project).

~*~

So if you got that working, here's a side project for you. Notice that in screen_init, I defined variables for screen_x and screen_y. But so far, they've just sat at zero and don't do anything. With this, you could create a little function that "jumps" that x and y value around a bit, giving the screen a "shaking" effect, and at the end of the effect snapping them back to zero. Or, you could have the screen slide off one side of the screen as a sort of transition.

~*~

Anyhow, enjoy folks. I'm currently working on an advanced GML library/extension called DeftScreen which will be used to handle a bunch of screen, scaling, and view effects and functions with ease. So that'll go here when it's done, too.

Questions can be PMed to me, posted here, or emailed to me ([email protected]). I'm always glad to help.

ChevyRay
Does it apply to 3d?
Logged

ink.inc
Guest
« Reply #347 on: June 26, 2011, 07:23:21 PM »

If I remember correctly, surfaces don't work in 3D mode, though I could be mistaken (I've yet to experiment with any of GM's 3D capabilities).
Logged
Pencerkoff
CCCP
Level 4
*


Hello I am Pencerkoff


View Profile
« Reply #348 on: June 27, 2011, 04:11:24 PM »

Hello this is Pencerkoff

If I remember correctly, surfaces don't work in 3D mode, though I could be mistaken (I've yet to experiment with any of GM's 3D capabilities).

This is correct, surfaces is (at least was) a 2D thing.  I was also under the impression that 3D had no need for that correction, did you run into something that made you think it did?

I had a 3D game with a 2D surface HUD, though I can't recall how I did it.  I have also forgotten what HUD stands for.

-PENCERKOFF
Logged

Xion
Pixelhead
Level 10
******


View Profile WWW
« Reply #349 on: June 27, 2011, 04:59:35 PM »

there is an extension/dll that lets you use surfaces with gm's 3d. I think it's called GM Surface fix. I haven't used it though so I don't know if the process would be exactly the same but you should be able to get the desired effect one way or another with it.

*seconds later*

link: http://gmc.yoyogames.com/index.php?showtopic=454468
Logged

SuperMistLand
Level 0
***


View Profile WWW
« Reply #350 on: July 05, 2011, 08:55:25 PM »

Woo! I finished Derek's beginner tutorial pt. 1-3 the other day. Feels like I've leveled up! So glad I stumbled in to this thread.

First time ever doing pixel art, too, it's a lot of fun.


Logged

gimymblert
Level 10
*****


The archivest master, leader of all documents


View Profile
« Reply #351 on: July 08, 2011, 12:55:57 PM »

How does this not a sticky?
Logged

Desert Dog
Level 4
****


View Profile
« Reply #352 on: July 08, 2011, 06:39:38 PM »

there is an extension/dll that lets you use surfaces with gm's 3d. I think it's called GM Surface fix. I haven't used it though so I don't know if the process would be exactly the same but you should be able to get the desired effect one way or another with it.

*seconds later*

link: http://gmc.yoyogames.com/index.php?showtopic=454468

Whoops, I should be a bit more active on this forum.

Yep, that DLL is the only way to get surfaces into 3d in GM8 and less. In GM8.1, however, that is fixed. So if you've got the latest, you can use surfaces in 3d mode.

Logged

ink.inc
Guest
« Reply #353 on: July 09, 2011, 07:18:34 AM »

  I have also forgotten what HUD stands for.

Heads Up Display
Logged
Pencerkoff
CCCP
Level 4
*


Hello I am Pencerkoff


View Profile
« Reply #354 on: July 09, 2011, 11:04:45 AM »

Hello this is Pencerkoff

  I have also forgotten what HUD stands for.

Heads Up Display

Ah, sexy. 

I recall drawing a screen-sized surface first, then when I specified the 3D drawing window, it was a smaller size that left the HUD visible around it.  I guess that could be done either way, but you can't really get away with drawing a surface in the middle of rendering the 3D.  You would need to create a 3D surface with a 3D location for that.

Well anyway it's good stuff, learning it goes pretty fast too once you really dig into it.

-PENCERKOFF
Logged

ink.inc
Guest
« Reply #355 on: November 30, 2011, 05:46:31 PM »

Question - I'm drawing my HUD to a surface, so that I can zoom the game's camera in and out. Text is being drawn at declining alpha values to create a fading effect. However, instead of clearing the text once its finished, the remains on screen at the last >0 alpha value. How do I fix this? Note that only the HUD is being drawn to the surface, the rest isn't (yet).

I've tried draw_clear_alpha; that doesn't seem to help.

Sad
Logged
Pencerkoff
CCCP
Level 4
*


Hello I am Pencerkoff


View Profile
« Reply #356 on: November 30, 2011, 07:50:13 PM »

Hello this is Pencerkoff

Sounds like you got your order mixed up.  It should be:  Draw HUD surface to screen, Draw text to screen.  If you draw the text onto the surface itself, every frame, then it would just stay there.  Also that would be awful on your processor, saving that surface every frame.

Granted what you said confused me greatly, so maybe that's not it.

-PENCERKOFF
Logged

ink.inc
Guest
« Reply #357 on: November 30, 2011, 08:06:21 PM »

Sorry about that; I was typing it right before I had to head to class.

To clarify:


I'm drawing the HUD and HUD related text to a single surface called hud_surface.

In the step event:

Code:
surface_set_target(global.hud_surface)
draw_sprite_ext(sModeGauge,image_index,17,15,1,1,false,c_white,1)
/*
other hud sprites
*/
if text_timer>-5
    {
    draw_set_alpha((10+text_timer)/10)
    text_timer-=1
    draw_set_color(56829)
    draw_set_halign(fa_left)
    draw_text_transformed(17,40,text,1,1,0)//the mode the player is in
    }
/*
other text
*/
surface_reset_target()

in the draw event
Code:
draw_surface_ext(global.hud_surface,view_xview,view_yview,global.scale,global.scale,false,c_white,1)

So according to what you just said, I should draw to the surface, draw the surface, then wipe it every frame?

EDIT: Yep, that fixed it. Surfaces work a bit differently than I thought they did.
« Last Edit: November 30, 2011, 08:26:59 PM by John Sandoval » Logged
Geeze
Level 5
*****


Totally.


View Profile
« Reply #358 on: November 30, 2011, 09:39:50 PM »

Yeah surfaces work like that. But they aren't really that expensive; In my screen deform tutorial I could have 4 surfaces and update each of them every frame and make huge modifications to them.
Logged

Pencerkoff
CCCP
Level 4
*


Hello I am Pencerkoff


View Profile
« Reply #359 on: December 03, 2011, 08:16:40 AM »

Hello this is Pencerkoff

Now that I see your screen I'm not concerned about that.  I had a game with a screen-sized HUD that was unchanging except for the text on it, which could not be redrawn every frame without major processor consequence.

Does your code all still work if you don't target the HUD surface but instead put all of that text-drawing code in the draw-event, after you draw your surface to the screen?  That's what I said to do, basically.  Keeps your HUD squeaky clean from text contamination.

-PENCERKOFF
Logged

Pages: 1 ... 16 17 [18] 19 20 ... 24
Print
Jump to:  

Theme orange-lt created by panic