(...continue from previous post)ResistanceAs anyone who plays Cogmind becomes aware of before long, the world isn't just a static place waiting for you to explore it and encounter inhabitants awaiting your arrival. (For more about this, read
The Living Dungeon.) Based on the amount of negative "influence" you're having on the surroundings, the central AI reacts to your presence with what it considers a proportional response in order to contain the damage. This acts as a sort of self-adjusting difficulty level (though handled in a realistic manner), by which players earning higher scores will come up against greater resistance.
The effect has been toned down somewhat since the earliest versions, to give players a fighting chance in the late game which used to be pretty overwhelming unless you spent all your time in stealth mode. Still, as you can see below it becomes increasingly difficult to keep your influence from rising later in the game:
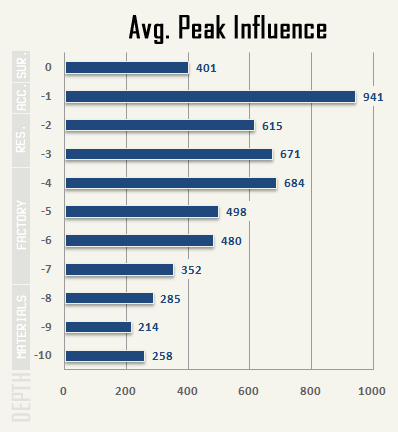 Average peak influence over the history of runs ending at each depth.
That said, all the winning builds (arrived at depth 0) were apparently those which were able to keep their influence relatively low throughout the game. Even one of the two combat wins was close to the average value!
Influence directly translates to security level, which is what really determines the hostile response:
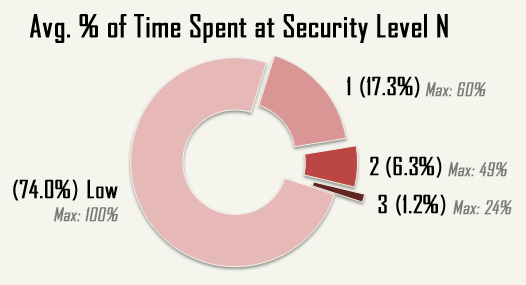 Average amount of time at each security level during all runs, showing also the longest duration ("Max") reached during an individual run.
There are actually
five security levels. A few players made it to #4, but the data was so insignificant that the percentage didn't register by the end of two weeks, so here we've left out both 4 and (oh my you wouldn't last long) 5. The highest level we've got in this graph is someone who apparently spent nearly a quarter (24%) of their game at level 3.
There was a time earlier in Alpha when it was easier to rack up influence with a small army at your side, and players who did that ended up in so much trouble once that army was gone. (The system is more realistic and appropriately balanced now.)
The vast majority of runs (74%) remained at Low Security; of course, as we'll see further below 54% of runs didn't make it out of Materials, i.e. the early game, where it's not so easy to raise your security level very high. From the peak influence graph further above, you can see that after a relatively steady level of influence through Materials the true danger starts in Factory, where influence begins climbing rapidly. This is a side effect of both greater numbers of more dangerous enemies (including the appearance of Programmers) and longer stretches between map transitions (which are a way to lose some heat).
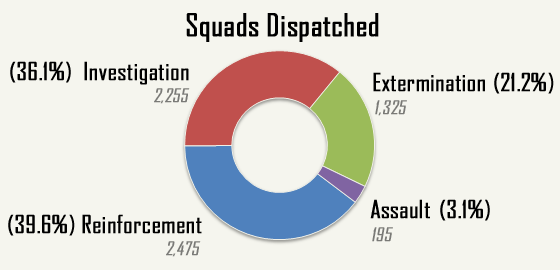 Total number of squads dispatched, divided by type.
The primary way in which the AI responds to the presence of Cogmind or other hostiles is to dispatch different types of squads depending upon the activity involved. I'm not going to go into detail here because doing so would be somewhat spoilery, but we can talk about the obvious outlier here, Assault squads. Assaults are only dispatched to deal with a significant threat, so even without hacking terminals to check the current security status you know you're pissing off the AI when this happens. It usually doesn't take more than a few such squads to squash Cogmind, so we don't see as many of them because either they stopped a run, or the player was able to keep their influence low enough under the radar that they weren't dispatched in the first place.
CombatIn Cogmind, if you're not sneaking or running--or possibly hacking--you're shooting. That means lots of projectiles flying around. Just how many? This many:
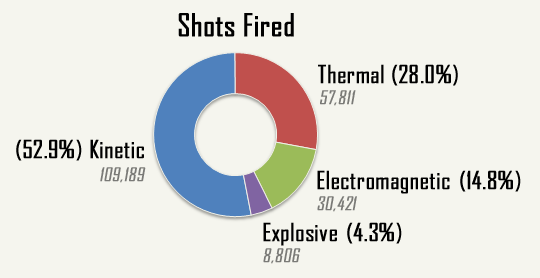 Every single shot fired during the tournament, all 206,227 of them :D
The four types of ranged damage each have their own properties, though in terms of player choice this graph must also be taken with a grain of salt because often times players equip themselves with parts salvaged from hostile robots, and robots are most likely to carry kinetic weapons, followed by some thermal, very little electromagnetic, and virtually no explosives.
Still, the general popularity of kinetic is likely above that of the other types, since it doesn't generate much heat (thermal/EM) or require much matter (explosive). And of course some amount of choice is behind the data because 1) there are certainly plenty of weapon caches and 2) kinetic weapons are actually
more rare than thermal weapons in terms of random finds. So there is meaning here, after all.
Just over half the shots fired were kinetic (52.9%), probably the easiest type to use. As the other major category, thermal accounts for nearly a third (28.0%), and could use an additional benefit or two (beyond the recently added offensive meltdown potential), because it is not usually worth simultaneously powering thermal weapons and a range of utilities. By comparison, better energy and heat balance contribute to the stable versatility of kinetic-based builds.
Electromagnetic (14.8%) weapons are somewhat more rare, and only available from a very small number of hostiles, which, combined with their lower damage and reliance on specific side-effects, means they don't see much use. However, during the tournament it was confirmed that, where possible, complete reliance on EM in the late-game is OP. There will be a few tweaks to this damage type coming up.
Explosives (4.3%) are one of the most valuable and sought after weapons in the game, but at the same time we can see that most players learn pretty quickly to show restraint when they get one because the level of destruction and resource drain are enough to do anyone in. (There are stories of those who don't show restraint--the path is glorious, but the ending ain't pretty.)
Even assuming r
estraint, despite only 4.3% of shots being fired from an explosive weapon, an average of 28.7% of all damage inflicted was due to explosions:
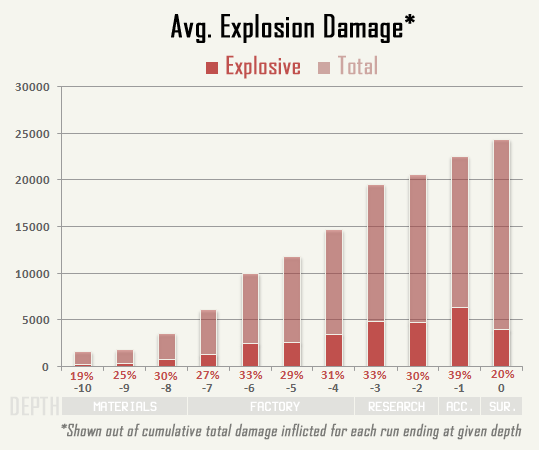 About one-third of damage inflicted was from explosions.
The percentage of explosion damage remains fairly steady throughout the depths, with a few understandable exceptions:
- As finding an explosive weapon isn't absolutely guaranteed, players who died in the first couple depths were less likely to have had one, while those who did find one quite likely made it to -8 or -7. When used correctly an early Grenade Launcher is like an Advance to GO card, where GO is the Factory.
- The low surface value (20%) comes from a majority of victories being stealth runs (i.e. where you don't go blowing everything up).
In a more general sense, the relatively small 4.3% of shots doing 28.7% of the damage suggests that explosives were being effectively used against groups of hostiles (as one would expect). Certainly they're more powerful than other weapons, but not nearly 6.7 times as powerful. Actually, from the data (and weapon stats) we can extrapolate that roughly 2.7 robots were hit per explosion.
On the same graph we can also examine the average total damage per depth, which doesn't offer us anything particularly interesting except that jump at -3. In combination with that, notice that seven of the top ten players (as shown on the earlier high scores list) were stopped in -3, hence this is where they made their last stand against more difficult opponents (and more importantly in a more difficult environment) than in previous depths. An alternative way to read the same data (since we can't be sure the damage wasn't inflicted before arriving in -3) is that only players who were more capable of dealing significant damage were able to even
reach -3.
So how effective was all this shooting...
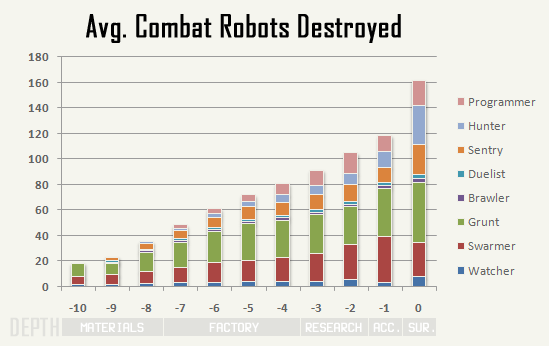 Cumulative average combat robot kill counts during runs ending at each depth (e.g. players destroyed on -4 had on average destroyed about 80 combat robots). Graph includes only the most common combat robot classes.
In terms of total kills, the trend is gradual and clear. Aw yeah.
The noticeable spike at the end is because 1) by then the player can be armed with what are currently the most powerful weapons in the game, which outclass anything the enemy can throw at you there (trust me, they're holding the fearsome stuff in reserve for more important locations and events to come

) and 2) players prepared to exit -1 have free reign to use surplus resources to first attract attention and take down as many hostiles as possible before leaving.
Class-wise:
- Grunts and Swarmers are the most common patrol robot, and travel in groups, so they are naturally the most common kill. Duelists and Brawlers are occasionally found accompanying Grunts, and not so often as part of regular patrols, so their numbers are fairly small.
- Sentries guard important intersections so taking some of them out is inevitable, but they always work solo (and can be circumvented), so again fairly small numbers there.
- Programmers don't start appearing until -7, after which both they and Hunters gradually increase in number.
How do those numbers compare to robots minding their own business:
 Cumulative average non-combat robot kill counts during runs ending at each depth (e.g. players destroyed on -2 had on average destroyed about 40 non-combat robots). Graph includes only the most common non-combat robot classes.
The total number of non-combat robot kills flattens out through the latter third of the game presumably because you don't have the luxury of taking them out while worrying about the then much deadlier foes patrolling the corridors of Research and beyond. They also don't provide much in the way of useful salvage by this point--if you're looting Wheels or Light Ion Engines there is a good chance you're soon to be scrap (unless you can remain minimally effective just long enough to locate a real cache).
Class-wise:
- Despite being unarmed, Recyclers are public enemy #1 since they ruthlessly spirit away your hard-earned loot. If some players weren't already using warning shot tactics to shoo them away, these would certainly also enjoy the top kill spot. Already two pieces of fan art have surfaced about Recyclers (1, 2), together with countless mentions among players in other capacities. They're (in)famous!
- Haulers are "the pinatas of Cogmind," though not as plentiful as the other types, so their ratio looks about right.
- Tunnelers are not necessarily the safest of the bunch--they do tend to stay out of the way, but there are also fewer of them to begin with. They're likely destroyed only when in the way.
- Builders are frequently caught in crossfires as they work to repair combat zones.
- Workers are the most abundant robot, and also roam about fairly slowly, so they are more likely to become an obstacle in a narrow corridor and warrant a shot in the back, as well as be in the wrong place at the wrong time and get blasted by stray shots. Their greater numbers also mean they're the most readily available target when low on matter or you need a quick power source. I'm not entirely sure where the Worker death spike came from for the last bar, but there are only two players who contributed to that data segment, so it has to do with their particular style (blow the crap out of everything)--it's also not as huge a difference as it appears, only an extra five or so Workers destroyed.
In short: players hate Recyclers, Haulers are pinatas, Tunnelers are few, Builders get in the way, and Workers are everywhere.
Comparing the previous two graphs, aside from the last couple depths players generally destroyed twice as many combat robots as non-combat robots.
Lots of robots were destroyed, but then most Cogminds didn't make it out alive, either...
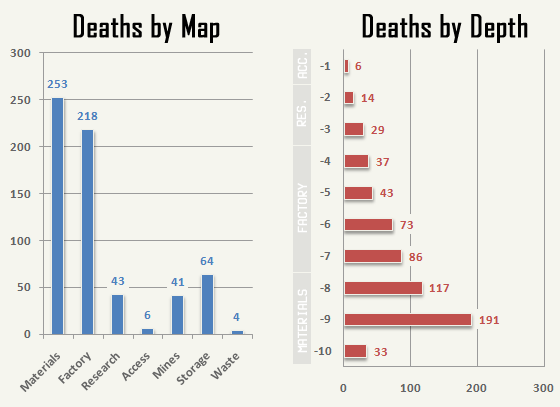 Many Cogminds were harmed in the making of these stats.
First see that beautiful curve on the right. It'd be really interesting to compare what it looks like after some time with the same set of players--I've no doubt the peak would gradually begin to shift upward, but for the duration of the tournament it makes sense as seen here since the overall community experience level was relatively low.
The low death count at -10 can be attributed to most deaths on the first floor not earning enough points to qualify for inclusion. However, without the point boost from evolution those 33 Cogminds that
were included must have caused quite a stir.
The steep drop from -9 to -8 occurred because anyone with the ability to beat -9 won't likely have too much trouble with -8. Similarly, the drop from -6 to -5 is players experienced with the early Factory floors being fairly successful in the Factory at large. Further up, many players who reached the late game had trouble facing down the gateway that is -3, as it's another jump in difficulty from the Factory.
Overall, 54.2% of deaths occurred in the early game (-10/-9/-8), 38.0% in mid game (-7/-6/-5/-4), and 7.8% in late game (-3/-2/-1).
Another factor contributing to higher death counts in the early game are the branches, which only exist at that point and keep players at a given depth for longer. (Mid/late-game branches have yet to be added, so the same effect could come into play for them later.) This is reflected in the left graph, where you'll see that a combined 105 players (16.9%) died in Mines and Storage (early branches).
How did players fare before death:
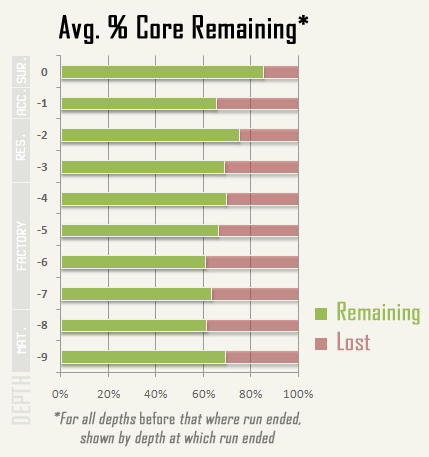 Warning: Graph is pretty meaningless.
The above graph, showing approximately how much core integrity Cogmind had left on each floor that was survived, is heavily impacted by the lack of historical run data, as the only way to get these values is to calculate backwards from the point of death and average the remaining integrity out over all previous depths. It would be far more meaningful to look at data from individual runs, especially if we stored the necessary values explicitly (plotting that data from all players as overlapping line graphs would be pretty awesome).
But perhaps there is meaning in at least explaining why this graph doesn't tell us much.
From an individual run's point of view, as an average it smooths out factors like a lucky exit find that let Cogmind advance relatively unscathed, or the all too common narrow escapes. I've made it to an access point with
less than 0.1% of integrity remaining, and heard stories of others doing the same. It's intense.
By averaging all runs together, it also merges the very different data resulting from play styles on complete opposite sides of the spectrum. Combat builds are much more likely to reach an exit with less than half their integrity (remember that in Cogmind core integrity damage is irreparable--you must ascend to the next depth to evolve), while stealth/speed runs don't have much trouble ascending with 80-90% (it's an all-or-nothing approach)
Maybe in its current form this data would be somewhat more telling if, again, we compare it to the same set of players later on. At least we could look to see if the 60-70% range has shifted towards 100% with improved skill. The shift would be a slow one, since it's inevitable that combat builds will lose a portion of their integrity to attrition. The addition of more branches at each depth will also shift the range back towards 0%. That will be something to watch closely

Among the factors contributing to death irrespective of core integrity:
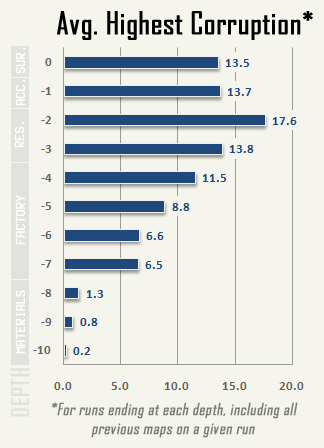 Corruption goes up and up and up... mostly.
System corruption is one of the game's food clocks (described in more detail in
The Importance of Roguelike Food Clocks). A lack of core repair is the other, which plays a bigger role while Cogmind is weaker in the first half of the game. Corruption doesn't take over as a serious threat until Programmers start showing up in -7 (see the 400% jump from -8). After that it's a gradual rise as Programmers become more common and carry more powerful EM weapons, then it plateaus for the late-game stretch. The spike at -2 is players new to the late game getting in over their heads and dying as they get deeper into Research (-2 is probably the most difficult floor in the current version, by the way).
As with other data, there is a large difference between play styles, and these values lie somewhere in the middle ground. By the end of the game, combat builds can peak at 30%+ corruption, while stealth runs can race through the entire game close to zero (they don't need a food clock--for them the real danger is getting caught in a trap, or chased down by Swarmers, and picked to pieces).
Worth noting, before encountering Programmers (in Materials), those low corruption records are either someone not being careful with their EMP Blaster (self-inflicted corruption), or hanging out too close to an exploding Neutrino Reactor. Don't do that.
(Continued in next post...)
 Community
